Примечание.
Для доступа к этой странице требуется авторизация. Вы можете попробовать войти или изменить каталоги.
Для доступа к этой странице требуется авторизация. Вы можете попробовать изменить каталоги.
В этом руководстве описано, как перенести исходящее подключение из исходящего доступа по умолчанию к шлюзу NAT. Вы узнаете, как изменить исходящее подключение с правил исходящего трафика подсистемы балансировки нагрузки на шлюз NAT. Вы повторно используете IP-адрес из конфигурации правила исходящего трафика для шлюза NAT.
Шлюз NAT Azure — это рекомендуемый метод для исходящего подключения. Шлюз NAT — это полностью управляемая и высоко отказоустойчивая служба преобразования сетевых адресов (NAT). Шлюз NAT не имеет таких ограничений на исчерпание портов преобразования адресов исходной сети (SNAT), как это бывает при исходящем доступе по умолчанию. Шлюз NAT заменяет необходимость в правилах исходящего трафика в подсистеме балансировки нагрузки для исходящего подключения.
Дополнительные сведения о шлюзе Azure NAT см. в статье "Что такое шлюз Azure NAT"?
В этом руководстве описано, как:
- Перенос исходящего доступа по умолчанию к шлюзу NAT.
- Перенос исходящего подключения подсистемы балансировки нагрузки и IP-адреса в шлюз NAT.
Предпосылки
Учетная запись Azure с активной подпиской. Создайте учетную запись бесплатно .
Стандартный общедоступный балансировщик нагрузки в вашей подписке. Подсистема балансировки нагрузки должна иметь отдельный внешний IP-адрес и правила исходящего трафика. Дополнительные сведения о создании Azure Load Balancer см. в документе Краткое руководство. Создание общедоступной подсистемы балансировки нагрузки с помощью портала Azure для распределения нагрузки между виртуальными машинами.
- Имя подсистемы балансировки нагрузки, используемое в примерах, — myLoadBalancer.
Примечание.
Шлюз NAT Azure обеспечивает исходящее подключение для стандартных внутренних подсистем балансировки нагрузки. Дополнительные сведения об интеграции шлюза NAT с внутренними подсистемами балансировки нагрузки см. в руководстве по интеграции шлюза NAT с внутренним балансировщиком нагрузки с помощью портала Azure.
Перенос исходящего доступа по умолчанию
В этом разделе описано, как изменить метод исходящего подключения с исходящего доступа по умолчанию к шлюзу NAT.
Войдите на портал Azure.
В поле поиска в верхней части портала введите сетевой шлюз NAT. Выберите Шлюзы NAT.
В шлюзах NAT нажмите кнопку +Создать.
В разделе Создание шлюза NAT введите или выберите следующие значения на вкладке Основные сведения.
Настройки Ценность Сведения о проекте Подписка Выберите подписку. Группа ресурсов Выберите Создать новое.
Введите myResourceGroup.
Нажмите кнопку ОК.Сведения об инстанции Имя шлюза NAT Введите myNATgateway. Регион Выберите регион виртуальной сети. В этом примере это Западная Европа. Зона доступности Оставьте значение по умолчанию Нет. Время ожидания простоя (в минутах) Введите 10. Откройте вкладку Исходящий IP-адрес или щелкните Далее: Исходящий IP-адрес внизу страницы.
На вкладке "Исходящий IP-адрес" на вкладке "Общедоступный IP-адрес" выберите "Создать общедоступный IP-адрес".
В поле "Добавление общедоступного IP-адреса" введите myNATgatewayIP в name. Нажмите ОК.
Откройте вкладку Подсеть или нажмите Далее: Подсеть в нижней части страницы.
В раскрывающемся списке для виртуальной сети выберите виртуальную сеть.
В Subnet name установите флажок рядом с вашей подсетью.
Выберите вкладку "Просмотр и создание " или нажмите кнопку "Просмотр и создание " в нижней части страницы.
Выберите Создать.
Перенос исходящих подключений балансировщика нагрузки
В этом разделе описано, как изменить метод исходящего подключения из правил исходящего трафика на шлюз NAT. Вы сохраняете тот же внешний IP-адрес, который используется для правил исходящего трафика. Вы удалите интерфейсную IP-конфигурацию правила исходящего трафика, а затем создадите шлюз NAT с тем же интерфейсным IP-адресом. В этом разделе используется общедоступная подсистема балансировки нагрузки.
Удаление конфигурации интерфейсного IP-адреса для исходящего трафика
Вы удалите правило исходящего трафика и связанную конфигурацию внешнего IP-адреса из подсистемы балансировки нагрузки. Имя подсистемы балансировки нагрузки, используемое в этом примере, — myLoadBalancer.
Войдите на портал Azure.
В поле поиска в верхней части портала введите Подсистема балансировки нагрузки. В результатах поиска выберите Подсистема балансировки нагрузки.
Выберите myLoadBalancer или свою подсистему балансировки нагрузки.
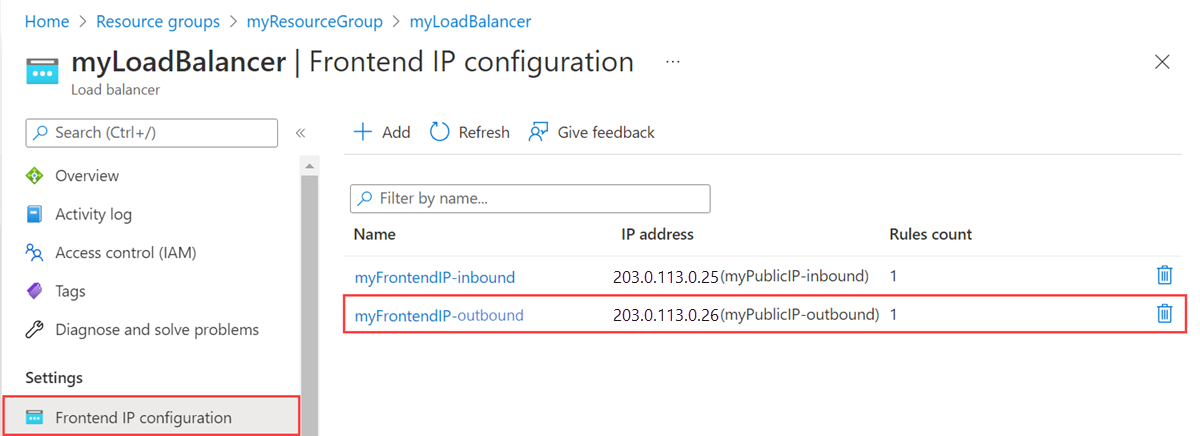
В myLoadBalancer выберите конфигурацию ВНЕШНЕГО IP-адреса в параметрах.
Обратите внимание на IP-адрес в конфигурации внешнего IP-адреса, который требуется перенести в шлюз NAT. Эти сведения потребуются в следующем разделе. В этом примере это myFrontendIP-outbound.
Выберите "Удалить" рядом с ip-конфигурацией, которую вы хотите удалить. В этом примере это myFrontendIP-outbound.

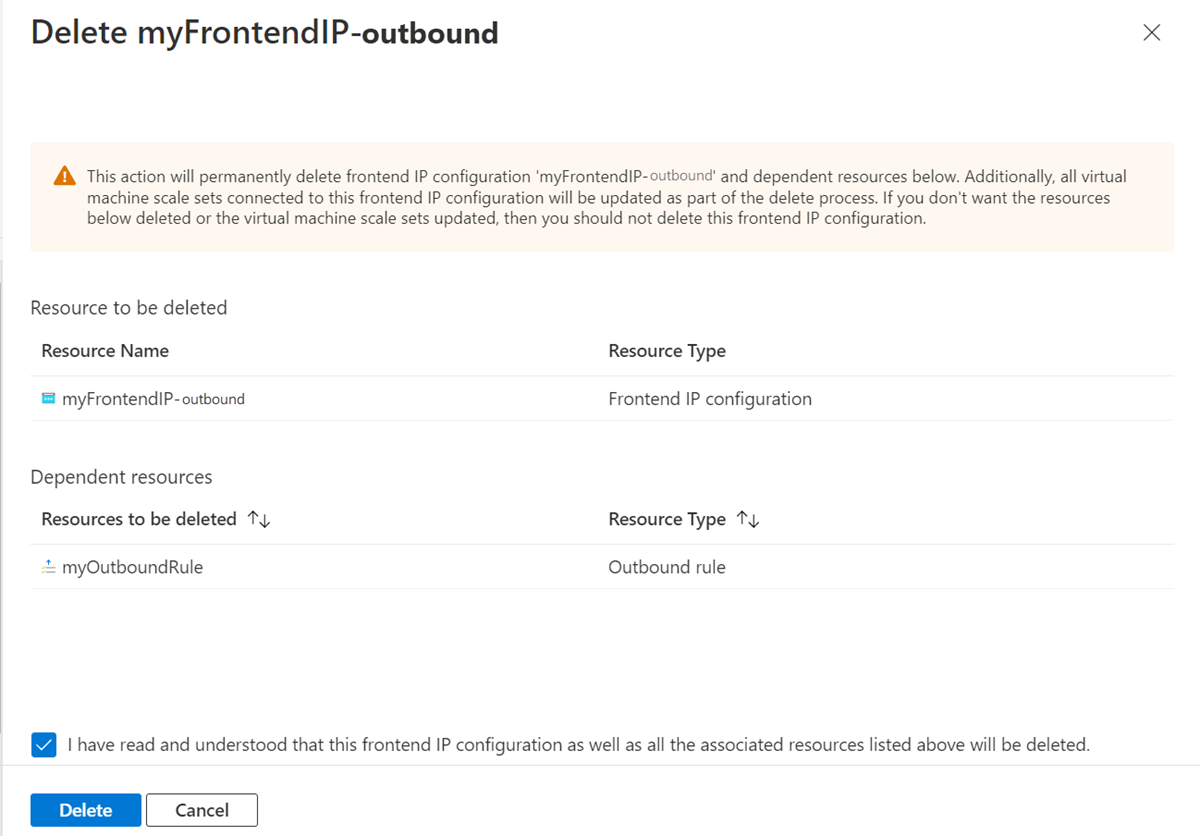
Выберите команду Удалить.
В Delete myFrontendIP-outbound установите флажок рядом с Я прочитал и понимаю, что эта конфигурация frontend IP, а также указанные выше связанные ресурсы, будут удалены.
Выберите команду Удалить. Эта процедура удаляет конфигурацию внешнего IP-адреса и правило исходящего трафика, связанное с фронтендом.

Создание шлюза NAT
В этом разделе описано, как создать шлюз NAT с IP-адресом, ранее используемым для правила исходящего трафика, и назначить его предварительно созданной подсети в виртуальной сети. Имя подсети для этого примера — myBackendSubnet.
В поле поиска в верхней части портала введите сетевой шлюз NAT. Выберите Шлюзы NAT.
В шлюзах NAT нажмите кнопку +Создать.
В разделе Создание шлюза NAT введите или выберите следующие значения на вкладке Основные сведения.
Настройки Ценность Сведения о проекте Подписка Выберите подписку. Группа ресурсов Выберите Создать новое.
Введите myResourceGroup.
Нажмите кнопку ОК.Сведения об инстанции Имя шлюза NAT Введите myNATgateway. Регион Выберите регион виртуальной сети. В этом примере это Западная Европа. Зона доступности Оставьте значение по умолчанию Нет. Время ожидания простоя (в минутах) Введите 10. Откройте вкладку Исходящий IP-адрес или щелкните Далее: Исходящий IP-адрес внизу страницы.
На вкладке "Исходящий IP-адрес" на вкладке "Общедоступные IP-адреса" выберите IP-адрес, указанный в предыдущем разделе. В этом примере это myPublicIP-outbound.
Откройте вкладку Подсеть или нажмите Далее: Подсеть в нижней части страницы.
В раскрывающемся списке для виртуальной сети выберите виртуальную сеть.
В имени подсети установите флажок для подсети. В этом примере это myBackendSubnet.
Выберите вкладку "Просмотр и создание " или нажмите кнопку "Просмотр и создание " в нижней части страницы.
Выберите Создать.
Очистка ресурсов
Если вы не собираетесь продолжать использовать это приложение, удалите шлюз NAT, выполнив следующие действия.
В меню слева выберите Группы ресурсов.
Выберите группу ресурсов myResourceGroup.
Выберите команду Удалить группу ресурсов.
Введите myResourceGroup и выберите Удалить.
Следующий шаг
В этой статье вы узнали, как:
Перенос исходящего доступа по умолчанию к шлюзу NAT.
Перенос исходящего подключения подсистемы балансировки нагрузки и IP-адреса в шлюз NAT.
Дополнительные сведения о шлюзе NAT и преимуществах подключения см. в статье "Проектирование виртуальных сетей с помощью шлюза NAT".
Перейдите к следующей статье, чтобы узнать, как интегрировать шлюз NAT с общедоступной подсистемой балансировки нагрузки: