Примечание.
Для доступа к этой странице требуется авторизация. Вы можете попробовать войти или изменить каталоги.
Для доступа к этой странице требуется авторизация. Вы можете попробовать изменить каталоги.
Обзор
В этом руководстве вы добавите push-уведомления в проект быстрого запуска iOS, чтобы push-уведомление отправлялось на устройство при каждой вставке записи.
Если вы не используете скачанный проект сервера быстрого запуска, вам потребуется пакет расширения push-уведомлений. Дополнительные сведения см. в руководстве по работе с пакетом SDK серверного сервера .NET для мобильных приложений Azure .
Симулятор iOS не поддерживает push-уведомления. Вам потребуется физическое устройство iOS и членство в программе разработчика Apple.
Настройка Центра уведомлений
Функция мобильных приложений Службы приложений Azure использует Центр уведомлений Azure для отправки push-уведомлений, поэтому вам нужно настроить центр уведомлений для вашего мобильного приложения.
На портале Azureперейдите к службам приложений, а затем выберите серверную часть вашего приложения. В разделе Параметрывыберите Push.
Чтобы добавить ресурс концентратора уведомлений в приложение, выберите Подключиться. Вы можете создать концентратор или подключиться к существующему.
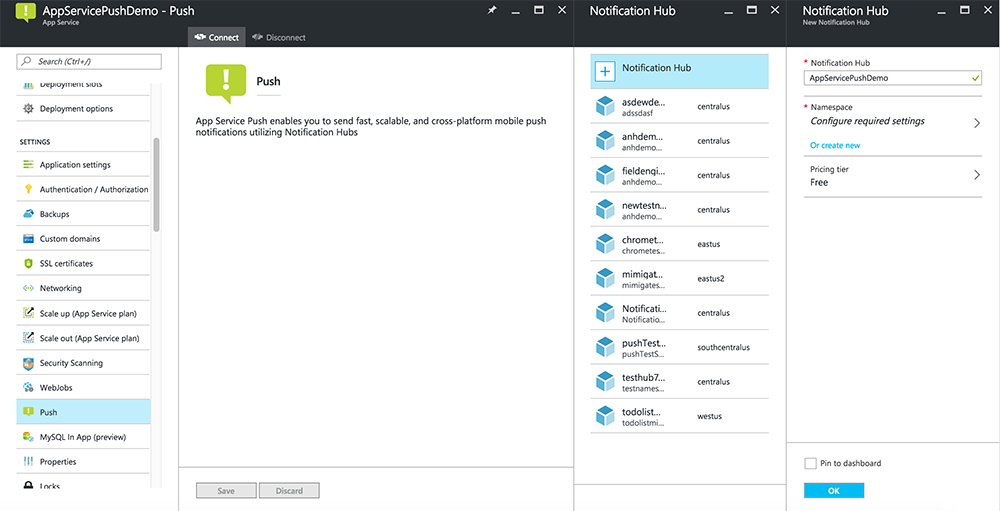
Теперь вы подключили центр уведомлений к внутреннему проекту мобильных приложений. Позже вы настроите этот центр уведомлений для подключения к системе уведомлений платформы (PNS) для отправки на устройства.
Регистрация приложения для push-уведомлений
- Зарегистрируйте идентификатор дляприложения. Создайте явный идентификатор приложения (а не маскировочный идентификатор приложения) и для идентификатор пакета используйте точный идентификатор пакета, который находится в проекте Xcode с быстрым запуском. Также важно выбрать параметр Push Notifications.
- Затем , чтобы подготовиться к настройке Push-уведомлений, создайте либо SSL-сертификат "Разработка", либо "Распространение".
Настройка Azure для отправки push-уведомлений
- На компьютере Mac запустите Доступ к Связке ключей. На панели навигации слева в разделе Категорияоткройте Мои Сертификаты. Найдите SSL-сертификат, скачанный в предыдущем разделе, и раскройте его содержимое. Выберите только сертификат (не выбирайте закрытый ключ). Затем экспортировать его.
- На портале Azure выберите Обзор всех>служб приложений. Затем выберите бэкэнд мобильных приложений.
- В настройкахвыберите Push-уведомления службы приложений. Затем выберите имя концентратора уведомлений.
- Перейдите к Службам уведомлений Apple Push>загрузить сертификат. Загрузите .p12 файл, выбрав правильный режим (в зависимости от того, является ли ваш ранее полученный клиентский SSL-сертификат продуктовым или тестовым). Сохраните любые изменения.
Теперь служба настроена для работы с push-уведомлениями в iOS.
Обновление серверной части для отправки push-уведомлений
Серверная часть .NET (C#):
В Visual Studio щелкните правой кнопкой мыши проект сервера и выберите пункт "Управление пакетами NuGet", найдите
Microsoft.Azure.NotificationHubsи нажмите кнопку "Установить". Это устанавливает библиотеку Центров уведомлений для отправки уведомлений из серверной части.В проекте Visual Studio серверной части откройте контроллеры>TodoItemController.cs. В верхней части файла добавьте следующую
usingинструкцию:using Microsoft.Azure.Mobile.Server.Config; using Microsoft.Azure.NotificationHubs;Замените метод
PostTodoItemследующим кодом:public async Task<IHttpActionResult> PostTodoItem(TodoItem item) { TodoItem current = await InsertAsync(item); // Get the settings for the server project. HttpConfiguration config = this.Configuration; MobileAppSettingsDictionary settings = this.Configuration.GetMobileAppSettingsProvider().GetMobileAppSettings(); // Get the Notification Hubs credentials for the Mobile App. string notificationHubName = settings.NotificationHubName; string notificationHubConnection = settings .Connections[MobileAppSettingsKeys.NotificationHubConnectionString].ConnectionString; // Create a new Notification Hub client. NotificationHubClient hub = NotificationHubClient .CreateClientFromConnectionString(notificationHubConnection, notificationHubName); // iOS payload var appleNotificationPayload = "{\"aps\":{\"alert\":\"" + item.Text + "\"}}"; try { // Send the push notification and log the results. var result = await hub.SendAppleNativeNotificationAsync(appleNotificationPayload); // Write the success result to the logs. config.Services.GetTraceWriter().Info(result.State.ToString()); } catch (System.Exception ex) { // Write the failure result to the logs. config.Services.GetTraceWriter() .Error(ex.Message, null, "Push.SendAsync Error"); } return CreatedAtRoute("Tables", new { id = current.Id }, current); }Переопубликуйте серверный проект.
Node.js бэкенд:
Настройте ваш бэкенд-проект.
Замените скрипт таблицы todoitem.js следующим кодом:
var azureMobileApps = require('azure-mobile-apps'),
    promises = require('azure-mobile-apps/src/utilities/promises'),
    logger = require('azure-mobile-apps/src/logger');

var table = azureMobileApps.table();

// When adding record, send a push notification via APNS
table.insert(function (context) {
    // For details of the Notification Hubs JavaScript SDK,
    // see https://aka.ms/nodejshubs
    logger.info('Running TodoItem.insert');

    // Create a payload that contains the new item Text.
    var payload = "{\"aps\":{\"alert\":\"" + context.item.text + "\"}}";

    // Execute the insert; Push as a post-execute action when results are returned as a Promise.
    return context.execute()
        .then(function (results) {
            // Only do the push if configured
            if (context.push) {
                context.push.apns.send(null, payload, function (error) {
                    if (error) {
                        logger.error('Error while sending push notification: ', error);
                    } else {
                        logger.info('Push notification sent successfully!');
                    }
                });
            }
            return results;
        })
        .catch(function (error) {
            logger.error('Error while running context.execute: ', error);
        });
});

module.exports = table;
При редактировании файла на локальном компьютере повторно опубликуйте проект сервера.
Добавление push-уведомлений в приложение
Objective-C:
В QSAppDelegate.m импортируйте пакет SDK iOS и QSTodoService.h:
#import <MicrosoftAzureMobile/MicrosoftAzureMobile.h>
#import "QSTodoService.h"
В
didFinishLaunchingWithOptionsв QSAppDelegate.m вставьте эти строки прямо передreturn YES;:UIUserNotificationSettings* notificationSettings = [UIUserNotificationSettings settingsForTypes:UIUserNotificationTypeAlert | UIUserNotificationTypeBadge | UIUserNotificationTypeSound categories:nil]; [[UIApplication sharedApplication] registerUserNotificationSettings:notificationSettings]; [[UIApplication sharedApplication] registerForRemoteNotifications];В QSAppDelegate.m добавьте следующие методы обработчика. Теперь приложение обновлено для поддержки push-уведомлений.
// Registration with APNs is successful
- (void)application:(UIApplication *)application
didRegisterForRemoteNotificationsWithDeviceToken:(NSData *)deviceToken {

    QSTodoService *todoService = [QSTodoService defaultService];
    MSClient *client = todoService.client;

    [client.push registerDeviceToken:deviceToken completion:^(NSError *error) {
        if (error != nil) {
            NSLog(@"Error registering for notifications: %@", error);
        }
    }];
}

// Handle any failure to register
- (void)application:(UIApplication *)application didFailToRegisterForRemoteNotificationsWithError:
(NSError *)error {
    NSLog(@"Failed to register for remote notifications: %@", error);
}

// Use userInfo in the payload to display an alert.
- (void)application:(UIApplication *)application
        didReceiveRemoteNotification:(NSDictionary *)userInfo {
    NSLog(@"%@", userInfo);

    NSDictionary *apsPayload = userInfo[@"aps"];
    NSString *alertString = apsPayload[@"alert"];

    // Create alert with notification content.
    UIAlertController *alertController = [UIAlertController
                                    alertControllerWithTitle:@"Notification"
                                    message:alertString
                                    preferredStyle:UIAlertControllerStyleAlert];

    UIAlertAction *cancelAction = [UIAlertAction
                                    actionWithTitle:NSLocalizedString(@"Cancel", @"Cancel")
                                    style:UIAlertActionStyleCancel
                                    handler:^(UIAlertAction *action)
                                    {
                                        NSLog(@"Cancel");
                                    }];

    UIAlertAction *okAction = [UIAlertAction
                                actionWithTitle:NSLocalizedString(@"OK", @"OK")
                                style:UIAlertActionStyleDefault
                                handler:^(UIAlertAction *action)
                                {
                                    NSLog(@"OK");
                                }];

    [alertController addAction:cancelAction];
    [alertController addAction:okAction];

    // Get current view controller.
    UIViewController *currentViewController = [[[[UIApplication sharedApplication] delegate] window] rootViewController];
    while (currentViewController.presentedViewController)
    {
        currentViewController = currentViewController.presentedViewController;
    }

    // Display alert.
    [currentViewController presentViewController:alertController animated:YES completion:nil];

}
Swift:
Добавьте файл ClientManager.swift со следующим содержимым. Замените %AppUrl% URL-адресом серверной части мобильного приложения Azure.
class ClientManager {
    static let sharedClient = MSClient(applicationURLString: "%AppUrl%")
}
В ToDoTableViewController.swift замените строку
let clientинициализацииMSClientна эту строку:let client = ClientManager.sharedClientВ AppDelegate.swift замените текст
func applicationследующим образом:func application(application: UIApplication, didFinishLaunchingWithOptions launchOptions: [NSObject: AnyObject]?) -> Bool { application.registerUserNotificationSettings( UIUserNotificationSettings(forTypes: [.Alert, .Badge, .Sound], categories: nil)) application.registerForRemoteNotifications() return true }В AppDelegate.swift добавьте следующие методы обработчика. Теперь приложение обновлено для поддержки push-уведомлений.
func application(application: UIApplication,
    didRegisterForRemoteNotificationsWithDeviceToken deviceToken: NSData) {
    ClientManager.sharedClient.push?.registerDeviceToken(deviceToken) { error in
        print("Error registering for notifications: ", error?.description)
    }
}

func application(application: UIApplication,
    didFailToRegisterForRemoteNotificationsWithError error: NSError) {
    print("Failed to register for remote notifications: ", error.description)
}

func application(application: UIApplication,
    didReceiveRemoteNotification userInfo: [NSObject: AnyObject]) {

    print(userInfo)

    let apsNotification = userInfo["aps"] as? NSDictionary
    let apsString       = apsNotification?["alert"] as? String

    let alert = UIAlertController(title: "Alert", message: apsString, preferredStyle: .Alert)
    let okAction = UIAlertAction(title: "OK", style: .Default) { _ in
        print("OK")
    }
    let cancelAction = UIAlertAction(title: "Cancel", style: .Default) { _ in
        print("Cancel")
    }

    alert.addAction(okAction)
    alert.addAction(cancelAction)

    var currentViewController = self.window?.rootViewController
    while currentViewController?.presentedViewController != nil {
        currentViewController = currentViewController?.presentedViewController
    }

    currentViewController?.presentViewController(alert, animated: true) {}

}
Проверка push-уведомлений
- В Xcode нажмите клавишу Run и запустите приложение на устройстве iOS (обратите внимание, что push-отправка не будет работать на симуляторах). Нажмите кнопку "ОК ", чтобы принять push-уведомления; этот запрос возникает при первом запуске приложения.
- В приложении добавьте новый элемент и нажмите кнопку +.
- Убедитесь, что уведомление получено, а затем нажмите кнопку "ОК ", чтобы закрыть уведомление. Теперь вы успешно завершили работу с этим руководством.
Больше
- Шаблоны обеспечивают гибкость отправки кроссплатформенных push-уведомлений и локализованных push-уведомлений. Использование клиентской библиотеки iOS для мобильных приложений Azure содержит инструкции по регистрации шаблонов.