Ask Learn
Preview
Ask Learn is an AI assistant that can answer questions, clarify concepts, and define terms using trusted Microsoft documentation.
Please sign in to use Ask Learn.
Sign inThis browser is no longer supported.
Upgrade to Microsoft Edge to take advantage of the latest features, security updates, and technical support.
Blazor can bind forms to models in your application. If you decorate those models with data annotations, you can get client- and server-side validations without writing more code.
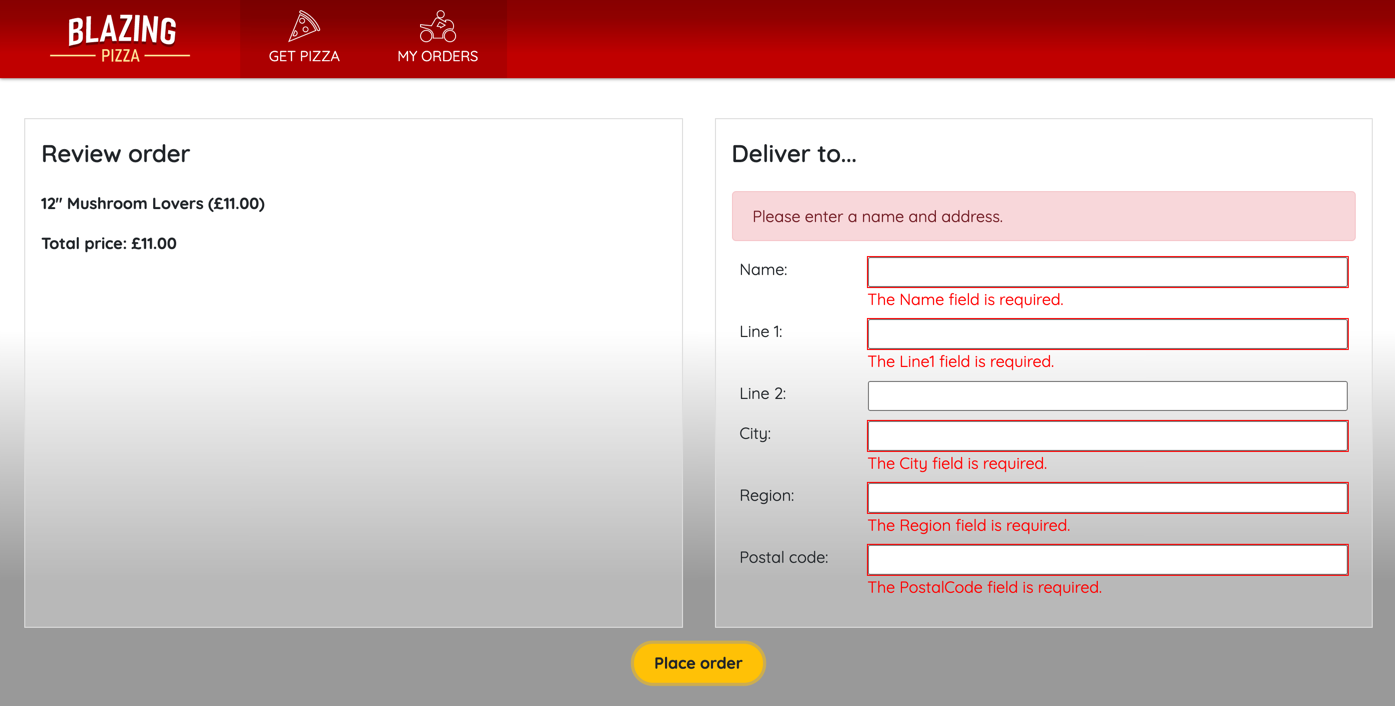
The app correctly doesn't place orders when a client doesn't enter a name and some address fields. The team would like you to enhance the validations to include more of the fields. They'd also like to have some minimum lengths and character validation.
In this exercise, you replace the current server-side validation to use data annotations. Then you see how to manage validation messages and improve the out-of-the-box validation support. In the last step, you control how the form submits, only submitting a form when all fields are valid.
In Visual Studio Code, in the file explorer, expand Model, then select Address.cs.
Add a reference to System.ComponentModel.DataAnnotations at the top of the class.
using System.ComponentModel.DataAnnotations;
For each required field, add a data annotation.
public class Address
{
    public int Id { get; set; }

    [Required, MinLength(3), MaxLength(100)]
    public string Name { get; set; }

    [Required, MinLength(5), MaxLength(100)]
    public string Line1 { get; set; }

    [MaxLength(100)]
    public string Line2 { get; set; }

    [Required, MinLength(3), MaxLength(50)]
    public string City { get; set; }

    [Required, MinLength(3), MaxLength(20)]
    public string Region { get; set; }

    [Required, RegularExpression(@"^([0-9]{5})$")]
    public string PostalCode { get; set; }
}
In the file explorer, expand Pages, then select Checkout.razor.
Above the closing </EditForm> tag, add the validation summary and the data annotations validator.
    <ValidationSummary />
    <DataAnnotationsValidator />
  </EditForm>
</div>
In the EditForm tag, replace the OnSubmit parameter to use the valid submit.
<EditForm Model=Order.DeliveryAddress OnValidSubmit=PlaceOrder>
You can now delete the custom server-side logic to test if the address is valid. Delete the CheckSubmission method in the @code block.
In Visual Studio Code, press F5 or select Run > Start Debugging.
Try to order some pizzas without entering any information, then with incomplete information. Observe the detailed error messages for each field.

This interaction improves the error checks for each field, but the error for each field would be better next to the field it relates to.
Press Shift + F5 to stop the app from running.
In the file explorer, expand Pages, then select Checkout.razor.
Delete the Blazor <ValidationSummary /> component.
        <DataAnnotationsValidator />
  </EditForm>
</div>
In the file explorer, expand Shared, then select AddressEditor.razor.
Below each field, add a custom validation message.
<div class="form-field">
    <label>Name:</label>
    <div>
        <InputText @bind-Value="Address.Name" />
        <ValidationMessage For="@(() => Address.Name)" />
    </div>
</div>

<div class="form-field">
    <label>Line 1:</label>
    <div>
        <InputText @bind-Value="Address.Line1" />
        <ValidationMessage For="@(() => Address.Line1)" />
    </div>
</div>

<div class="form-field">
    <label>Line 2:</label>
    <div>
        <InputText @bind-Value="Address.Line2" />
        <ValidationMessage For="@(() => Address.Line2)" />
    </div>
</div>

<div class="form-field">
    <label>City:</label>
    <div>
        <InputText @bind-Value="Address.City" />
        <ValidationMessage For="@(() => Address.City)" />
    </div>
</div>

<div class="form-field">
    <label>Region:</label>
    <div>
        <InputText @bind-Value="Address.Region" />
        <ValidationMessage For="@(() => Address.Region)" />
    </div>
</div>

<div class="form-field">
    <label>Postal code:</label>
    <div>
        <InputText @bind-Value="Address.PostalCode" />
        <ValidationMessage For="@(() => Address.PostalCode)" />
    </div>
</div>
In the file explorer, expand Model, then select Address.cs.
Add a custom error message for each field's data annotation.
public class Address
{
    public int Id { get; set; }

    [Required, MinLength(3, ErrorMessage = "Please use a Name bigger than 3 letters."), MaxLength(100, ErrorMessage = "Please use a Name less than 100 letters.")]
    public string Name { get; set; }

    [Required, MinLength(5, ErrorMessage = "Please use an Address bigger than 5 letters."), MaxLength(100, ErrorMessage = "Please use an Address less than 100 letters.")]
    public string Line1 { get; set; }

    [MaxLength(100)]
    public string Line2 { get; set; }

    [Required, MinLength(3, ErrorMessage = "Please use a City bigger than 3 letters."), MaxLength(50, ErrorMessage = "Please use a City less than 50 letters.")]
    public string City { get; set; }

    [Required, MinLength(3, ErrorMessage = "Please use a Region bigger than 3 letters."), MaxLength(20, ErrorMessage = "Please use a Region less than 20 letters.")]
    public string Region { get; set; }

    [Required, RegularExpression(@"^([0-9]{5})$", ErrorMessage = "Please use a valid Postal Code with five numbers.")]
    public string PostalCode { get; set; }
}
In Visual Studio Code, press F5 or select Run > Start Debugging.
The address form dynamically shows error message below a field that has invalid data. This interaction happens client-side and prevents customers entering bad addresses.
Press Shift + F5 to stop the app from running.
In the file explorer, expand Pages, then select Checkout.razor.
Add an OnInvalidSubmit parameter that calls a ShowError method to the EditForm component.
<EditForm Model=Order.DeliveryAddress OnValidSubmit=PlaceOrder OnInvalidSubmit=ShowError>
Add a ShowError method that updates the isError property.
protected void ShowError()
{
    isError = true;
}
Change the PlaceOrder method to update the isError and isSubmitting properties.
async Task PlaceOrder()
{
    isError = false;
    isSubmitting = true;
    var response = await HttpClient.PostAsJsonAsync(
        $"{NavigationManager.BaseUri}orders", OrderState.Order);
    var newOrderId= await response.Content.ReadFromJsonAsync<int>();
    OrderState.ResetOrder();
    NavigationManager.NavigateTo($"myorders/{newOrderId}");
}
In Visual Studio Code, press F5 or select Run > Start Debugging.
The error message displays if the customer tries to submit an invalid form.
Press Shift + F5 to stop the app from running.
Would a better user experience be that a customer can't submit their order until they complete all the fields? Let's change the checkout page to support this requirement. Change the EditForm to use an EditContext instead of a model.
In the file explorer, expand Pages, then select Checkout.razor.
Update EditForm element.
<EditForm EditContext=editContext OnValidSubmit=PlaceOrder>
Change the button element to use the isError parameter.
<button class="checkout-button btn btn-warning" type="Submit" disabled=@isError>
In the @code block, add a declaration for the new EditContext.
private EditContext editContext;
Initialize the context with the order delivery address.
protected override void OnInitialized()
{
    editContext = new(Order.DeliveryAddress);
    editContext.OnFieldChanged += HandleFieldChanged;
}
This code also allows for linking an event handler to when a field is changed. In the new handler, you can check to see if the model is valid and set the isError appropriately.
    private void HandleFieldChanged(object sender, FieldChangedEventArgs e)
    {
        isError = !editContext.Validate();
        StateHasChanged();
    }
Now that we created an event handler, we should dispose of it when the checkout component no longer needs it.
public void Dispose()
{
    editContext.OnFieldChanged -= HandleFieldChanged;
}
To implement the Dispose feature, you also have to let Blazor know. Add this code at the top of the page under the @inject statements.
@implements IDisposable
Delete all the references to isSubmitting and update the PlaceOrder method.
async Task PlaceOrder()
{
  var response = await HttpClient.PostAsJsonAsync(NavigationManager.BaseUri + "orders", OrderState.Order);
  var newOrderId= await response.Content.ReadFromJsonAsync<int>();
  OrderState.ResetOrder();
  NavigationManager.NavigateTo($"myorders/{newOrderId}");
}
In Visual Studio Code, press F5 or select Run > Start Debugging.
A customer is now prompted to enter information, and to begin with the Place order button is disabled. Only after all the required fields have data does the button become clickable.
Press Shift + F5 to stop the app from running.
Ask Learn is an AI assistant that can answer questions, clarify concepts, and define terms using trusted Microsoft documentation.
Please sign in to use Ask Learn.
Sign in