Note
Access to this page requires authorization. You can try signing in or changing directories.
Access to this page requires authorization. You can try changing directories.
Segment-based journeys send messages to people who qualify for one or more segments. Use them for outbound scenarios such as announcements or nurture campaigns. To create journeys that can react to customers' actions in real time, see Create a trigger-based journey.
Creating a segment-based journey to send an announcement
To illustrate the capabilities of segment-based journeys, we create a simple journey that sends an announcement to your most valuable customers about an upcoming product. If the customers show interest in the product by clicking the product link, we send them a follow-up message when the product is launched.
Prerequisites
Create segments
Create a segment of your Most valuable customers. You can create your own contact or lead-based segment. Segment-based journeys can also work with segments from Customer Insights - Data.
- If you use Customer Insights - Data segments, use Customer Profile as the audience data for personalization.
Note
Segment publishing requires Create and Write privileges for the msdynmkt_segment entity. Ensure that anyone who requires the ability to create a segment has the necessary permissions.
Create email and text messages
- Product announcement email: Initial email announcement that is sent to your most valuable customers. Include a link to the new product in this email.
- Product launched text message: Follow-up text message that's sent after the product is launched. This follow-up message is sent only to customers who clicked the link in the first email.
You can build the journey while the content is in the Draft state. To publish and go live with the journey, move the content to the Ready to send state.
Set the journey start
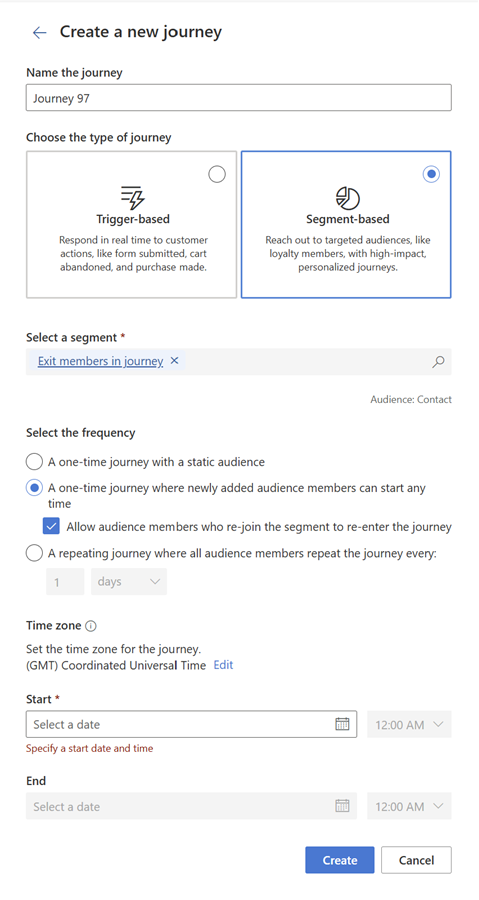
To create a segment-based journey, go to Engagement > Journeys and select +New journey in the top toolbar.
On the "Create a new journey" screen:
- Enter a name for the journey.
- Select Segment-based for the journey type. Customers start a segment-based journey when they qualify to be part of a segment.
- Select one or more segments. Note the following when selecting multiple segments:
- The total combined member count of all segments can't exceed the segment limits for journeys. You can select at most 15 segments (or fewer if the segment size limit is reached sooner).
- Mixed audience types (for example, contacts and leads) can't be selected.
- Environments that use their own Azure Data Lake storage account aren't supported.
- Choose the frequency at which your journey should run:
A one-time journey with a static audience that runs one time. When the journey starts, the current members of the segment start the journey.
A one-time journey where newly added members can start at any time. This journey responds to changes in segment membership, letting more people start after the journey begins. When the journey starts, the current members of the segment start the journey. Newly added segment members start the journey when the segment is refreshed. If Allow audience members who re-join the segment to re-enter the journey isn't selected, each person goes through the journey only once even if they're removed and later added back to the segment. If that option is selected, a person who leaves the segment and later rejoins goes through the journey again.
- Selecting Allow audience members who re-join the segment to re-enter the journey supports advanced scenarios such as maintaining separate "Active" and "Inactive" customer segments with different journeys. Customers who make a purchase can move into the "Active" segment, whose journey promotes other products. Later, those customers might move to the "Inactive" segment and receive different communications, such as win-back offers. When customers in the "Inactive" segment make a purchase, they can move back into the "Active" segment. This option lets the business decide whether those rejoined customers can start the "Active" journey again.
A repeating journey runs on a schedule that you define. Every time the journey reaches the scheduled run time, all current members of the segment start the journey. Members added to the segment between the scheduled run times are included in the next run of the journey. Every time the journey runs, all segment members start the journey even if they previously entered the journey.
The repeating schedule is evaluated from the start date and time using 24 hours for days and 7 days for weeks. For months, the same date on the new month is used and if the month doesn't have that date, the last day of the month is used. For example, a journey starting on January 31 and repeating every month will run on January 31, February 28 (or February 29 if it's a leap year), March 31, April 30, and so on.
- Set the start date and time: Specify the start date and time when you want the journey to start. You can specify the time zone for the journey's relative start date and time. Once set, the time is converted to UTC to normalize all journey times across different user time zones.
Other journey configurations
In the journey editor, you can adjust configurations to exclude members at entry or exit, set goals, or cap journey frequency so the same person isn't saturated by messages across multiple journeys. You can modify these settings before the journey is published. Once the journey is published, some settings might no longer be editable because people are already moving through the live journey.
- Entry: In the Entry settings, you can modify the segments included, change the frequency, add segments to exclude from the journey, change the start or end time, or limit the rate at which people enter the journey.
- Exclude segments: There's no limit to the number of segments you can list to be excluded; however, if the segments are large, it can slow the performance of the journey. For large exclusions, it's best to edit the segment definition and include the excluded segments there for better performance.
- Rate limit: If you choose to limit the rate at which people enter the journey, you can specify how many people per day or per hour should enter. You can also specify which days of the week new audience members should start the journey to spread out the entry flow throughout the week.
- Exit: In the Exit setting you can specify that people should exit the journey if they engage a trigger or belong to a particular segment.
- Exit when a trigger occurs: Sometimes you want a person to exit a journey if they complete a specific action. For example, if a person views a product detail page on your website but doesn't purchase and the journey sends them a reminder email every day to complete the purchase, you want them to exit the journey if they complete the purchase. In this case, you want the person to exit the journey if they trigger a purchase completion for that item.
- Exit by segments: Sometimes you want a person to exit if they become a member of a segment or multiple segments. For example, you may have a nurture journey for a segment of people who have never purchased from your brand before; however, once they make a purchase they move into the loyalty segment and you want them to exit the journey. As soon as they become a member of the loyalty segment, you want them to exit the first-time buyer journey.
- Goal: Measuring marketing impact helps you calculate return on investment and justify ongoing marketing budgets. You can set a journey goal with a target outcome, choose from predefined goals, or create a custom goal title and associate it with the trigger that indicates success. You can specify targets by number or by percentage of people who meet the goal. Once the journey is live, you can monitor the results.
- Additional settings: You can specify message frequency caps to help people avoid promotional message fatigue. For example, you might not want to send promotional messages to a person more than once per week. In Settings, you can set up the frequency caps that fit your business and choose whether to apply them to the journey. You can exclude operational messages, such as password reset confirmations, so they're always delivered.
Add the announcement messages
Use the plus sign (+) on the journey canvas to add the individual steps in your journey.
- Send an email: Because the first step of the journey is to send the product announcement, select the Product announcement email. For the Send to field, select the attribute that contains the email address you want to send the email to.
- Add an if/then branch: Set the Branch off this property to the previous Product announcement email. You want to Wait for the Email link clicked event. For Which link, select the link to view the product details. Finally, set the time limit to 1 day to indicate that customers have up to one day after receiving the email to select the product link.
- Add a wait: If customers select the view product link within one day, they proceed down the Yes branch. Under the yes branch, add a Wait and select Until a specific date and time. Here, you can specify the exact date and time that the product will launch. This is helpful if, say, the product launches a few days after your email announcement. Customers wait on this step until the specific date and time. If the date and time has already passed, customers will immediately proceed to the next step.
- Send a text message: After waiting for the product launch, you can send the Product launched text message. For the Send to field, select the attribute that contains the phone number you want to send the text message to.
Publish the journey
After adding all the steps to the journey canvas, the journey is ready to go live and message real customers. Before you publish the journey, make sure all related content (email, text messages, and push notifications) is in the Ready to send state. After publishing, you can't modify the journey, so verify that each step is set up the way you want.
Once the journey is published and live, you can look at the journey analytics page to understand how it's performing.