Note
Access to this page requires authorization. You can try signing in or changing directories.
Access to this page requires authorization. You can try changing directories.
Improve marketing return on investment by targeting the right audience. Build segments directly in Dynamics 365 Customer Insights - Journeys with the powerful, easy-to-use logic builder that doesn't require specialized knowledge of complex data structures or logical operators. Preview the estimated segment size and membership before you mark your segment as "Ready to use" in customer journeys.
When building segments, you can choose to target contacts, leads, or unified profiles from Customer Insights - Data.
Note
To target unified profiles, install Customer Insights - Journeys and Customer Insights - Data on the same environment.
Create a demographic segment targeting leads
You can now create dynamic segments targeting leads directly without having to connect it to a parent contact.
To target leads directly, go to Customer Insights - Journeys > Audience > Segments and select + New Segment in the top toolbar. You can then name the new segment and select Lead under the Select a target audience dropdown. After you select the Create button, you'll be taken directly to the segment builder where you can create and save your segment.

In the right pane of the segment builder, you can search for attributes to add to the builder canvas. You can drag and drop it directly onto the canvas or use the menus to manually select a group to add it to.
Example: Qualifying leads that are scheduled for a follow-up in the next seven days:

Create demographic segment using related tables
In addition to having a segment return its targeting entity (such as contacts or leads), you can also build more complex queries that reference other tables (for example, Event Registration or Account) to enrich your segment definition. You can even reference customer measures from Customer Insights - Data when targeting unified profiles.
Note
To reference customer measures, Customer Insights - Journeys and Customer Insights - Data must be installed on the same environment.
When adding an attribute that relates to a different table, you can search for the attribute and then define how the two tables are related based on your segment definition. To add an attribute from a related table, you must enable Track changes in the related table. For new or existing tables, Track changes can be checked from the table properties.
Tip
Virtual tables aren't supported in real-time journeys segmentation. The real-time journeys segment designer doesn't show virtual tables in the "Add tables" dialog.
Note
To target contacts based on their consent, don't add the contact point consent table (msdynmkt_contactpointconsent) as a related table. By design, there's no direct relationship between it and the contact or lead tables, so this approach won't work. Instead, use consent-based criteria. For more information, see Build segments using consent-based criteria.
Example: Leads whose parent accounts are in the Consumer Services industry.
Search for "industry" on the right-side pane and select the + button to the right of the item in the table you want. You can see all possible combinations of how the Lead and Account tables are related.

Select "Account > Lead" for the relationship path, then select the Next button. Next, set the path between the Lead and Account tables to be "Parent Account for lead" according to the segment definition, then select the Set Path button.

Previewing segment members and size estimate
When you're satisfied with your segment definition, select Refresh on the bottom toolbar to quickly check if you are on the right track to creating your segment. Refreshing gives you an estimated size of how many members are in the segment.
To see a list of the first set of segment members the app fetched based on your definition, select View sample of included members on the bottom toolbar. This action gives you an estimate of who is in the segment.
Important
The segment size estimate and member sample are a best-effort preview. Customer Insights - Journeys tries to return an estimate quickly, but for some segments - especially large or complex ones - a preview might not be available. This condition is expected and doesn't mean anything is wrong with your segment. To see the exact member count and the full list of members, mark your segment as Ready to use and go live with it in a customer journey.

Add a subgroup to your segment
Example: Leads with company size of more than 10,000 employees, whose parent accounts are in either the Consumer Services or Financial Services industry.
You can choose your attribute to be added to a new subgroup. To do this, search for the attribute, then select the name of the attribute item from the results. A contextual menu pops up that allows you to add the item to a new or existing subgroup.

To include members from either subgroup, select the or subgroup operator.

Add a new group to a segment
Example: Let’s say you want to create a query for leads with a company size of more than 10,000 employees whose parent accounts are in the Consumer Services or Financial Services industries, but not leads with a budget of less than $20,000.
To create the segment from the example, create a new segment in Customer Insights - Journeys for leads whose company size is 10,001 or more. Open the Elements pane by selecting the top icon on the menu on the right side of the window. Then, go to the Attributes tab and search for the Budget Amount attribute. Select the icon to the left of the attribute name from the results list. A contextual menu appears, allowing you to add the attribute to an existing or new group. Alternatively, you can drag and drop the attribute directly onto the canvas to create a new group.

In the example, the attribute was added to a new group (Group 2). To create the segment you want, select the operator button between the groups.

Note
Calculated and Formula Dataverse table fields aren't supported in real-time journeys segmentation. The segmentation backend doesn't receive an update signal when a Calculated or a Formula field is updated. This is by design, as values of Calculated and Formula fields aren't persisted anywhere, they're just calculated on the fly. To address this, the app now shows Calculated and Formula fields as disabled in the real-time journeys segment designer (with an appropriate tooltip).
Tip
While adding nested segments to the segment definition, you can view the details of the underlying segment by selecting the View segment hyperlink when hovering over the desired segment. To use keyboard controls to view the segment, press the "K" key while focus is on the desired segment. This action opens a dialog displaying the segment details.

How conditions on a related table combine across groups
When you filter on the same related table more than once, the segment builder handles your conditions differently depending on whether they're in one group or split across groups.
- Same group: All conditions must be met by the same related record. The builder applies the filters together, so a single matching related record has to satisfy every condition.
- Separate groups: The conditions are applied independently. Different related records can each satisfy one condition, and the target still qualifies.
Example: Say you're targeting contacts based on their connected accounts (through the Connection table).
- If you put both conditions (account named "Contoso" and account located in Valencia) in the same group, a contact qualifies only when a single connected account is both named "Contoso" and located in Valencia. A contact connected to two different accounts (one named "Contoso" and another in Valencia) won't qualify.
- If you put each condition in a separate group and combine the groups with and, a contact qualifies when they have a connected account named "Contoso" and a connected account in Valencia, even if those are two different accounts.
Use a single group when the conditions must describe one related record, and separate groups when different related records can each satisfy a condition.
Include or exclude manually selected audience members
Adding manual inclusions or exclusions is a powerful way to augment segment building criteria. Adding manual inclusions ensures a segment always includes VIP customers so they're invited to special events. Adding manual exclusions always excludes them so they get a different experience. These options are also an easy way to build test segments for journeys.
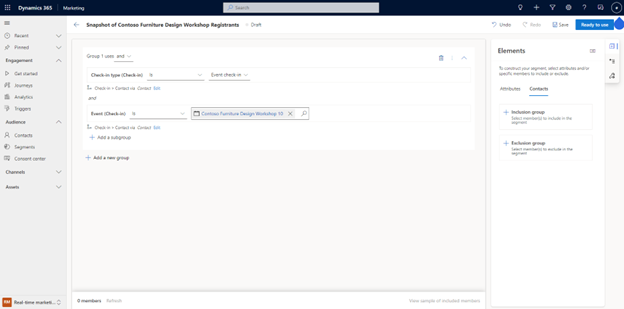
Example: In addition to the event registrants for the workshop, you also want to include some of your VIP customers in this list. You can manually search for them by name and decide whether to always include them or not.
To manually add customers, go to the Contacts tab in the Elements pane. Select whether you want to include (+Inclusion group) or exclude (+Exclusion group) these members.
To add your VIP customers to your segment, search for them by name. When you find the segment members you want to add or exclude, select the plus (+) button next to their name.
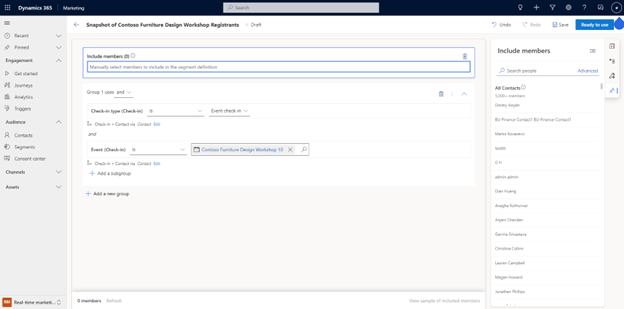
The search-by-name list on the Contacts tab is limited to 100 members. To statically include or exclude larger lists (up to 2,000,000 members), select members from the Dataverse grid or upload a CSV file, as explained in Statically include or exclude up to 2,000,000 segment members.
Statically include or exclude up to 2,000,000 segment members
You can control segment membership directly by statically including or excluding specific contacts or leads, up to 2,000,000 members. You don't need a CSV file to do this. Add static members in either of these ways:
- Manual selection: Pick contacts or leads directly from the Dataverse grid - no CSV required.
- CSV upload: Match a list of contacts or leads from a CSV file to records in Dataverse. The segment builder matches email addresses with existing contacts or leads, which you can then include as a static list.
You can combine both approaches and mix static lists with dynamic query criteria in the same segment.
Prerequisites
- You must save the segment before you can add static members.
Add static members
- Create a new contact or lead-based segment.
- Select the + Add a new group dropdown, and then select an inclusion or exclusion group. To add members from a file, select Upload CSV. You can also drag and drop a CSV file onto the segment builder.
- The CSV file must have a column with the header
emailaddress1that contains email addresses for matching contact or lead records in Dataverse.- When using a CSV file, all contact or lead records in Dataverse with a matching email address are included in the list. Multiple records with the same email address aren't deduplicated.
- You can also manually select members from Dataverse using the standard contact or leads grid view. To launch the standard Dataverse grid view, go to Manual select > Select members > Add members.
Note
The grid view is limited to browser cache sizes for displaying available contacts or leads. You can only select as many contacts or leads at a time as the cache will display.
- Each static member group defined either by a CSV file or by manually selecting from the contact or leads grid can contain up to 200,000 members. You can have a maximum of 10 groups, for a total of 2,000,000 possible static members. You can then add dynamic query criteria for additional members to be included when they meet the query criteria.
Tip
Segment definitions can include static lists and dynamic criteria in the same definition.
Include a large list but exclude specific members
You can combine inclusion and exclusion groups in the same segment. Exclusion takes precedence over inclusion, so any member who's in both an inclusion group and an exclusion group is left out of the segment.
Example: You want to include 200,000 contacts from a CSV file but leave out three specific contacts who are also in that file. Add the CSV to an inclusion group, then add the three contacts to an exclusion group. The three excluded contacts are removed from the segment, even though they appear in the CSV.
Guidance for using CSV files for static segments
- The "Not found" list includes rows in the CSV for which there aren't any matching records in Dataverse. You can download this list and follow the steps to upload them into Dataverse using the contact or leads list view CSV upload feature to create the records in Dataverse. You can then retry the matching to include them in the segment definition.
- The number of records found in the CSV file shows the number of rows in the CSV file that match one or more contact or lead records in Dataverse. If multiple records match the same email address in the CSV, the member count of the static list can be larger than the number of records found in the CSV. For example, one row in the CSV with
email@email.commight match three contact records with the same email address. The member count shows the number of contact or lead records in the segment. The "found" count shows the number of CSV rows that match one or more contact or lead records. - For static snapshots, contacts or leads that the segment builder has permissions to see in Dataverse either by teams or business unit scoping permissions are found and included in the segment definition. For dynamic queries, any matching contacts or leads, regardless of the business unit that the segment author belongs to while defining the segment, are included in the segment at run time.
View and edit your segment with the query view
Tip
To enable this feature:
- Go to Settings > Overview > Feature switches.
- Enable the Query edit toggle inside the Segmentation section.
Using the query viewer, you can view, copy, and directly edit the underlying MQL (Marketing Query Language) that defines a segment. To open the query viewer, select the </> Query toggle in the top right of the segment builder. This opens a pane with the MQL query that represents the segment. You can edit the MQL query to change the segment definition or copy the query or parts of it from one segment to another. Directly editing the MQL query is useful when you’re iterating quickly on complex logic or cloning a segment pattern across similar segments.
Augment with the segment builder API
The segment builder API powers the user interface (UI), so anything you do through the UI, you can do programmatically using the API. Use the API to augment a segment you build using the UI. For more information, see Create a Customer Insights - Journeys segment using the Web API.