Примечание.
Для доступа к этой странице требуется авторизация. Вы можете попробовать войти или изменить каталоги.
Для доступа к этой странице требуется авторизация. Вы можете попробовать изменить каталоги.
Обзор
Azure Blob Storage is a service for storing large amounts of unstructured data, such as text or binary data, that can be accessed from anywhere in the world via HTTP or HTTPS. You can use Blob storage to expose data publicly to the world, or to store application data privately. In this article, you'll learn how to use Storage Explorer to work with blob containers and blobs.
Предпосылки
Чтобы выполнить действия, описанные в этой статье, вам потребуется следующее:
- Скачивание и установка обозревателя службы хранилища
- Подключение к учетной записи хранения Azure или службе
Create a blob container
All blobs must reside in a blob container, which is simply a logical grouping of blobs. An account can contain an unlimited number of containers, and each container can store an unlimited number of blobs.
The following steps illustrate how to create a blob container within Storage Explorer.
Откройте обозреватель хранилищ.
In the left pane, expand the storage account within which you wish to create the blob container.
Right-click Blob Containers, and - from the context menu - select Create Blob Container.
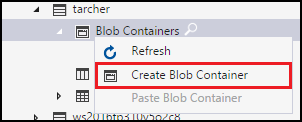
A text box will appear below the Blob Containers folder. Enter the name for your blob container. See Create a container for information on rules and restrictions on naming blob containers.

Press Enter when done to create the blob container, or Esc to cancel. Once the blob container has been successfully created, it will be displayed under the Blob Containers folder for the selected storage account.

View a blob container's contents
Blob containers contain blobs and virtual directories (that can also contain blobs).
The following steps illustrate how to view the contents of a blob container within Storage Explorer:
Откройте обозреватель хранилищ.
In the left pane, expand the storage account containing the blob container you wish to view.
Expand the storage account's Blob Containers.
Right-click the blob container you wish to view, and - from the context menu - select Open Blob Container Editor. You can also double-click the blob container you wish to view.

The main pane will display the blob container's contents.

Delete a blob container
Blob containers can be easily created and deleted as needed. (To see how to delete individual blobs, refer to the section, Managing blobs in a blob container.)
The following steps illustrate how to delete a blob container within Storage Explorer:
Откройте обозреватель хранилищ.
In the left pane, expand the storage account containing the blob container you wish to view.
Expand the storage account's Blob Containers.
Right-click the blob container you wish to delete, and - from the context menu - select Delete. You can also press Delete to delete the currently selected blob container.

Выберите "Да " в диалоговом окне подтверждения.

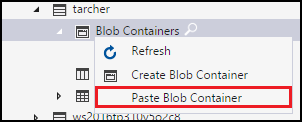
Copy a blob container
Storage Explorer enables you to copy a blob container to the clipboard, and then paste that blob container into another storage account. (To see how to copy individual blobs, refer to the section, Managing blobs in a blob container.)
The following steps illustrate how to copy a blob container from one storage account to another.
Откройте обозреватель хранилищ.
In the left pane, expand the storage account containing the blob container you wish to copy.
Expand the storage account's Blob Containers.
Right-click the blob container you wish to copy, and - from the context menu - select Copy Blob Container.

Right-click the desired "target" storage account into which you want to paste the blob container, and - from the context menu - select Paste Blob Container.
Get the SAS for a blob container
Подпись общего доступа (SAS) предоставляет делегированный доступ к ресурсам в вашей учетной записи хранилища. Это означает, что вы можете предоставить клиенту ограниченные разрешения объектам в учетной записи хранения в течение определенного периода времени и с указанным набором разрешений, не предоставляя общий доступ к ключам доступа к учетной записи.
The following steps illustrate how to create a SAS for a blob container:
Откройте обозреватель хранилищ.
In the left pane, expand the storage account containing the blob container for which you wish to get a SAS.
Expand the storage account's Blob Containers.
Right-click the desired blob container, and - from the context menu - select Get Shared Access Signature.

В диалоговом окне Маркера совместного доступа укажите политику, даты начала и окончания срока действия, часовой пояс и уровни доступа, которые вы хотите для ресурса.

После завершения указания параметров SAS нажмите кнопку "Создать".
A second Shared Access Signature dialog will then display that lists the blob container along with the URL and QueryStrings you can use to access the storage resource. Нажмите кнопку "Копировать " рядом с URL-адресом, который вы хотите скопировать в буфер обмена.

По завершении нажмите кнопку "Закрыть".
Manage Access Policies for a blob container
The following steps illustrate how to manage (add and remove) access policies for a blob container:
Откройте обозреватель хранилищ.
In the left pane, expand the storage account containing the blob container whose access policies you wish to manage.
Expand the storage account's Blob Containers.
Select the desired blob container, and - from the context menu - select Manage Access Policies.
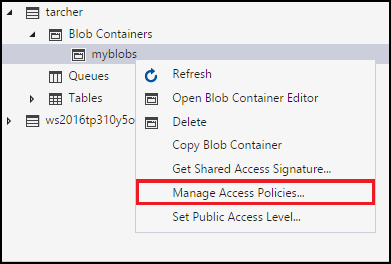
The Access Policies dialog will list any access policies already created for the selected blob container.

Выполните следующие действия в зависимости от задачи управления политиками доступа:
- Добавьте новую политику доступа — нажмите кнопку "Добавить". После создания диалоговое окно "Политики доступа" отобразит только что добавленную политику доступа (с параметрами по умолчанию).
- Изменение политики доступа . Внесите необходимые изменения и нажмите кнопку "Сохранить".
- Удаление политики доступа — выберите "Удалить рядом с политикой доступа", которую вы хотите удалить.
Примечание.
Modifying immutability policies is not supported from Storage Explorer.
Set the Public Access Level for a blob container
By default, every blob container is set to "No public access".
The following steps illustrate how to specify a public access level for a blob container.
Откройте обозреватель хранилищ.
In the left pane, expand the storage account containing the blob container whose access policies you wish to manage.
Expand the storage account's Blob Containers.
Select the desired blob container, and - from the context menu - select Set Public Access Level.

In the Set Container Public Access Level dialog, specify the desired access level.

Выберите Применить.
Managing blobs in a blob container
Once you've created a blob container, you can upload a blob to that blob container, download a blob to your local computer, open a blob on your local computer, and much more.
The following steps illustrate how to manage the blobs (and virtual directories) within a blob container.
Откройте обозреватель хранилищ.
In the left pane, expand the storage account containing the blob container you wish to manage.
Expand the storage account's Blob Containers.
Double-click the blob container you wish to view.
The main pane will display the blob container's contents.
The main pane will display the blob container's contents.
Выполните следующие действия в зависимости от задачи, которую вы хотите выполнить:
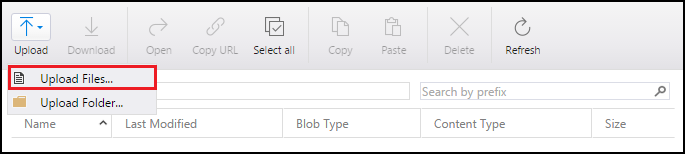
Upload files to a blob container
На панели инструментов главной панели выберите " Отправить", а затем в раскрывающемся меню "Отправить файлы ".
В диалоговом окне "Отправка файлов " нажмите кнопку с многоточием (...) в правой части текстового поля "Файлы ", чтобы выбрать нужные файлы.
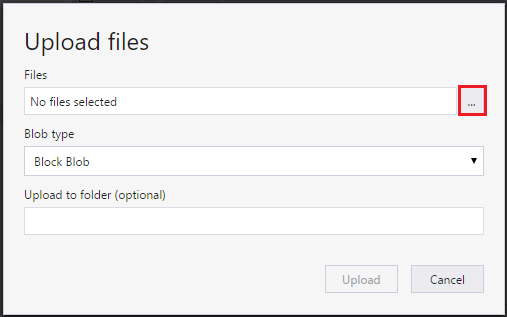
Specify the type of Blob type. See Create a container for more information.
Optionally, specify a target virtual directory into which the selected file(s) will be uploaded. If the target virtual directory doesn’t exist, it will be created.
Выберите Загрузить.
Upload a folder to a blob container
На панели инструментов главной панели выберите " Отправить" и " Отправить папку " в раскрывающемся меню.

В диалоговом окне "Отправить папку " нажмите кнопку с многоточием (...) в правой части текстового поля папки , чтобы выбрать папку, содержимое которой нужно отправить.

Specify the type of Blob type. See Create a container for more information.
Optionally, specify a target virtual directory into which the selected folder's contents will be uploaded. If the target virtual directory doesn’t exist, it will be created.
Выберите Загрузить.
Download a blob to your local computer
- Select the blob you wish to download.
- На панели инструментов главной панели нажмите кнопку "Скачать".
- In the Specify where to save the downloaded blob dialog, specify the location where you want the blob downloaded, and the name you wish to give it.
- Выберите Сохранить.
Open a blob on your local computer
- Select the blob you wish to open.
- На панели инструментов главной панели нажмите кнопку "Открыть".
- The blob will be downloaded and opened using the application associated with the blob's underlying file type.
Copy a blob to the clipboard
- Select the blob you wish to copy.
- На панели инструментов главной панели нажмите кнопку "Копировать".
- In the left pane, navigate to another blob container, and double-click it to view it in the main pane.
- On the main pane's toolbar, select Paste to create a copy of the blob.
Delete a blob
- Select the blob you wish to delete.
- На панели инструментов главной панели нажмите кнопку "Удалить".
- Выберите "Да " в диалоговом окне подтверждения.
Delete a blob along with snapshots
- Select the blob you wish to delete.
- На панели инструментов главной панели нажмите кнопку "Удалить".
- Выберите "Да " в диалоговом окне подтверждения.
- Under Activities the deletion of the blob will be skipped now click on retry.
- Retry Azcopy window will open and from Snapshot select Delete blobs with snapshots option from dropdown then select Retry selected.