Tutorial: Route network traffic with a route table
Статья
12.04.2025
Azure routes traffic between all subnets within a virtual network, by default. You can create your own routes to override Azure's default routing. Custom routes are helpful when, for example, you want to route traffic between subnets through a network virtual appliance (NVA).
In this tutorial, you learn how to:
Create a virtual network and subnets
Create an NVA that routes traffic
Deploy virtual machines (VMs) into different subnets
Create a route table
Create a route
Associate a route table to a subnet
Route traffic from one subnet to another through an NVA
Azure hosts Azure Cloud Shell, an interactive shell environment that you can use through your browser. You can use either Bash or PowerShell with Cloud Shell to work with Azure services. You can use the Cloud Shell preinstalled commands to run the code in this article, without having to install anything on your local environment.
To start Azure Cloud Shell:
Option
Example/Link
Select Try It in the upper-right corner of a code or command block. Selecting Try It doesn't automatically copy the code or command to Cloud Shell.
Go to https://shell.azure.com, or select the Launch Cloud Shell button to open Cloud Shell in your browser.
Select the Cloud Shell button on the menu bar at the upper right in the Azure portal.
To use Azure Cloud Shell:
Start Cloud Shell.
Select the Copy button on a code block (or command block) to copy the code or command.
Paste the code or command into the Cloud Shell session by selecting Ctrl+Shift+V on Windows and Linux, or by selecting Cmd+Shift+V on macOS.
Select Enter to run the code or command.
If you choose to install and use PowerShell locally, this article requires the Azure PowerShell module version 1.0.0 or later. Run Get-Module -ListAvailable Az to find the installed version. If you need to upgrade, see Install Azure PowerShell module. If you're running PowerShell locally, you also need to run Connect-AzAccount to create a connection with Azure.
If you prefer to run CLI reference commands locally, install the Azure CLI. If you're running on Windows or macOS, consider running Azure CLI in a Docker container. For more information, see How to run the Azure CLI in a Docker container.
If you're using a local installation, sign in to the Azure CLI by using the az login command. To finish the authentication process, follow the steps displayed in your terminal. For other sign-in options, see Sign in with the Azure CLI.
When you're prompted, install the Azure CLI extension on first use. For more information about extensions, see Use extensions with the Azure CLI.
Run az version to find the version and dependent libraries that are installed. To upgrade to the latest version, run az upgrade.
This article requires version 2.0.28 or later of the Azure CLI. If using Azure Cloud Shell, the latest version is already installed.
Create subnets
A DMZ and Private subnet are needed for this tutorial. The DMZ subnet is where you deploy the NVA, and the Private subnet is where you deploy the virtual machines that you want to route traffic to. The subnet-1 is the subnet created in the previous steps. Use subnet-1 for the public virtual machine.
Create a virtual network and an Azure Bastion host
The following procedure creates a virtual network with a resource subnet, an Azure Bastion subnet, and a Bastion host:
In the portal, search for and select Virtual networks.
On the Virtual networks page, select + Create.
On the Basics tab of Create virtual network, enter, or select the following information:
Setting
Value
Project details
Subscription
Select your subscription.
Resource group
Select Create new.
Enter test-rg for the name.
Select OK.
Instance details
Name
Enter vnet-1.
Region
Select East US 2.
Select Next to proceed to the Security tab.
In the Azure Bastion section, select Enable Azure Bastion.
Bastion uses your browser to connect to VMs in your virtual network over Secure Shell (SSH) or Remote Desktop Protocol (RDP) by using their private IP addresses. The VMs don't need public IP addresses, client software, or special configuration. For more information, see What is Azure Bastion?.
Примечание
Hourly pricing starts from the moment that Bastion is deployed, regardless of outbound data usage. For more information, see Pricing and SKUs. If you're deploying Bastion as part of a tutorial or test, we recommend that you delete this resource after you finish using it.
In Azure Bastion, enter or select the following information:
Setting
Value
Azure Bastion host name
Enter bastion.
Azure Bastion public IP address
Select Create a public IP address.
Enter public-ip-bastion in Name.
Select OK.
Select Next to proceed to the IP Addresses tab.
In the address space box in Subnets, select the default subnet.
In Edit subnet, enter or select the following information:
Setting
Value
Subnet purpose
Leave the default of Default.
Name
Enter subnet-1.
IPv4
IPv4 address range
Leave the default of 10.0.0.0/16.
Starting address
Leave the default of 10.0.0.0.
Size
Leave the default of /24 (256 addresses).
Select Save.
Select Review + create at the bottom of the window. When validation passes, select Create.
In the search box at the top of the portal, enter Virtual network. Select Virtual networks in the search results.
In Virtual networks, select vnet-1.
In vnet-1, select Subnets from the Settings section.
In the virtual network's subnet list, select + Subnet.
In Add subnet, enter or select the following information:
Setting
Value
Subnet purpose
Leave the default of Default.
Name
Enter subnet-private.
IPv4
IPv4 address range
Leave the default of 10.0.0.0/16.
Starting address
Enter 10.0.2.0.
Size
Leave the default of /24 (256 addresses).
Select Add.
Select + Subnet.
In Add subnet, enter or select the following information:
Setting
Value
Subnet purpose
Leave the default of Default.
Name
Enter subnet-dmz.
IPv4
IPv4 address range
Leave the default of 10.0.0.0/16.
Starting address
Enter 10.0.3.0.
Size
Leave the default of /24 (256 addresses).
Select Add.
Create a resource group with New-AzResourceGroup. The following example creates a resource group named test-rg for all resources created in this article.
Create four subnets by creating four subnet configurations with New-AzVirtualNetworkSubnetConfig. The following example creates four subnet configurations for Public, Private, DMZ, and Azure Bastion subnets.
Write the subnet configurations to the virtual network with Set-AzVirtualNetwork, which creates the subnets in the virtual network:
$virtualNetwork | Set-AzVirtualNetwork
Create Azure Bastion
Create a public IP address for the Azure Bastion host with New-AzPublicIpAddress. The following example creates a public IP address named public-ip-bastion in the vnet-1 virtual network.
Create an Azure Bastion host with New-AzBastion. The following example creates an Azure Bastion host named bastion in the AzureBastionSubnet subnet of the vnet-1 virtual network. Azure Bastion is used to securely connect Azure virtual machines without exposing them to the public internet.
Create a public IP address for the Azure Bastion host with az network public-ip create. The following example creates a public IP address named public-ip-bastion in the vnet-1 virtual network.
az network public-ip create \
    --resource-group test-rg \
    --name public-ip-bastion \
    --location eastus2 \
    --allocation-method Static \
    --sku Standard
Create an Azure Bastion host with az network bastion create. The following example creates an Azure Bastion host named bastion in the AzureBastionSubnet subnet of the vnet-1 virtual network. Azure Bastion is used to securely connect Azure virtual machines without exposing them to the public internet.
Network virtual appliances (NVAs) are virtual machines that help with network functions, such as routing and firewall optimization. In this section, create an NVA using an Ubuntu 24.04 virtual machine.
The VM takes a few minutes to create. Don't continue to the next step until Azure finishes creating the VM and returns output about the VM.
Create public and private virtual machines
Create two virtual machines in the vnet-1 virtual network. One virtual machine is in the subnet-1 subnet, and the other virtual machine is in the subnet-private subnet. Use the same virtual machine image for both virtual machines.
Create public virtual machine
The public virtual machine is used to simulate a machine in the public internet. The public and private virtual machine are used to test the routing of network traffic through the NVA virtual machine.
In the search box at the top of the portal, enter Virtual machine. Select Virtual machines in the search results.
Select + Create then Azure virtual machine.
In Create a virtual machine enter or select the following information in the Basics tab:
Setting
Value
Project details
Subscription
Select your subscription.
Resource group
Select test-rg.
Instance details
Virtual machine name
Enter vm-public.
Region
Select (US) East US 2.
Availability options
Select No infrastructure redundancy required.
Security type
Select Standard.
Image
Select Ubuntu Server 24.04 LTS - x64 Gen2.
VM architecture
Leave the default of x64.
Size
Select a size.
Administrator account
Authentication type
Select Password.
Username
Enter a username.
Password
Enter a password.
Confirm password
Reenter password.
Inbound port rules
Public inbound ports
Select None.
Select Next: Disks then Next: Networking.
In the Networking tab, enter or select the following information:
Setting
Value
Network interface
Virtual network
Select vnet-1.
Subnet
Select subnet-1 (10.0.0.0/24).
Public IP
Select None.
NIC network security group
Select None.
Leave the rest of the options at the defaults and select Review + create.
Select Create.
Create private virtual machine
In the search box at the top of the portal, enter Virtual machine. Select Virtual machines in the search results.
Select + Create then Azure virtual machine.
In Create a virtual machine enter or select the following information in the Basics tab:
Setting
Value
Project details
Subscription
Select your subscription.
Resource group
Select test-rg.
Instance details
Virtual machine name
Enter vm-private.
Region
Select (US) East US 2.
Availability options
Select No infrastructure redundancy required.
Security type
Select Standard.
Image
Select Ubuntu Server 24.04 LTS - x64 Gen2.
VM architecture
Leave the default of x64.
Size
Select a size.
Administrator account
Authentication type
Select Password.
Username
Enter a username.
Password
Enter a password.
Confirm password
Reenter password.
Inbound port rules
Public inbound ports
Select None.
Select Next: Disks then Next: Networking.
In the Networking tab, enter or select the following information:
Setting
Value
Network interface
Virtual network
Select vnet-1.
Subnet
Select subnet-private (10.0.2.0/24).
Public IP
Select None.
NIC network security group
Select None.
Leave the rest of the options at the defaults and select Review + create.
Select Create.
Create a VM in the subnet-1 subnet with New-AzVM. The following example creates a VM named vm-public in the subnet-public subnet of the vnet-1 virtual network.
# Create a credential object
$cred = Get-Credential

# Define the VM parameters
$vmParams = @{
    ResourceGroupName = "test-rg"
    Location = "EastUS2"
    Name = "vm-public"
    ImageName = "Canonical:ubuntu-24_04-lts:server-gen1:latest"
    Size = "Standard_DS1_v2"
    Credential = $cred
    VirtualNetworkName = "vnet-1"
    SubnetName = "subnet-1"
    PublicIpAddressName = $null  # No public IP address
}

# Create the VM
New-AzVM @vmParams
Create a VM in the subnet-private subnet.
# Create a credential object
$cred = Get-Credential

# Define the VM parameters
$vmParams = @{
    ResourceGroupName = "test-rg"
    Location = "EastUS2"
    Name = "vm-private"
    ImageName = "Canonical:ubuntu-24_04-lts:server-gen1:latest"
    Size = "Standard_DS1_v2"
    Credential = $cred
    VirtualNetworkName = "vnet-1"
    SubnetName = "subnet-private"
    PublicIpAddressName = $null  # No public IP address
}

# Create the VM
New-AzVM @vmParams
The VM takes a few minutes to create. Don't continue with the next step until the VM is created and Azure returns output to PowerShell.
Create a VM in the subnet-1 subnet with az vm create. The --no-wait parameter enables Azure to execute the command in the background so you can continue to the next command.
To route traffic through the NVA, turn on IP forwarding in Azure and in the operating system of vm-nva. When IP forwarding is enabled, any traffic received by vm-nva that's destined for a different IP address, isn't dropped and is forwarded to the correct destination.
Enable IP forwarding in Azure
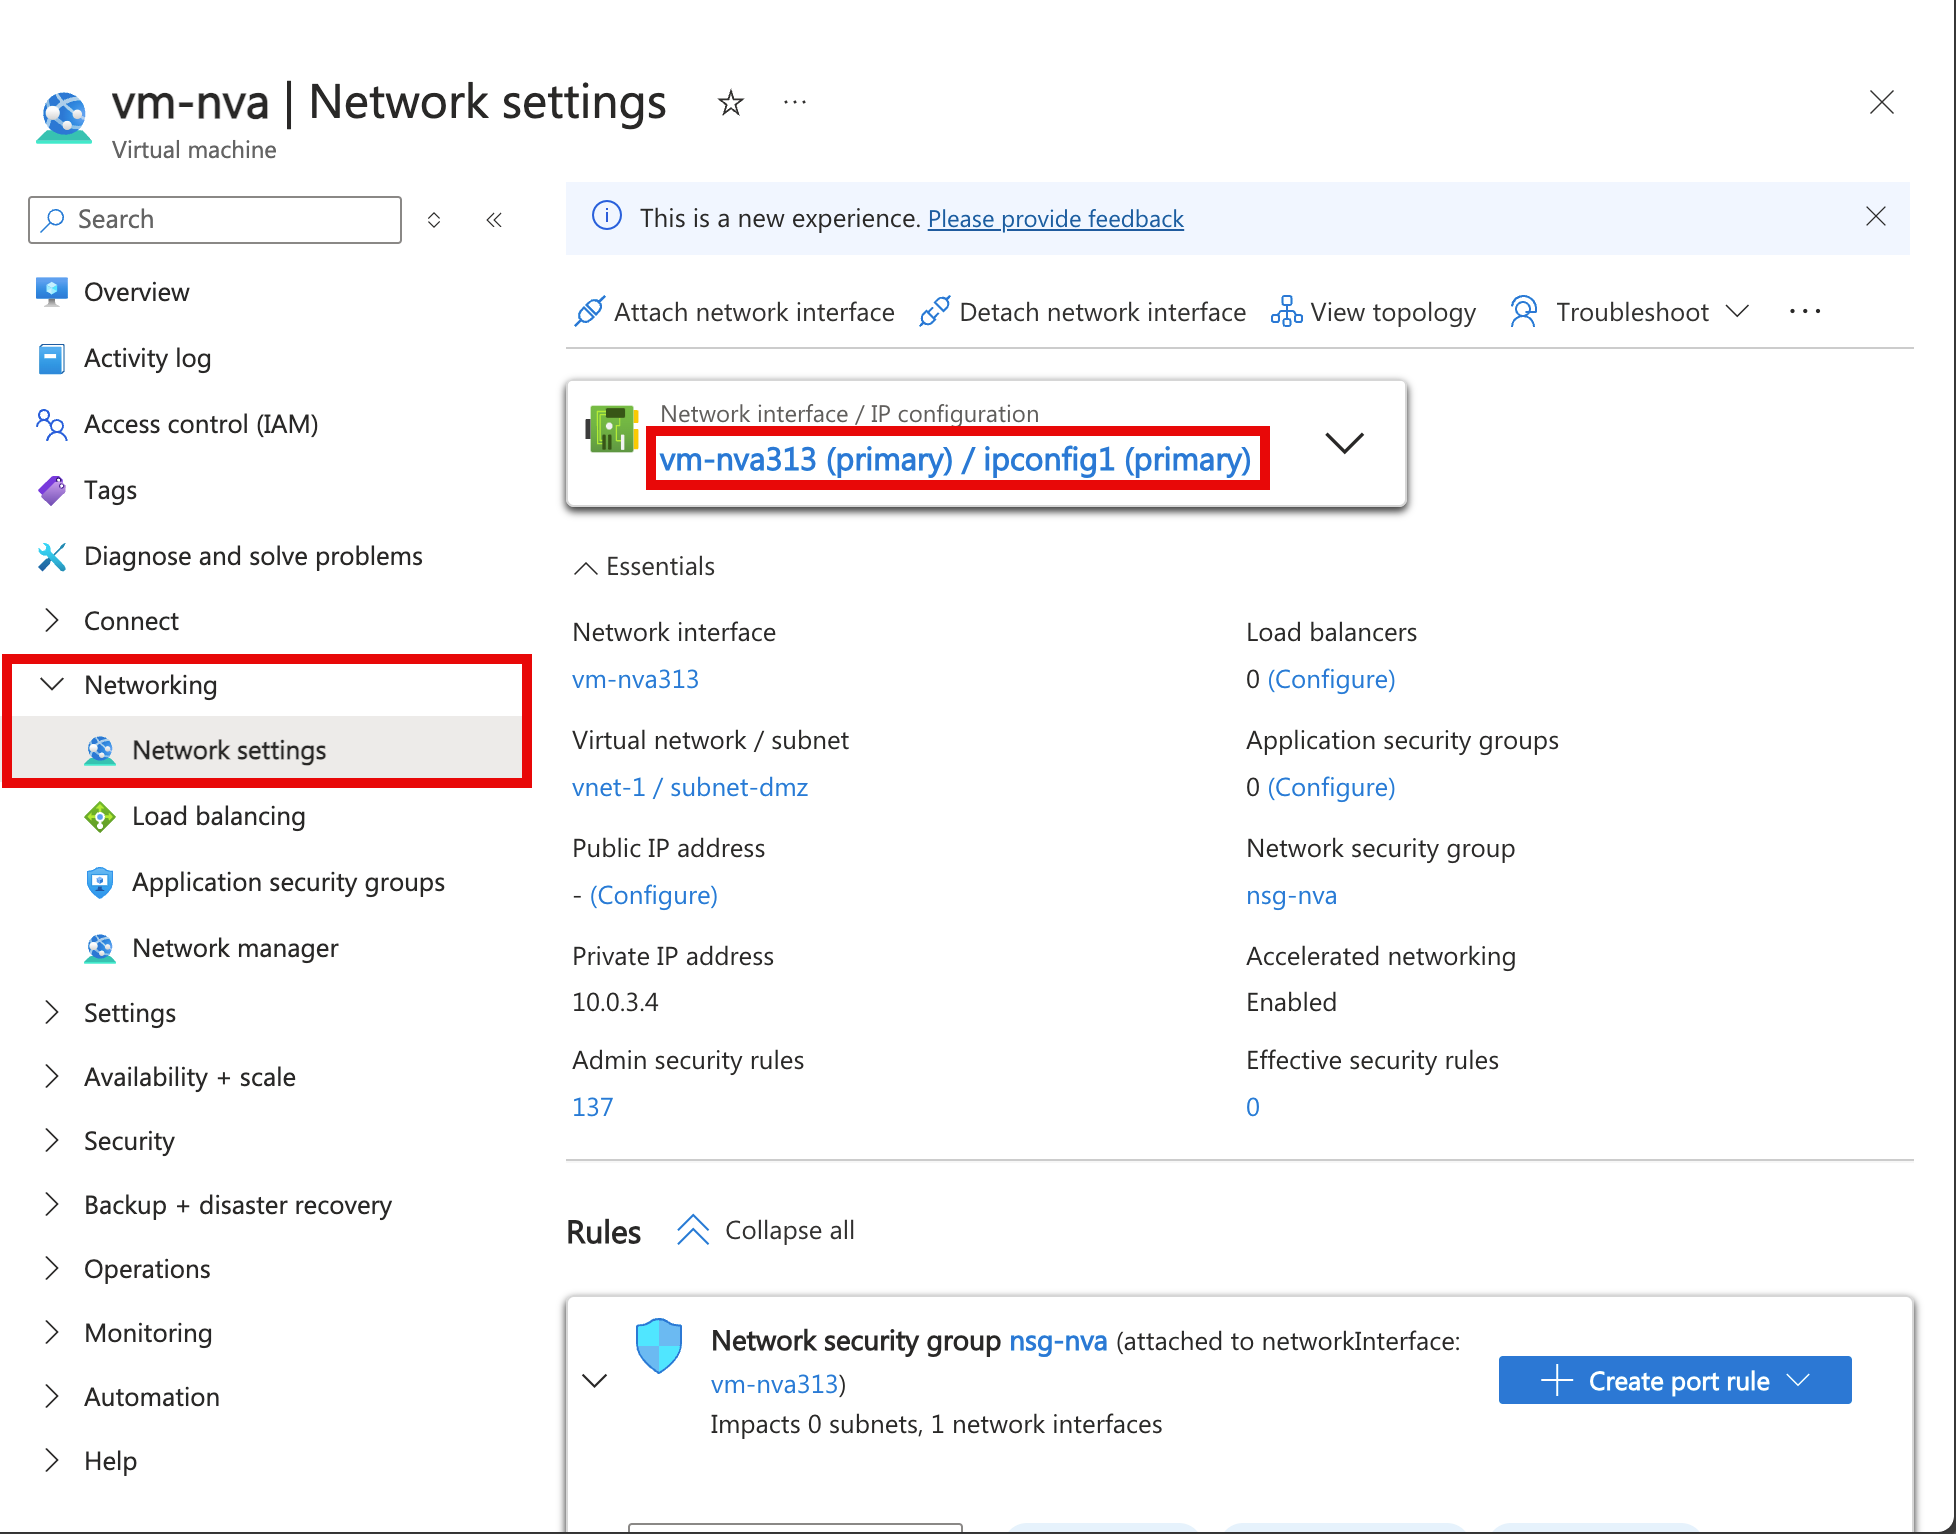
In this section, you turn on IP forwarding for the network interface of the vm-nva virtual machine.
In the search box at the top of the portal, enter Virtual machine. Select Virtual machines in the search results.
In Virtual machines, select vm-nva.
In vm-nva, expand Networking then select Network settings.
Select the name of the interface next to Network Interface:. The name begins with vm-nva and has a random number assigned to the interface. The name of the interface in this example is vm-nva313.
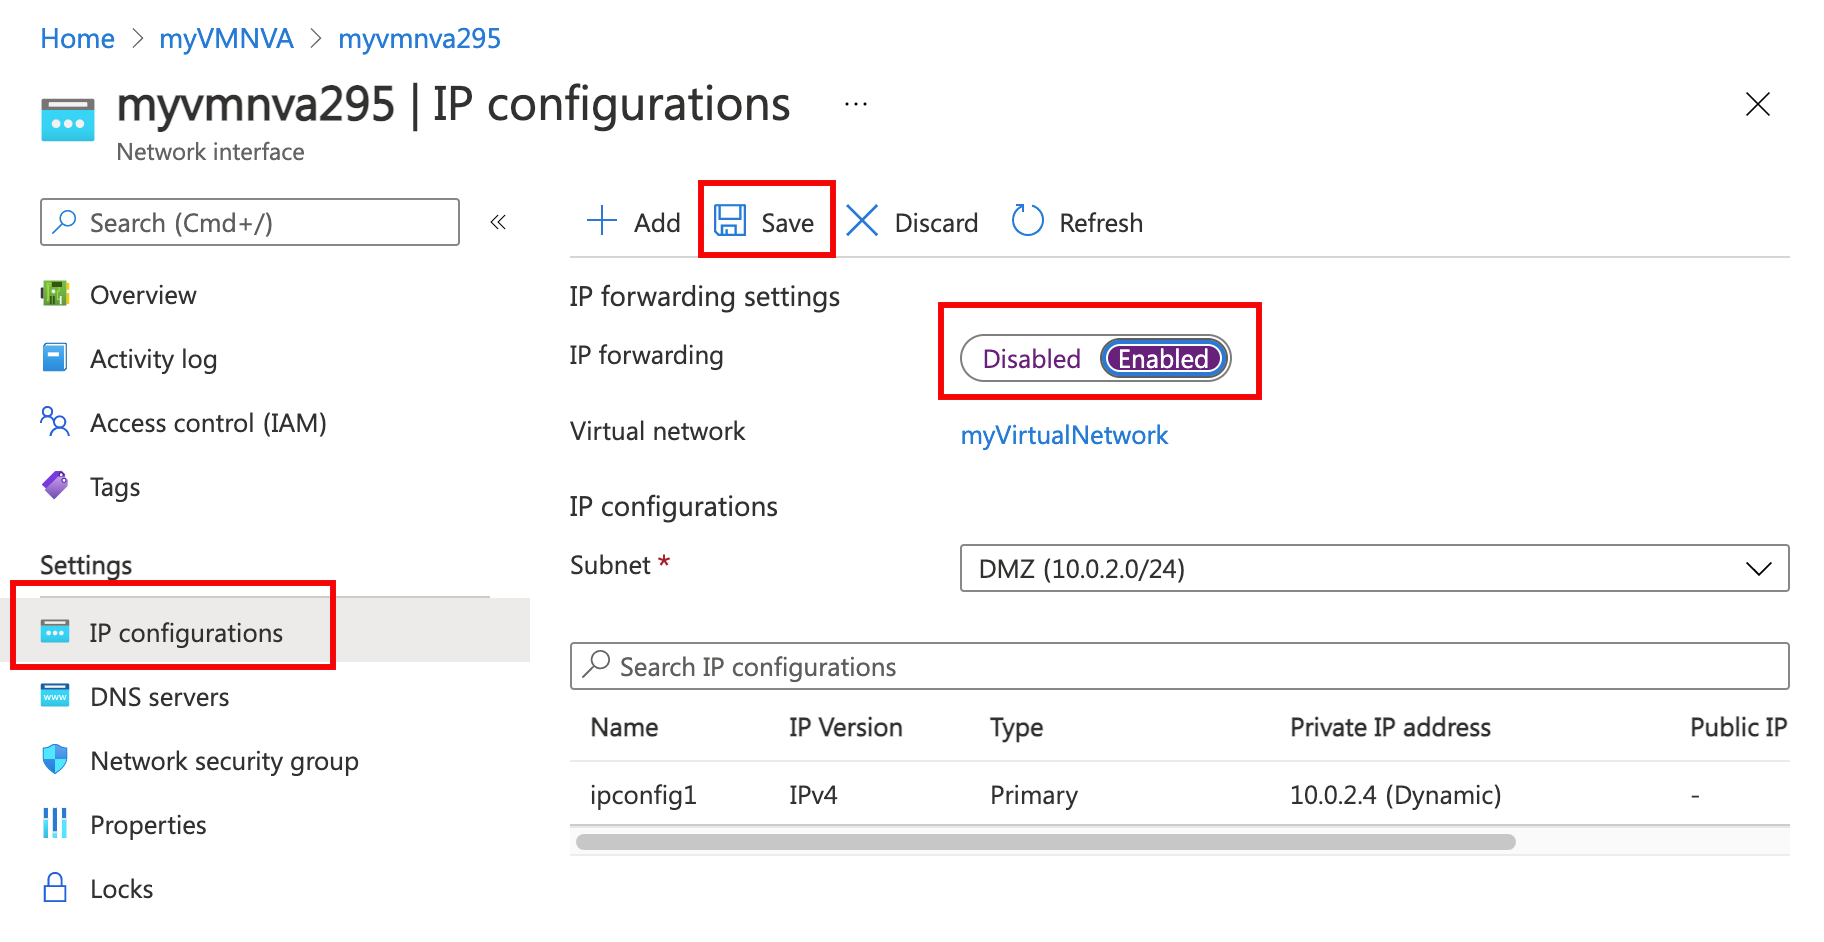
In the network interface overview page, select IP configurations from the Settings section.
In IP configurations, select the box next to Enable IP forwarding.
Select Apply.
Enable IP forwarding for the network interface of the vm-nva virtual machine with Set-AzNetworkInterface. The following example enables IP forwarding for the network interface named vm-nva313.
Enable IP forwarding for the network interface of the vm-nva virtual machine with az network nic update. The following example enables IP forwarding for the network interface named vm-nvaVMNic.
az network nic update \
    --name vm-nvaVMNic \
    --resource-group test-rg \
    --ip-forwarding true
Enable IP forwarding in the operating system
In this section, turn on IP forwarding for the operating system of the vm-nva virtual machine to forward network traffic. Use the Azure Bastion service to connect to the vm-nva virtual machine.
In the search box at the top of the portal, enter Virtual machine. Select Virtual machines in the search results.
In Virtual machines, select vm-nva.
Select Connect, then Connect via Bastion in the Overview section.
Enter the username and password you entered when the virtual machine was created.
Select Connect.
Enter the following information at the prompt of the virtual machine to enable IP forwarding:
sudo vim /etc/sysctl.conf
In the Vim editor, remove the # from the line net.ipv4.ip_forward=1:
Press the Insert key.
# Uncomment the next line to enable packet forwarding for IPv4
net.ipv4.ip_forward=1
Press the Esc key.
Enter :wq and press Enter.
Close the Bastion session.
Restart the virtual machine.
Create a route table
In this section, create a route table to define the route of the traffic through the NVA virtual machine. The route table is associated to the subnet-1 subnet where the vm-public virtual machine is deployed.
Associate the route table with the subnet-1 subnet with Set-AzVirtualNetworkSubnetConfig. The following example associates the route-table-public route table with the subnet-1 subnet.
You can see that there are two hops in the above response for tracepath ICMP traffic from vm-public to vm-private. The first hop is vm-nva. The second hop is the destination vm-private.
Azure sent the traffic from subnet-1 through the NVA and not directly to subnet-private because you previously added the to-private-subnet route to route-table-public and associated it to subnet-1.
Close the Bastion session.
Test network traffic from vm-private to vm-public
In the search box at the top of the portal, enter Virtual machine. Select Virtual machines in the search results.
In Virtual machines, select vm-private.
Select Connect then Connect via Bastion in the Overview section.
Enter the username and password you entered when the virtual machine was created.
Select Connect.
In the prompt, enter the following command to trace the routing of network traffic from vm-private to vm-public: