Workbook dropdown parameters
By using dropdown parameters, you can collect one or more input values from a known set. For example, you can use a dropdown parameter to select one of your app's requests. Dropdown parameters also provide a user-friendly way to collect arbitrary inputs from users. Dropdown parameters are especially useful in enabling filtering in your interactive reports.
The easiest way to specify a dropdown parameter is by providing a static list in the parameter setting. A more interesting way is to get the list dynamically via a KQL query. You can also specify whether it's single or multi-select by using parameter settings. If it's multi-select, you can specify how the result set should be formatted, for example, as delimiter or quotation.
Dropdown parameter components
When using either static JSON content or getting dynamic values from queries, dropdown parameters allow up to four fields of information, in this specific order:
value(required): the first column / field in the data is used as the literal value of the parameter. In the case of simple static JSON parameters, it can be as simple as the JSON content["dev", "test", "prod"], which would create a dropdown of three items with those values as both the value and the label in the dropdown. The name of this field doesn't need to bevalue, the dropdown will use the first field in the data no matter the name.label(optional): the second column / field in the data is used as the display name/label of the parameter in the dropdown. If not specified, the value is used as the label. The name of this field doesn't need to belabel, the dropdown will use the second field in the data no matter the name.selected(optional): the third column / field in the data is used to specify which value should be selected by default. If not specified, no items are selected by default. The selection behavior is based on the JavaScript "falsy" concept, so values like0,false,null, or empty strings are treated as not selected. The name of this field doesn't need to beselected, the dropdown will use the third field in the data no matter the name.Note
This only controls default selection, once a user has selected values in the dropdown, those user selected values are used. Even if a subsequent query for the parameter runs and returns new default values. To return to the default selection, the use can use the "Default Items" option in the dropdown, which will re-query the default values and apply them.
Default values are only applied if no items have been selected by the user.
If a subsequent query returns items that do not include previously selected values, the missing values are removed from the selection. The selected items in the dropdown will become the intersection of the items returned by the query and the items that were previously selected.
group(optional): unlike the other fields, the grouping column must be namedgroupand appear aftervalue,labelandselected. This field in the data is used to group the items in the dropdown. If not specified, no grouping is used. If default selection isn't needed, the data/query must still return aselectedfield in at least one object/row, even if all the values arefalse.
Note
Any other fields in the data are ignored by the dropdown parameter. It is suggested to limit the content to just those fields used by the dropdown to avoid complicated queries returning data that is ignored.
Create a static dropdown parameter
Start with an empty workbook in edit mode.
Select Add parameters > Add Parameter.
In the new parameter pane that opens, enter:
Parameter name:
EnvironmentParameter type:
Drop downRequired:
checkedAllow multiple selections:
uncheckedGet data from:
JSONor, selectQueryand select theJSONdata source.The JSON data source allows the JSON content to reference any existing parameters.
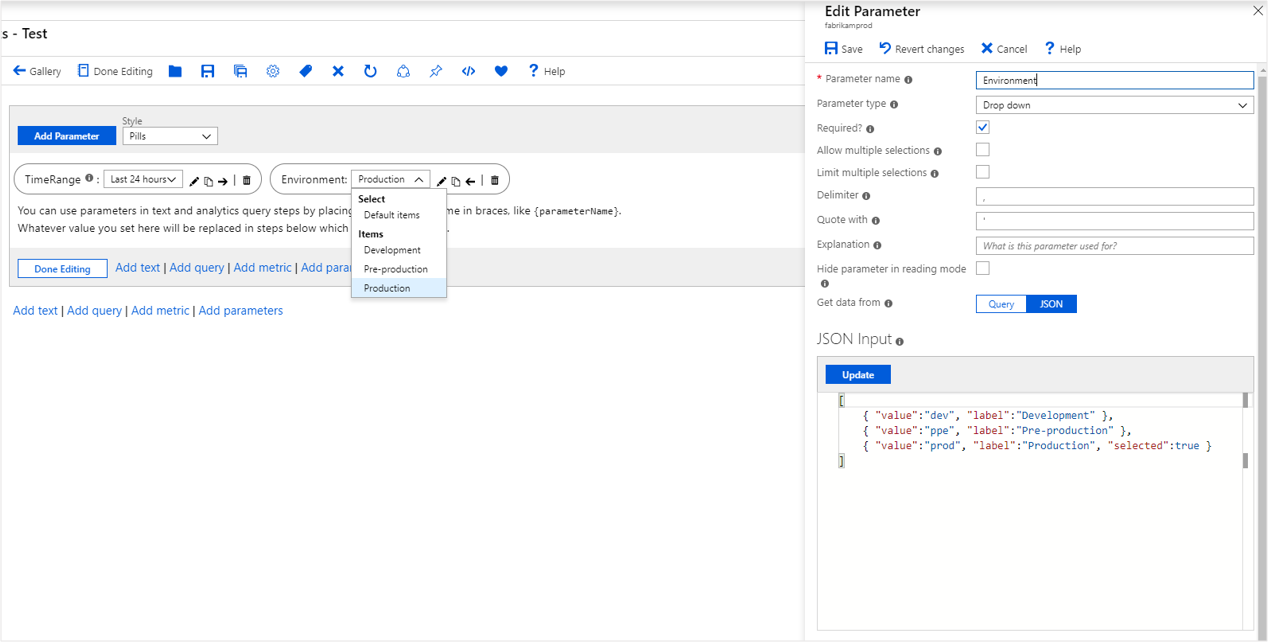
In the JSON Input text block, insert this JSON snippet:
[
    { "value":"dev", "label":"Development" },
    { "value":"ppe", "label":"Pre-production" },
    { "value":"prod", "label":"Production", "selected":true }
]
Select Update.
Select Save to create the parameter.
The Environment parameter is a dropdown list with the three values.

Create a static dropdown list with groups of items
If your query result/JSON contains a group field, the dropdown list displays groups of values. Follow the preceding sample, but use the following JSON instead:
[
    { "value":"dev", "label":"Development", "group":"Development" },
    { "value":"dev-cloud", "label":"Development (Cloud)", "group":"Development" },
    { "value":"ppe", "label":"Pre-production", "group":"Test" },
    { "value":"ppe-test", "label":"Pre-production (Test)", "group":"Test" },
    { "value":"prod1", "label":"Prod 1", "selected":true, "group":"Production" },
    { "value":"prod2", "label":"Prod 2", "group":"Production" }
]

Note
When using a group field in your query, you must also supply a value for label and selected fields.
Create a dynamic dropdown parameter
Start with an empty workbook in edit mode.
Select Add parameters > Add Parameter.
In the new parameter pane that opens, enter:
- Parameter name:
RequestName - Parameter type:
Drop down - Required:
checked - Allow multiple selections:
unchecked - Get data from:
Query
- Parameter name:
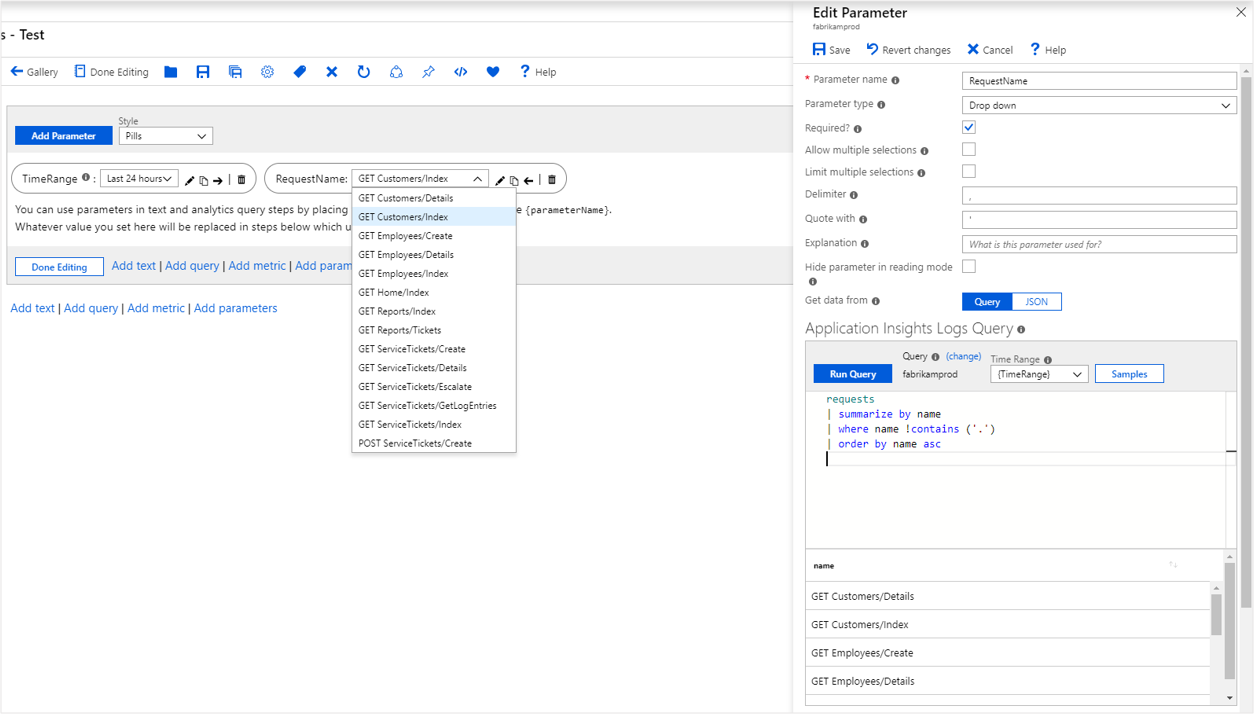
In the JSON Input text block, insert this JSON snippet:
    requests
    | summarize by name
    | order by name asc
Select Run Query.
Select Save to create the parameter.
The RequestName parameter is a dropdown list with the names of all requests in the app.

Example: Custom labels, selecting the first item by default, and grouping by operation name
The query used in the preceding dynamic dropdown parameter returns a list of values that are rendered in the dropdown list. If you want a different display name, or to allow the user to select the display name, use the value, label, selection, and group columns.
The following sample shows how to get a list of distinct Application Insights dependencies. The display names are styled with an emoji, the first item is selected by default, and the items are grouped by operation names:
dependencies
| summarize by operation_Name, name
| where name !contains ('.')
| order by name asc
| serialize Rank = row_number()
| project value = name, label = strcat('🌐 ', name), selected = iff(Rank == 1, true, false), group = operation_Name

Reference a dropdown parameter
You can reference dropdown parameters anywhere that parameters can be used, including replacing the parameter value into queries, visualization settings, Markdown text content, or other places where you can select a parameter as an option.
In KQL
Select Add query to add a query control, and then select an Application Insights resource.
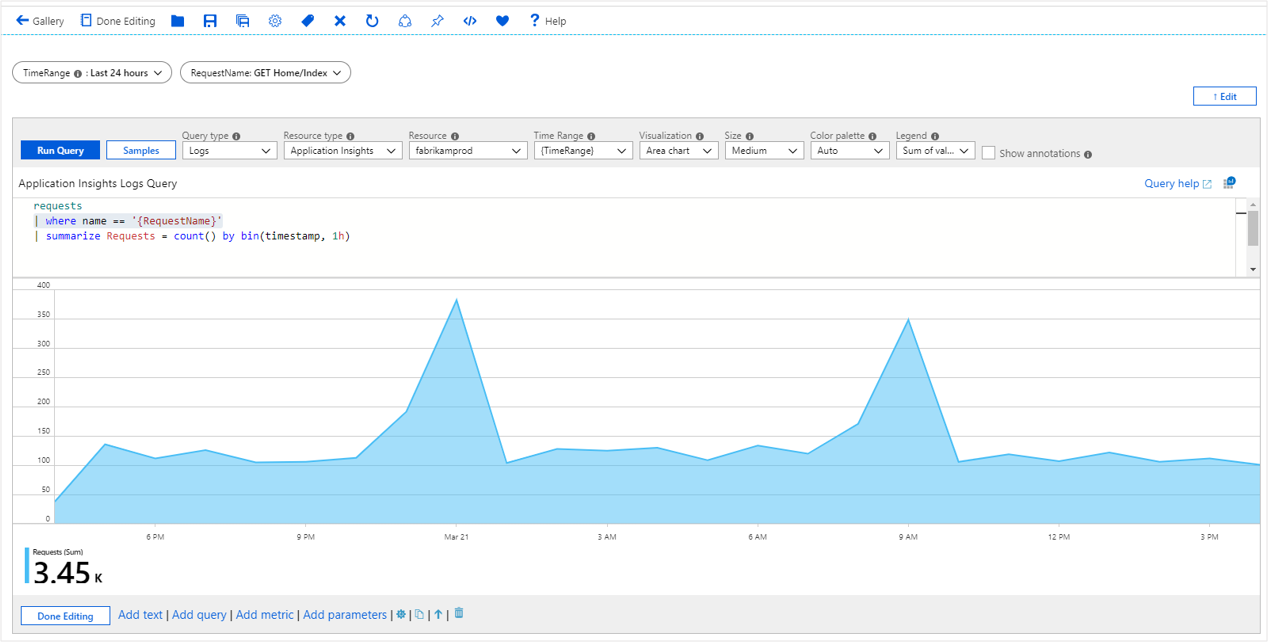
In the KQL editor, enter this snippet:
    requests
    | where name == '{RequestName}'
    | summarize Requests = count() by bin(timestamp, 1h)
The snippet expands on query evaluation time to:
    requests
    | where name == 'GET Home/Index'
    | summarize Requests = count() by bin(timestamp, 1h)
Select the Run query to see the results. Optionally, render it as a chart.

Dropdown parameter options
| Parameter | Description | Example |
|---|---|---|
{DependencyName} |
The selected value | GET fabrikamaccount |
{DependencyName:value} |
The selected value (same as above) | GET fabrikamaccount |
{DependencyName:label} |
The selected label | 🌐 GET fabrikamaccount |
{DependencyName:escape} |
The selected value, with any common quote characters replaced when formatted into queries | GET fabrikamaccount |
Multiple selection
The examples so far explicitly set the parameter to select only one value in the dropdown list. Dropdown parameters also support multiple selection. To enable this option, select the Allow multiple selections checkbox.
You can specify the format of the result set via the Delimiter and Quote with settings. By default, , (comma) is used as the delimiter, and ' (single quote) is used as the quote character. The default returns the values as a collection in the form of 'a', 'b', 'c' when formatted into the query. You can also limit the maximum number of selections.
When using a multiple select parameter in a query, make sure that the KQL referencing the parameter works with the format of the result. For example:
- a single value parameter doesn't include any quotes when formatted into a query, so make sure to include the quotes in the query itself, for example:
where name == '{parameter}'. - quotes are included in the formatted parameter when using a multiple select parameter, so make sure that the query doesn't include quotes. For example,
where name in ({parameter}).
Note how this example also switched from name == to name in. The == operator only allows a single value, while the in operator allows multiple values.
dependencies
| where name in ({DependencyName})
| summarize Requests = count() by bin(timestamp, 1h), name
This example shows the multi-select dropdown parameter at work:

Dropdown special selections
Dropdown parameters also allow you to specify special values that also appear in the dropdown:
- Any one
- Any three
- ...
- Any 100
- Any custom limit
- All
When these special items are selected, the parameter value is automatically set to the specific number of items, or all values.
Special casing All, and allowing an empty selection to be treated as All
When you select All, an additional field appears, which allows you to specify a special value for the All parameter. This is useful when "All" could be a large number of items and could generate a very large query.

In this specific case, the string [] is used instead of a value. This string can be used to generate an empty array in the logs query, like:
let selection = dynamic([{Selection}]);
SomeQuery
| where array_length(selection) == 0 or SomeField in (selection)
If all items are selected, the value of Selection is [], producing an empty array for the selection variable in the query. If no values are selected, the value of Selection is formatted as empty string, also resulting in an empty array. If any values are selected, they're formatted inside the dynamic part of the query, causing the array to have those values. You can then test for array_length of 0 to have the filter not apply or use the in operator to filter on the values in the array.
Other common examples use '*' as the special marker value when a parameter is required, and then test with:
| where "*" in ({Selection}) or SomeField in ({Selection})