Note
Access to this page requires authorization. You can try signing in or changing directories.
Access to this page requires authorization. You can try changing directories.
This article provides general information about bug check system halt errors, also known as stop code errors. The exact appearance of the stop code screen depends on the cause of the error.
Depending on your scenario, you might be interested in another article:
If you're a customer whose system is displaying a stop code error with a bug check code, see Troubleshoot stop code errors.
If you're an IT professional, you can find more information in Advanced troubleshooting for stop code errors.
If you're a programmer looking for common bug check codes displayed on the bug check screen, see the Bug check code reference.
Understand bug check system halts
When Windows encounters a condition that compromises safe system operation, the system halts. This condition is referred to as a bug check, or sometimes, a system crash, kernel error, or stop error.
Here are some example scenarios related to a bug check system halt:
If the operating system is allowed to continue to run after the integrity is compromised, data can be corrupted or the security of the system compromised.
If crash dumps are enabled on the system, a crash dump file is created.
If a kernel debugger is attached and active, the system causes a break so the debugger can be used to investigate the crash.
If no debugger is attached, a text screen appears with information about the error. This screen is called a stop code error or bug check screen.
The following example illustrates a bug check system halt condition that displays a stop code error:
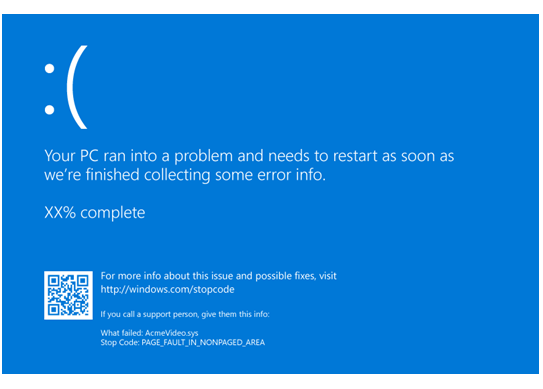
The bug check screen displays the stop code error and also the module name of the currently executing code, when it's available. The example shows the PAGE_FAULT_IN_NONPAGED_AREA stop code and the name of the executing module, AcmeVideo.sys. The stop code hex value associated with each stop code is available in Bug check code reference.
Here's an example for Windows 11, version 24H2 and later versions:

The bug check screen displays the stop code error, such as CRITICAL_PROCESS_DIED. When the module name of the currently executing code is available, the name also displays, such as rdbyss.sys.
If the system can generate a dump file, you see a display showing the percent complete as the system writes the dump file.
Troubleshoot bug checks (stop code errors)
If your computer stops working and displays a stop code error, the computer shuts down abruptly to protect itself from data loss. A hardware device, its driver, or related software might cause the error. To learn more about the information displayed, such as the faulting driver name, see Analyze bug check stop code error data.
The following table provides general troubleshooting tips for Windows bug check codes.
| Scenario | Troubleshooting tips |
|---|---|
| New device drivers or system services | Remove or update any recently added device drivers or system services. Identify any recent system configuration changes that might cause a new bug check code. |
| Faulty devices or drives | Open Windows Device Manager and check for devices marked with the exclamation point (!). Review the events log displayed in the driver properties. Look for any faulting driver and update the related driver. |
| New hardware | Remove or replace any recently added hardware. Check with the manufacturer to see if any patches are available. |
| Other hardware issues | Run the hardware diagnostics supplied by the system manufacturer. |
| Critical errors in system log | Check the system log in the Event Viewer for error messages. Look for content that might help pinpoint the device or driver that's causing the error. Check for critical errors in the system log that occurred in the same time frame as the stop code error. |
| Memory errors | Run the Windows Memory Diagnostics tool to test the memory. In the Window Control Panel, search for Memory, and then select Diagnose your computer's memory problems. After the test runs, use Event Viewer to see the results under the system log. Look for the MemoryDiagnostics-Results entry and view the results. |
| Hardware incompatibility | Confirm any recently installed hardware is compatible with the installed version of Windows. For example, you can get information about required hardware at Windows 10 specifications. |
| Virus or system corruption | Run a virus detection program. Viruses can infect all types of hard disks formatted for Windows. The resulting disk corruption can generate system bug check codes. Check the Master Boot Record for infections with the virus detection program. |
| File system errors | Use the Scan disk utility to confirm there are no file system errors. Right-click the drive to scan and select Properties > Tools > Check now. |
| Missing or corrupted files | Use the System File Checker tool to repair missing or corrupted system files. This Windows utility allows users to look for corruptions in Windows system files and then restore corrupted files. Use the SFC /scannow command to run the System File Checker tool (SFC.exe). For more information, see Use the System File Checker tool to repair missing or corrupted system files. |
| Insufficient free space | Confirm sufficient free space on the hard drive. The operating system and some applications require sufficient free space to create swap files and perform other functions. Based on the system configuration, the exact requirement varies, but it's a good idea to have 10% to 15% of free space available. |
| Outdated software | Verify the system has the latest Service Pack installed. To detect which Service Pack is installed on your system, select Start > Run, enter winver, and select OK. The About Windows dialog opens showing the Windows version number and the version number of the Service Pack, if any is installed. |
| Outdated BIOS or firmware | Check with the manufacturer to see if an updated system BIOS or Unified Extensible Firmware Interface (UEFI) firmware is available. |
| Hardware connection problems | For computers, make sure all expansion boards are properly seated and all cables are properly connected. |
Use Safe Mode
When you remove or disable any components during troubleshooting, it's a good practice to run in Safe Mode.
Safe Mode loads only the minimum required drivers and system services during the Windows startup.
To enter Safe Mode, go to Control Panel > Settings and select Update and Security.
To boot to maintenance mode, select Recovery > Advanced startup.
At the next menu, select Troubleshoot > Advanced Options > Startup Settings > Restart.
After Windows restarts to the Startup Settings screen, select option 4, 5, or 6 to boot to Safe Mode.
Safe Mode might be available by pressing a function key on boot, for example F8. Refer to information from the manufacturer for specific startup options.