Note
Access to this page requires authorization. You can try signing in or changing directories.
Access to this page requires authorization. You can try changing directories.
When a Cloud PC is in a grace period, the user can continue using the Cloud PC for seven days. After the seven-day grace period expires, the user is logged off the Cloud PC. They’ll lose access and the Cloud PC will be deprovisioned.
There may be situations where you don't want to wait seven days for the grace period to end normally. In this case, you can use the End grace period option to immediately end the grace period.
End grace period
Ending the grace period is a destructive action. Before ending the grace period, notify your users to be sure that they're fully aware of the impact.
Sign in to the Microsoft Intune admin center, select Devices > All Cloud PCs.
In the Status column of the list, select In grace period > Deprovision now > Yes.
Important
This is a destructive act. It will delete the operating system and data. The Cloud PC will no longer be available.
After you select Yes, the following steps will happen automatically:
- The Cloud PC will start deprovisioning.
- The user loses access to the Cloud PC.
- The operating system and data are deleted from the Cloud PC. The Cloud PC is no longer available.
- If the original provisioning policy was replaced with a different policy, the Cloud PC will be reprovisioned with the settings in the new policy.
Bulk deprovision (Public Preview)
Windows 365 Enterprise Cloud PCs and Flex Cloud PCs created in Dedicated mode that are in grace period can be deprovisioned in bulk. Any data saved to individual Cloud PCs is removed and the user is no longer able to access the Cloud PC. There are two ways to initiate bulk deprovisioning. One is through the provisioning policy view and the other is through Intune's Bulk Action Wizard.
Tip
Ensure all Cloud PCs you select are in grace period. The Deprovision action may be blocked if a provisioned Cloud PC is selected. This does not apply for Reserve Cloud PCs. For further details see Manage W365 Reserve.
Provisioning Policy View
Deprovisioning is a destructive action. Before deprovisioning, notify your users to be sure that they're fully aware of the impact.
Sign in to the Microsoft Intune admin center, select Devices > scroll down to Manage W365 Cloud PCs section > select Provision Cloud PCs.
Search or select an Enterprise of Flex Dedicated provisioning policy >head to the Devices tab > select Cloud PCs in grace period.
Click Deprovision from the actions bar above. If you select multiple Cloud PCs, it will automatically redirect you to the Bulk Action Wizard.

Select Next to view the devices you have selected to deprovision > then click Next to view the Review + Create tab.
Once the Create button is pressed, the Cloud PCs will be deprovisioned, all data will be lost and the action cannot be undone.
Intune Bulk Action Wizard
Deprovisioning is a destructive action. Before deprovisioning, notify your users to be sure that they're fully aware of the impact.
Sign in to the Microsoft Intune admin center, select Devices > select All devices section > click Bulk device actions.
In the Basics tab, select Windows as the OS, Cloud PCs as Device type, and Deprovision as your action.
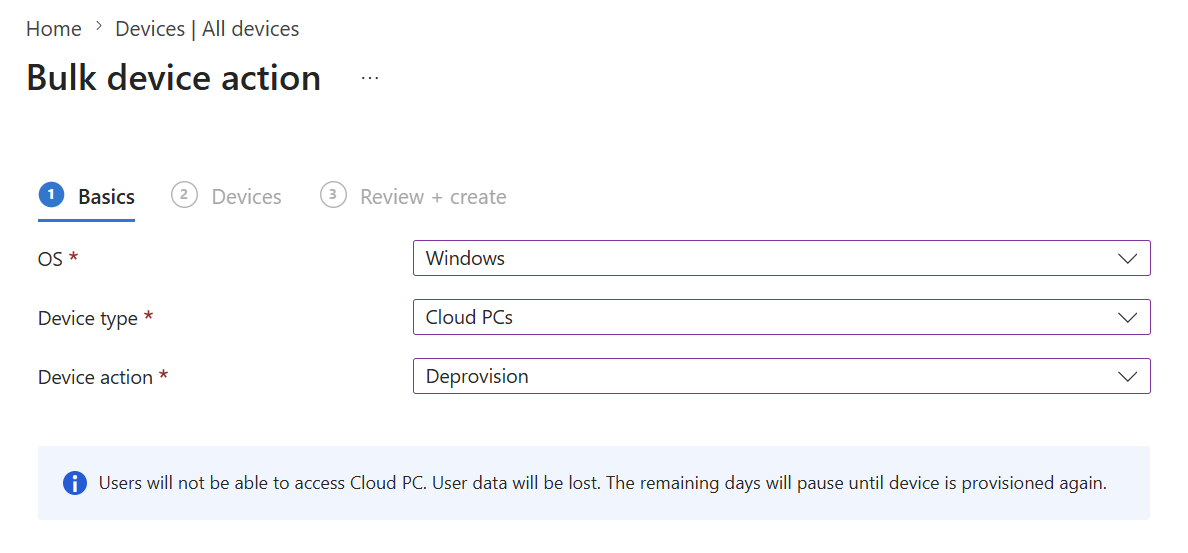
After clicking Next, you may select individual devices or devices targeted to a specific user group. Click Add devices to begin selecting. Note only Enterprise or Flex Dedicated Cloud PCs in grace period and Reserve Cloud PCs will appear.
Select Next to view the devices you have selected to deprovision > then click Next to view the Review + Create tab.
Once the Create button is pressed, the Cloud PCs will be deprovisioned, all data will be lost and the action cannot be undone.
Next steps
For more information on grace periods, see Device management overview for Cloud PCs.