Note
Access to this page requires authorization. You can try signing in or changing directories.
Access to this page requires authorization. You can try changing directories.
The AI cost query is a custom flexible (person-level) query template. It lets you extract Copilot credit consumption data - the same metrics that power the AI Cost Dashboard - at the PersonId, ServiceId and Date level, and deliver it through any of the standard query output channels, like .csv download, Power BI connection, or Azure Data Lake.
Note
This template doesn't include any prebuilt Power BI report. Analysts who want a ready-made report can use the existing AI Cost Dashboard.
To run an AI cost query, follow these five basic steps:
- Set up your query.
- Review the pre-selected metrics.
- Add conditions and condition groups.
- Select HR attributes.
- Run your query.
1. Set up your query
In the Viva Insights web app, on the left, select Create analysis. Select Create custom query, then select AI cost query.
Tip
You can also set up your query using Microsoft 365 Copilot. Learn how.
The following steps below are optional. Default values are described below. Under Query setup:
Name your query. Queries are assigned a default name, which follows this format: query type, user ID, date, and time. Make sure the name is unique.
Select a Time period. Choose the range your query analyzes (auto, past N periods, or a custom date range).
Note
The most recent credit consumption data is available up to one to two days before the current date.
Set Auto-Refresh. When turned on, your query runs automatically and refreshes whenever a new, complete set of data becomes available, based on the aggregation type (Group by) you selected (daily, weekly, or monthly).
Type a Description.
Set how the query is grouped. Source data is PersonId, ServiceId, and MetricDate (one row per person, per service, per day). By default, AI cost queries are grouped by week. To change this to day or month, select More Settings under the Description box.
2. Review the preselected metrics
Unlike a standard person query, the metric set for the AI cost query is preselected. These consumption metrics are automatically added on every run. Learn more about the metric definitions.
| Metric | Type |
|---|---|
| Total Copilot Credits used | number |
| Session count | number |
| User limit | number |
| Spending policy limit | number |
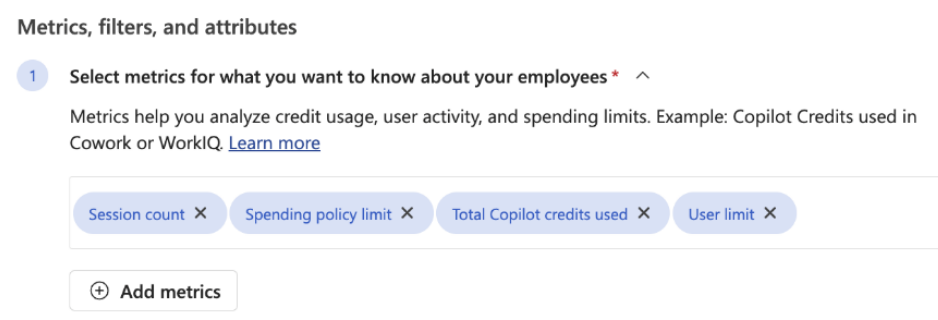
You can't add other metric categories. To remove a metric, select the "X" on it.
3. Add conditions and condition groups
Using conditions and condition groups, add one or more filters to narrow the population your query analyzes. You can filter using HR attributes or you can filter on a particular service.
Note
The default conjunction for conditions and condition groups is "and." To select "or" instead, use the dropdown menu.
4. Select HR attributes
Select the Select attributes button, then use the checklist to add HR attributes to each output row (for example, Organization, Level, Function, Region). When you're done, select Add to query.
The HR attribute set isn't fixed. The people metadata output file includes one column per attribute you select, so the file's columns vary from query to query. Selecting fewer attributes keeps your output file smaller.
Note
Two columns are always included in the people metadata file and can't be removed: PeopleHistoricalId (the join key to the activity file) and IsCopilotLicensed. Spending policy details (SpendingPolicyId, SpendingPolicyLimit) are part of the activity file, not the people metadata file.
Output files
Each run produces a single .zip file containing two .csv files (one activity file and one people metadata file), UTF-8, comma-separated, with a header row on every file.
File-name format
Daily:
AI_cost_query_day_metric_MonthDay_Year_Time.zip(for example,Cost_Management_day_metric_Jun16_2026_0905Hours.zip)Weekly:
AI_cost_query_week_metric_MonthDay_Year_Time.zipMonthly:
AI_cost_query_month_metric_MonthDay_Year_Time.zip
File 1 - Activity file (PersonServiceCreditsMetrics)
One row per PersonId, ServiceId, and MetricDate.
| Column | Type | Description |
|---|---|---|
| PersonId | string | Unique identifier for the user |
| ServiceId | string | Unique identifier for the service |
| ServiceName | string | Display name of the service |
| SpendingPolicyId | string | Identifier of the spending policy in effect for the user on MetricDate |
| MetricDate | date | Day of consumption (UTC) |
| Session count | number | Number of sessions for the PersonId and ServiceId interaction on MetricDate |
| Spending policy limit | number | Budget limit set at the spending-policy level |
| Total Copilot Credits used | number | Credits consumed by PersonId and ServiceId on MetricDate |
| User limit | number | Per-user limit on MetricDate |
| PeopleHistoricalId | string | Join key to the people metadata file |
File 2 - People metadata file (PeopleMetaData)
One row per person. Columns vary based on the HR attributes you selected during setup, plus the default columns below.
| Column | Type | Description |
|---|---|---|
| PeopleHistoricalId | string | Join key to the activity file |
| IsCopilotLicensed | boolean | Whether the user has a Microsoft 365 Copilot license |
| <HR attribute 1...N> | string | One column per HR attribute selected during setup (for example, Organization, Level, Function, Region) |
5. Run the query
Select Run in the screen's upper right to run the query.
After your query runs, access its results on the Analysis results page, where you can download the .zip output, copy the connection link for Power BI or Azure Data Lake, and edit or clone your query. Learn more.
Example AI cost query for credit consumption by team
Let's say you want to see which teams and services are consuming the most Copilot credits over the last month, broken out by day. You want to:
- Analyze your company's "West" organization only.
- Analyze Copilot Cowork credit usage only.
- See data for the last month, grouped by day.
- Include each person's Organization and Level in the output.
Here's how you might do that:
Set up your query.
- Query name: Enter something like "AICost_West_Daily".
- Time period: Select Last 1 month.
- Auto-Refresh: Select run once.
- More settings: Next to Group by, select Day.
Review the pre-selected metrics. The credit usage metrics are already added. Leave them as is.
Specify the population. Select Add condition, then select Organizational data. Select Organization, then next to operator select = and select West. Then add a second condition where you select ServiceName = Cowork.
Select HR attributes. Select Select attributes, choose Organization and Level, then select Add to query.
Run the query. Select Run. After it runs, download the .zip file from the Downloads column on the Analysis results page.