Person-to-group queries
Important
This article is for the legacy Workplace Analytics app and does not reflect functionality available on the updated Viva Insights platform. Access current documentation for Viva Insights advanced insights here: advanced insights documentation.
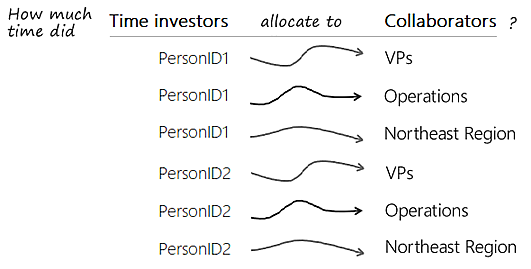
Person-to-group queries help you understand how an individual invests their time across the rest of the organization and beyond. The query results list individuals ("time investors") by their PersonIDs (de-identified), one or more groups that you define in the query ("their collaborators"), and the amount of time that the time investor spends with the groups that you define.

Note
Because individuals are assigned a randomly generated PersonID to maintain de-identification, there is no way to identify an individual in the output of a query.
Overview of time allocation
An understanding of time allocation helps you create better person-to-group queries. The details of time allocation can be complicated. Here is a summary of the basic concepts:
- Time allocation measures how individuals spent their time. For each interaction (a meeting attended or an email sent or received), the total time that a person spent on the interaction is divided among the other groups that participated.
- A time investor allocates their time among the other participants in the interaction (the collaborators) in proportion to how many people are in the collaborator group for that interaction.
- A person-to-group query can analyze time allocation only for employees in the population of measured employees, namely those who are licensed for Viva Insights. People who do not have a license for Viva Insights can appear as collaborators, but never as time investors.
- The time-allocation approach assumes that time investors allocate time only to themselves if no other groups are participating in the meeting or email.
Create a person-to-group query
While setting up a person-to-group query differs from setting up meeting or group-to-group queries, some of the options you set, such as for time-period aggregation, time range, and meeting-exclusion rules, are the same as for the other query types. To set up a person-to-group query, follow these steps:
To create a person-to-group query
In Analyze > Query designer, select Get started under Query.
Select Person-to-group, and then select Enter query name here and name the query and enter a description for it.
For Group by, select a time-grouping option -- day, week, or month.
Select a date range. The query will analyze only those person-to-group interactions that took place during this date range.
Select a set of meeting exclusions to ignore (filter out) specific meetings for this query.
In the Select metrics section, select one or more metrics that measure interactions between the time investors and collaborators, including:
- Collaboration hours gives you the total amount of time that an individual spent with collaborating groups. This includes both time spent working in emails and time spent in meetings.
- Email count and Email hours give you, respectively, the number of emails that were sent between the time investor and groups, and the amount of time the time investor spent sending and reading emails.
- Meeting count and Meeting hours give you, respectively, the number of meetings in which the time investor and the collaborators participated, and the number of hours the time investor spent in meetings.
- Network size The number of people in the collaborator group who had at least two meaningful interactions in the last four weeks with the time investor.
For more information about these metrics, see Person-to-group metrics.

In the following sections, you can group both the time investors and the collaborators. For example, you could analyze how senior leaders allocated time across different organizations by setting the time investors' group to “level” and the collaborators' group to “organization.”
In the Time investors section, for Employees, select whether you want Active only, Inactive only, or All employees included in the query. Active employees send at least one email or instant message during the unit of time—day, week, or month—defined by the query’s Group by setting.
In the Time investors section, you can optionally add filters to exclude specific time investors from the query. For example, if you specify FunctionType > Equals > Account Management, the query results will only include time investors in Account Management.

In the Their collaborators section, you can add employee filters to exclude specific collaborators, such as by Domain, FunctionType, or Organization.

At this point, the collaborators are not grouped, therefore the query results won't show which collaborators interacted with the time investors. To group the collaborators, answer the question How do you want to group the people who collaborated with the time investors? to show which groups interacted with them. You can also combine groups of collaborators for the purpose of isolating other specific groups who interacted with the time investors.

In the Organizational data section, you can select what data columns to include in the output (.csv) file. Select Clear all to clear the selected columns, and then select which columns you want to include from the list. Use Select all to include all columns, which is the default.
Select Run at the top right to run the query.
In Query designer > Results, the query status shows as Submitted. After the query status changes to Succeeded, you can view it, share it, download it (in .csv file format), delete it, or Copy an OData link to use in a visualization tool, such as Power BI or Excel.