Exercise - Customize lists with command set extensions
- 16 minutes
In this exercise, you'll create a SharePoint Framework (SPFx) command set extension that will display custom buttons in a SharePoint list.
Prerequisites
Important
In most cases, installing the latest version of the following tools is the best option. The versions listed here were used when this module was published and last tested.
- Node.js v22.*
- Gulp-cli v3.*
- Yeoman v5.*
- Yeoman Generator for SharePoint v1.21.1
- Visual Studio Code
Create a new SharePoint Framework project
Open a command prompt and change to the folder where you want to create the project.
Run the SharePoint Yeoman generator by executing the following command:
yo @microsoft/sharepoint
Use the following to complete the prompt that is displayed (if more options are presented, accept the default answer):
- What is your solution name?: SPFxCommandSet
- Which type of client-side component to create?: Extension
- What type of client-side extension to create?: ListView Command Set
- What is your Command Set name?: CommandSetDemo
After provisioning the folders required for the project, the generator will install all the dependency packages by running npm install automatically. When npm completes downloading all dependencies, open the project folder in Visual Studio Code.
Define the command set buttons
The first step to create a command set extension is to define the buttons. Buttons are defined in the component's manifest file.
Locate and open the ./src/extensions/commandSetDemo/CommandSetDemoCommandSet.manifest.json file. Replace the existing items property with the following JSON:
"items": {
  "ONE_ITEM_SELECTED": {
    "title": { "default": "One Item Selected" },
    "iconImageUrl": "icons/request.png",
    "type": "command"
  },
  "TWO_ITEM_SELECTED": {
    "title": { "default": "Two Items Selected" },
    "iconImageUrl": "icons/cancel.png",
    "type": "command"
  },
  "ALWAYS_ON": {
    "title": { "default": "Always On" },
    "iconImageUrl": "icons/cancel.png",
    "type": "command"
  }
}
Update the command set code
After defining the buttons, the next step is to write the code that implements the extension.
Locate and open the ./src/extensions/commandSetDemo/CommandSetDemoCommandSet.ts file. Locate the interface ICommandSetDemoCommandSetProperties and update its members to the following code:
messagePrefix: string;
Locate the method onInit() in the CommandSetDemoCommandSet class and replace its contents with the following code. This code controls what happens when the extension is initialized.
Log.info(LOG_SOURCE, 'Initialized CommandSetDemoCommandSet');

const one_item_selected: Command = this.tryGetCommand('ONE_ITEM_SELECTED');
one_item_selected.visible = false;

const two_item_selected: Command = this.tryGetCommand('TWO_ITEM_SELECTED');
two_item_selected.visible = false;

this.context.listView.listViewStateChangedEvent.add(this, this._onListViewStateChanged);

return Promise.resolve();
Locate the event handler _onListViewStateChanged in the CommandSetDemoCommandSet class and replace its contents with the following code. This code will show or hide two of the buttons depending on the number of items selected in the list.
Log.info(LOG_SOURCE, 'List view state changed');

const one_item_selected: Command = this.tryGetCommand('ONE_ITEM_SELECTED');
if (one_item_selected) {
  one_item_selected.visible = this.context.listView.selectedRows?.length === 1;
}
const two_item_selected: Command = this.tryGetCommand('TWO_ITEM_SELECTED');
if (two_item_selected) {
  two_item_selected.visible = this.context.listView.selectedRows?.length === 2;
}

// You should call this.raiseOnChange() to update the command bar
this.raiseOnChange();
Locate the method onExecute() in the CommandSetDemoCommandSet class and replace its contents with the following code. This code controls what happens when custom button is selected.
/* eslint-disable @typescript-eslint/no-floating-promises */
switch (event.itemId) {
  case 'ONE_ITEM_SELECTED':
    Dialog.alert(`${this.properties.messagePrefix} ONE_ITEM_SELECTED command checked; Title = ${event.selectedRows[0].getValueByName('Title')}`);
    break;
  case 'TWO_ITEM_SELECTED':
    Dialog.alert(`${this.properties.messagePrefix} TWO_ITEM_SELECTED command checked; Title = ${event.selectedRows[event.selectedRows.length-1].getValueByName('Title')}`);
    break;
  case 'ALWAYS_ON':
    Dialog.alert(`${this.properties.messagePrefix} ALWAYS_ON command checked. Total selected: ${event.selectedRows.length}`);
    break;
  default:
    throw new Error('Unknown command');
}
/* eslint-enable @typescript-eslint/no-floating-promises */
Update the deployment configuration
When command sets are deployed, they add a new custom action linked to the script in the command set's bundle file.
Locate and open the ./sharepoint/assets/elements.xml file. Update the ClientSideComponentProperties property on the <CustomAction> element, setting the values on the public properties on the command set:
ClientSideComponentProperties="{"messagePrefix":"[command_set_prefix]"}"
Test the command set
In a browser, navigate to a SharePoint Online site collection where you created the Work Status list in the previous exercise. Select the Site contents link in the left-hand navigation. Select the Work Status list:

To test the extension, you need to modify the serve.json configuration file. Open the ./config/serve.json file. Locate the serveConfigurations.default.pageUrl property. It's currently configured with a placeholder URL.
"pageUrl": "https://{tenantDomain}/SitePages/myPage.aspx",
The {tenantDomain} string is replaced automatically by the gulp serve task using an environment variable on your workstation. Set the environment variable SPFX_SERVE_TENANT_DOMAIN to the domain of your hosted SharePoint Online site you want to use for testing.
Tip
Learn more how to set environment variables on your development platform of choice:
Windows: set (environment variable) macOS: Use environment variables in Terminal on Mac Setting the SharePoint Framework Hosted Workbench Test Site
Update the remaining part of the URL with path to the AllItems.aspx page for the list you created in the previous exercise. For example, if you have a developer site with the homepage URL of https://contoso.sharepoint.com/sites/DeveloperSite/Lists/Work%20Stsatus/AllItems.aspx, update all pageUrl properties in this file to include the path to this page like the following:
"pageUrl": "https://{tenantDomain}/sites/DeveloperSite/Lists/Work%20Stsatus/AllItems.aspx",
Locate the serveConfigurations.default.customActions.properties object.
Change the value of the properties object to the following JSON:
"properties": {
  "messagePrefix": "[command_set_prefix]"
}
Run the project by executing the following command:
gulp serve
When prompted, select the Load debug scripts button.
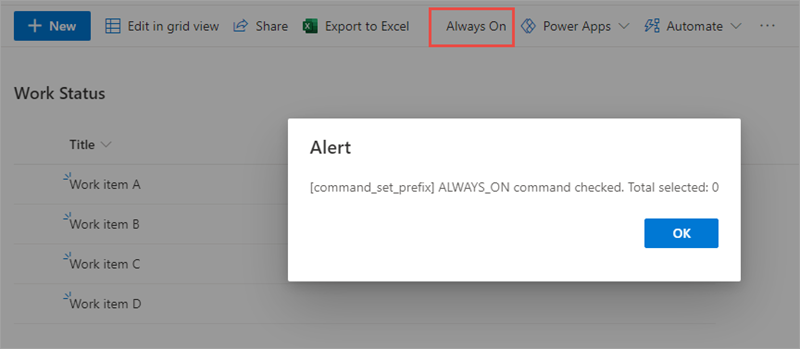
You'll see a new button in the toolbar after the page loads. When you select the Always On button, a dialog shows a message and the number of items selected. If the buttons don't appear, go back to the command prompt, wait for the reload to finish, and then refresh.
Select one item in the list. Notice a new button appears. Select the button and notice how the dialog has changed:

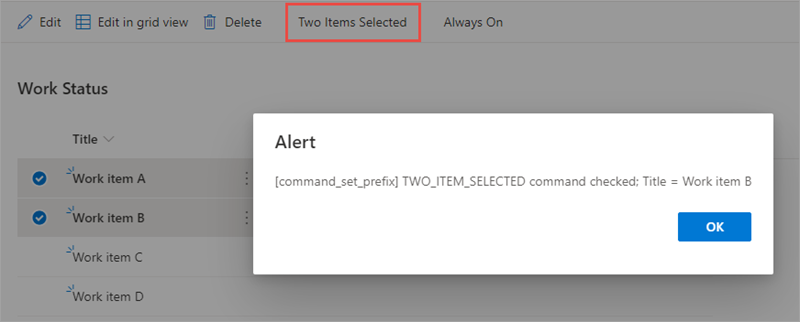
Select a second item in the list. Notice a new button appears. Select the button and notice how the dialog has changed:
Stop the local web server by pressing CTRL+C in the command prompt.
Summary
In this exercise, you created a SharePoint Framework (SPFx) command set extension that displays custom buttons in a SharePoint list.