Understand the data movement tools available
REST endpoint is a useful resource to import data to Azure SQL Database. However, other tools for data movement include Azure Data Factory (ADF), Bulk Copy Program (BCP), SQL Server Import and Export Wizard, and scripts in Azure CLI and PowerShell. These tools offer various options for data movement, each suitable for different scenarios.
In this unit, we will see step-by-step examples for some of these tools, while others will be explained in detail.
Use SQL Data Sync to synchronize data
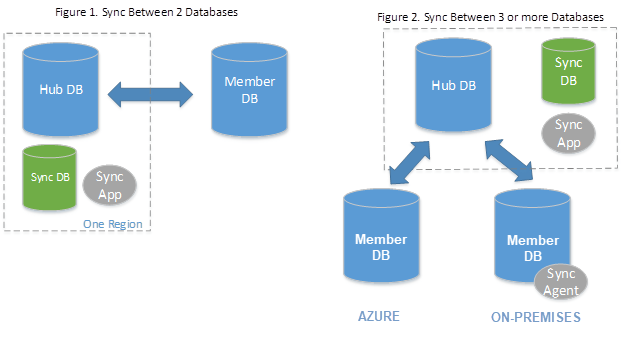
SQL Data Sync is a feature in Azure SQL Database that allows you to synchronize data across multiple databases, both in the cloud and on-premises. This capability is essential for maintaining data consistency and enabling hybrid cloud scenarios. SQL Data Sync is a service built on Azure SQL Database that lets you synchronize selected data bi-directionally across multiple databases. It uses a hub-and-spoke topology, where one database acts as the hub and others as members. The hub database must be an Azure SQL Database, while member databases can be either Azure SQL Databases or SQL Server databases.
Setting up SQL Data Sync
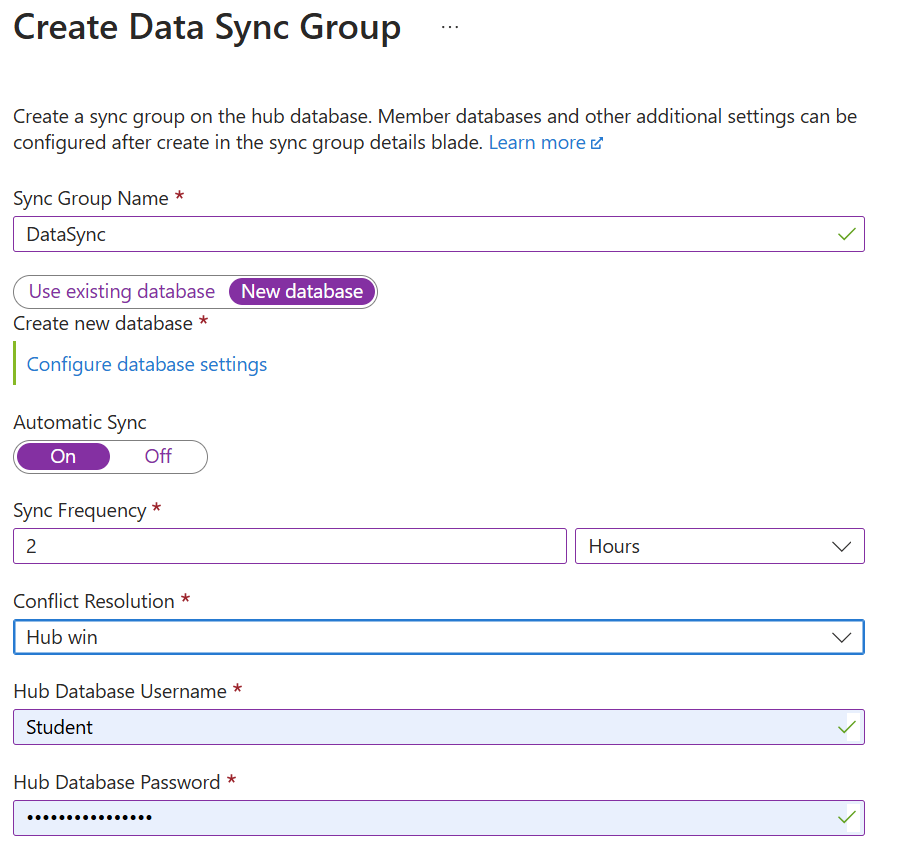
Create a sync group: To set up data synchronization, sign in to the Azure portal and navigate to your Azure SQL Database. Under the Data management section, select Sync to other databases. Then, select New Sync Group and configure the sync group settings, including the sync group name and the sync metadata database.
Add sync members: To add the databases you want to synchronize, you can include other Azure SQL Databases or on-premises SQL Server databases. For on-premises databases, you need to install and configure a local sync agent.
Configure sync settings: To define the sync schema, specify the tables and columns to synchronize. Set the sync direction (bi-directional, hub-to-member, or member-to-hub) and the sync frequency. Finally, choose a conflict resolution policy (hub wins or member wins) to handle data conflicts.
Monitor and manage sync: To monitor sync status and logs, use the Azure portal. Check for any synchronization errors and resolve them as needed.
Use Azure Data Factory to manipulate data in Azure SQL Database
Azure Data Factory (ADF) is a fully managed, cloud-based data integration service that allows you to create data-driven workflows for orchestrating and automating data movement and data transformation. It supports a wide range of data sources and destinations and complex hybrid extract-transform-load (ETL), extract-load-transform (ELT) processes, making it a versatile tool for data integration tasks.
With ADF, you can design your own data orchestration and integration process.
Create a Data Factory resource: This is the resource that encapsulates all the data integration and transformation activities.
- On Azure portal, navigate to Create a resource and search for "Data factories".
- Fill in the required details such as the subscription, resource group, and region, then select Create.
Create linked services: Linked services are used to define the connection information for data sources and destinations.
- In Azure Data Factory, select Manage and then select Linked services.
- Create a new linked service for your Azure SQL Database by providing the necessary connection details.
Create datasets: Datasets represent the data structures within the data stores that the activities in a pipeline use.
- In Azure Data Factory, go to the Author tab.
- Select + (plus) and select Dataset.
- Choose the data store type (for example, Azure SQL Database, Azure Blob Storage). Also, provide the necessary connection details and dataset properties.
Create a pipeline: Pipelines are logical groupings of activities that perform a unit of work.
- In Azure Data Factory, select Author and create a new pipeline.
- Add a Copy Data activity to the pipeline to copy data from the source dataset to the destination dataset.
Run the pipeline: Running the pipeline executes the series of activities you configured.
- Trigger the pipeline to start the copy data process.
- Monitor the pipeline run to ensure the data is imported successfully.
Use BACPAC to import and export data
A BACPAC file is essentially a ZIP file with an extension of .bacpac, containing the database schema and data. It's used for database migration, backup, and archiving purposes. You can export a database to a BACPAC file and store it in Azure Blob Storage or on-premises, and later import it back into Azure SQL Database, Azure SQL Managed Instance, or SQL Server. Also, you can use BACPAC files to import just a subset of the data. This flexibility allows for a more tailored approach to data movement.
You can import and export data with BACPAC files using the Azure portal and SQL Server Management Studio (SSMS), but you can also use the SQLPackage utility.
Run the following example command to import data to a BACPAC file using SQLPackage. Replace <ServerName>, <DatabaseName>, <UserName>, <Password>, and <PathToBacpacFile> in the following scripts with your actual server name, database name, user credentials, and the path for the BACPAC file.
sqlpackage.exe /Action:Import /tsn:<ServerName> /tdn:<DatabaseName> /tu:<UserName> /tp:<Password> /sf:<PathToBacpacFile>
Run the following example command to export data to a BACPAC file using SQLPackage.
sqlpackage.exe /Action:Export /ssn:<ServerName> /sdn:<DatabaseName> /su:<UserName> /sp:<Password> /tf:<PathToBacpacFile>
Use Bulk Copy Program (BCP)
The BCP utility is a command-line tool that exports tables to files so you can import them. Use this approach to migrate from a single SQL Database to SQL Managed Instance and back.
Use SQL Server Import and Export Wizard
SQL Server Import and Export Wizard are a graphical tool in SSMS for importing and exporting data between SQL Server and many data sources. An advantage of the SQL Server Import and Export Wizard is that it uses SQL Server Integration Services (SSIS) to copy data. SSIS is a highly configurable tool for creating extract, transform, and load (ETL) processes which can be run on both SQL Server and Azure SQL Database instances.
Use Azure CLI and PowerShell
You can use scripts in both Azure CLI and PowerShell to automate import and export processes. Using scripts for import or export is suitable for integrating into CI/CD pipelines, however each script requires a high degree of customization compared to other methods.
To learn more about other tools available to export and import data, see Import and export data from SQL Server and Azure SQL Database.