Exercise - Manage an Azure Arc-enabled SQL Managed Instance
Exercise 1: Scale up or down your SQL Managed Instance resources
The number of resources required for your operational Arc-enabled SQL Managed Instance is dependent on the tier chosen and the number of available resources available on your Kubernetes cluster. To scale the resources (CPU/memory) up or down, we can use Azure Data Studio or az sql mi-arc update commands for our directly connected or indirectly connected mode Arc-enabled SQL Managed Instance environments. We can use the Azure portal, Azure Data Studio, or the az sql mi-arc update command in directly connected mode.
Option 1 - Azure Data Studio GUI deployment
This option is available for environments configured in either the directly connected or indirectly connected modes.
In Azure Data Studio, expand your Arc data controller to display your Arc-enabled SQL Managed Instance environments.
Right-click on your Arc-enabled SQL Managed Instance and select Manage.
Select Compute + Storage.
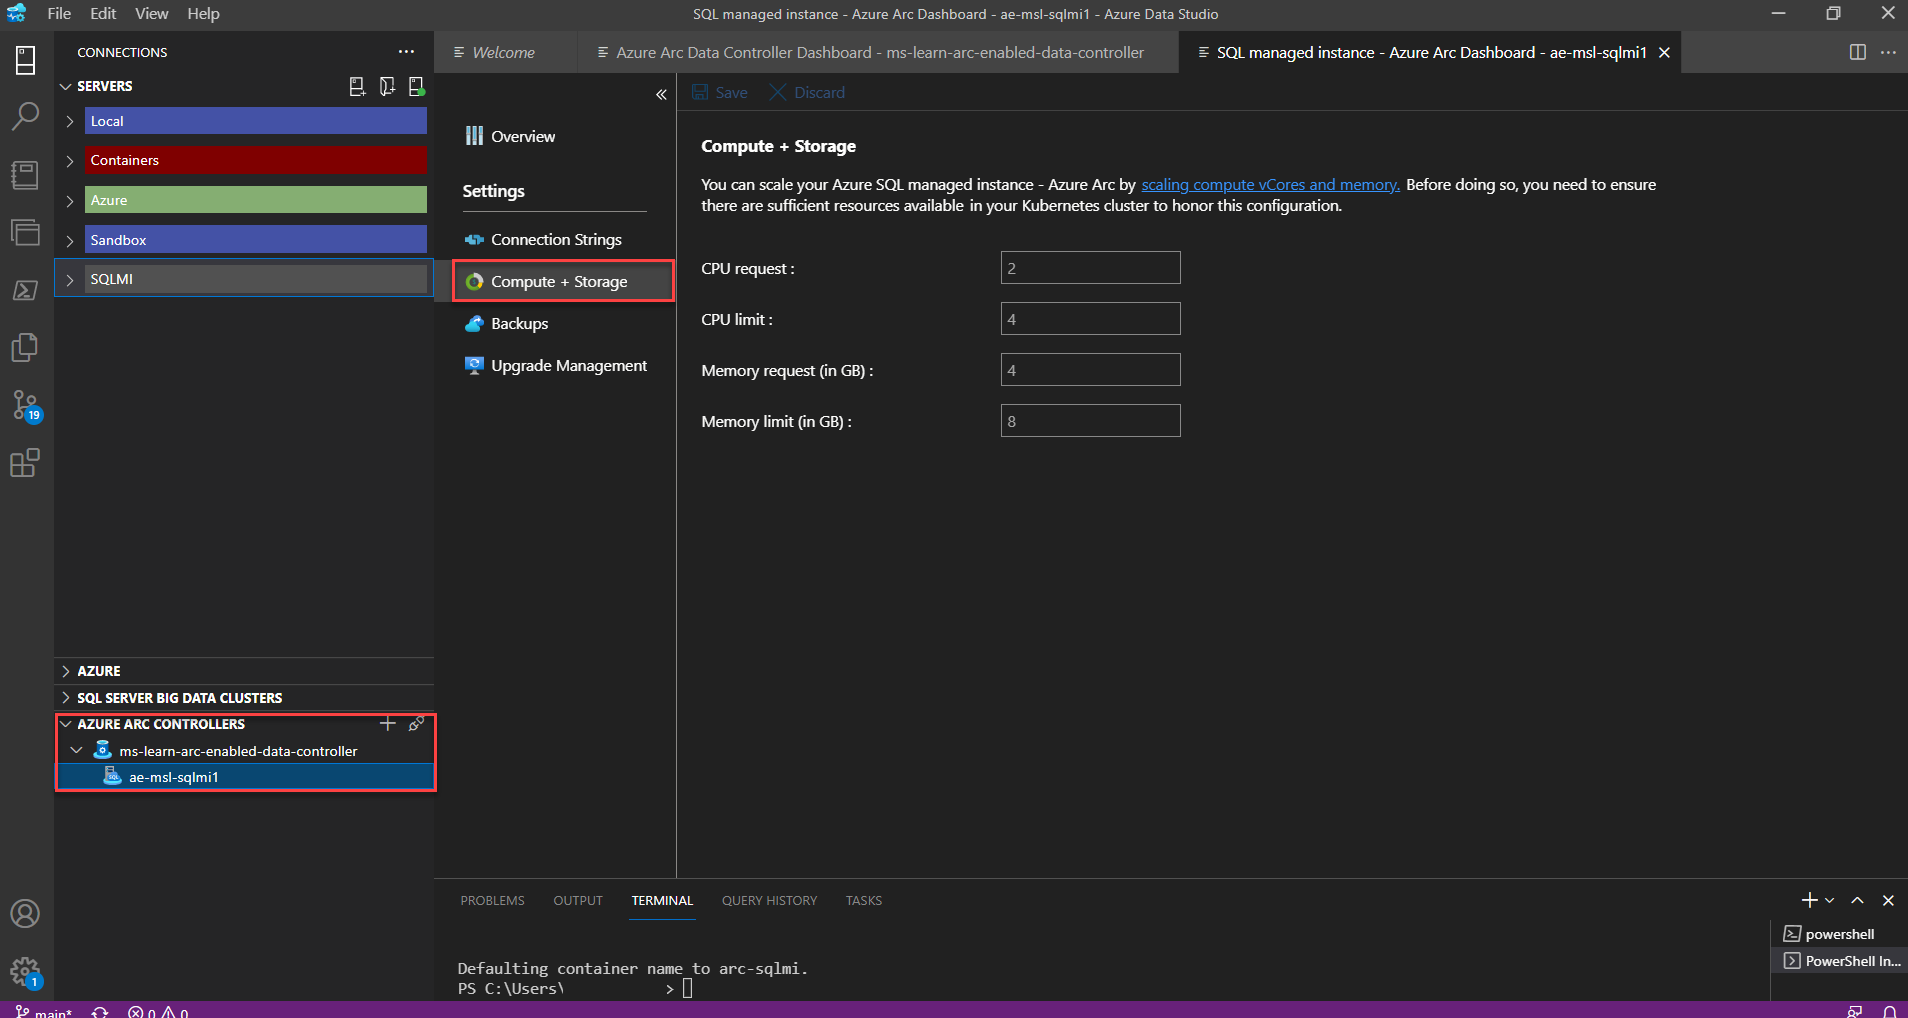
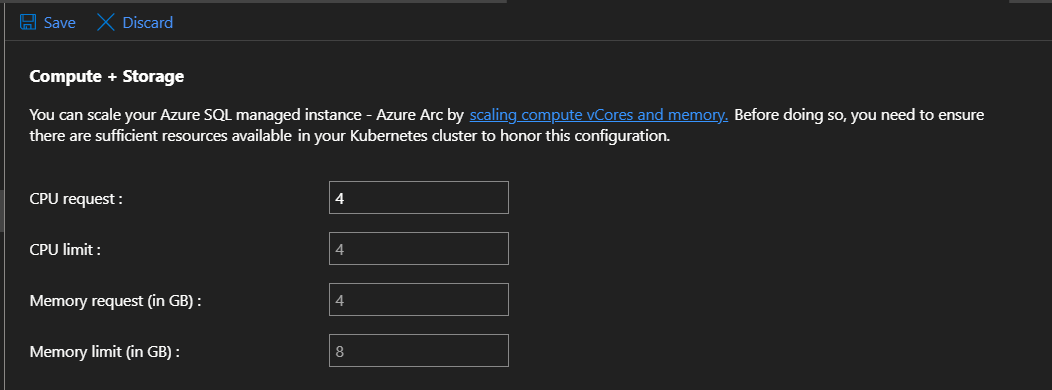
Increase your CPU request value from 2 to 4.
Select Save.
Option 2 - Azure Data Studio CLI deployment
This option is available for environments configured in either the directly connected or indirectly connected modes.
In the Azure Data Studio terminal window, configure your resource limit parameters:
$Env:MyNamespace= 'enter your arc-enabled namespace here'
$Env:sql-managed-instanceName= 'enter your arc-enabled sql managed instance name here'
$Env:CoresRequest = '4' ## Adjust your core requirements
$Env:CoresLimit = '4' ## Maximum number of cores
$Env:MemoryRequest = '4Gi' ## Adjust your volume size appropriately in Gigabytes
$Env:MemoryLimit = '8Gi' ## Adjust your volume size appropriately in Gigabytes
Run the following
az sql mi-arcupdate command:az sql mi-arc update --cores-limit $Env:CoresLimit ` --cores-request $Env:CoresRequest ` --memory-limit $Env:MemoryLimit ` --memory-request $Env:MemoryRequest ` -n $Env:sql-managed-instanceName ` --k8s-namespace $Env:MyNamespace ` --use-k8s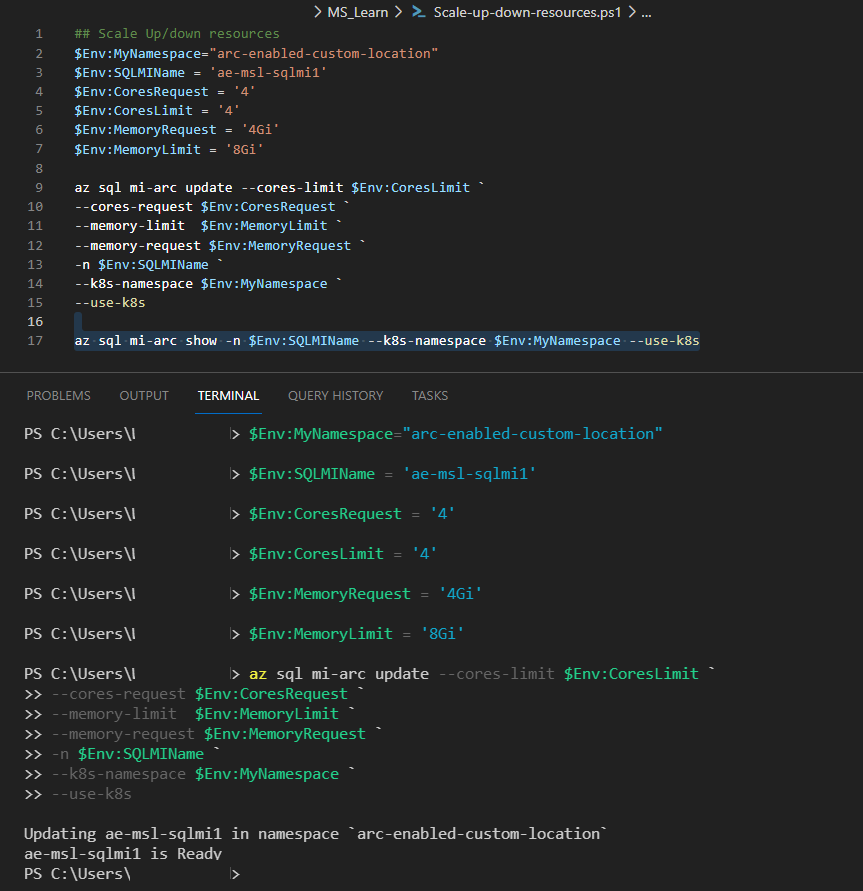
Run the following command and search for the results as shown:
az sql mi-arc show -n $Env:sql-managed-instanceName --k8s-namespace $Env:MyNamespace --use-k8s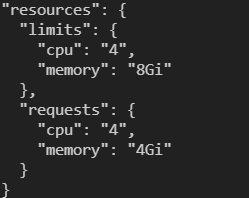
Exercise 2: Enable SQL Agent
The SQL Agent lets you create and schedule jobs that can run periodically against one or many databases to perform various actions, including maintenance tasks. The SQL Agent isn't enabled on your Arc-enabled SQL Managed Instance by default.
To enable SQL Agent on your Arc-enabled SQL Managed Instance, follow these steps:
In either the Azure portal Cloud Shell or Azure Data Studio terminal, prepare your CLI parameters:
$Env:sql-managed-instanceName = 'enter your arc-enabled sql managed instance name here'
$Env:MyNameSpace = 'enter your namespace where your SQL Managed Instance is deployed here'
$Env:MyResourceGroup = 'enter your resource group name here'
Run the following command to view the current configuration:
az sql mi-arc show --name $Env:sql-managed-instanceName --resource-group $Env:MyResourceGroupSearch for
sqlagentin the output. It should include results like this example:"sqlagent": { "enabled": "false" }Run the following command:
az sql mi-arc update --name $Env:sql-managed-instanceName `
    --k8s-namespace $Env:MyNamespace `
    --use-k8s `
    --agent-enabled true
Run the following command to view the new configuration:
az sql mi-arc show --name $Env:sql-managed-instanceName --resource-group $Env:MyResourceGroupSearch for
sqlagentin the output. It should show the following result:"sqlagent": { "enabled": "true" }
Exercise 3: Configure maintenance window
The maintenance window setting on the Arc data controller is essential to allow upgrades to be applied, allowing for the evergreen environment. To configure the maintenance window, follow these steps:
In either the Azure portal Cloud Shell or Azure Data Studio terminal, prepare your CLI parameters:
$Env:MyNameSpace = 'enter your namespace where your SQL Managed Instance is deployed here'
$Env:MaintDateTime = "2022-05-25T23:00"
$Env:MaintDuration = "3:00"
$Env:MaintRecurrence = "Monthly First Saturday"
$Env:Timezone = 'enter your time zone ID here'
Run the following command:
az arcdata dc update --maintenance-start $Env:MaintDateTime `
    --maintenance-duration $Env:MaintDuration `
    --maintenance-recurrence $Env:MaintRecurrence `
    --maintenance-time-zone $Env:Timezone `
    --k8s-namespace $Env:MyNamespace `
    --use-k8s
Run the following command to view the new configuration:
kubectl describe datacontroller -n <your resource group>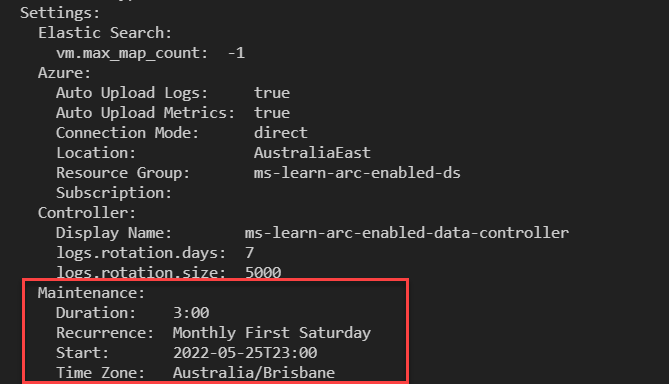
Run the following command to set the desired-version, allowing for automatic patching:
az sql mi-arc upgrade --name $Env:sql-managed-instanceName `
    --desired-version auto  `
    --k8s-namespace $Env:MyNamespace `
    --use-k8s
Run the following command to view the new configuration:
az sql mi-arc show --name $Env:sql-managed-instanceName --resource-group $Env:MyResourceGroupSearch for desired-version in the output. It should return results like this example:
"update": {
    "desiredVersion": "auto"
    }
Exercise 4: View available data controller upgrades
Open Azure Data Studio. Navigate to your Arc Data Controller.
Right-click on your Arc data controller and select Manage.
Select Upgrade Management
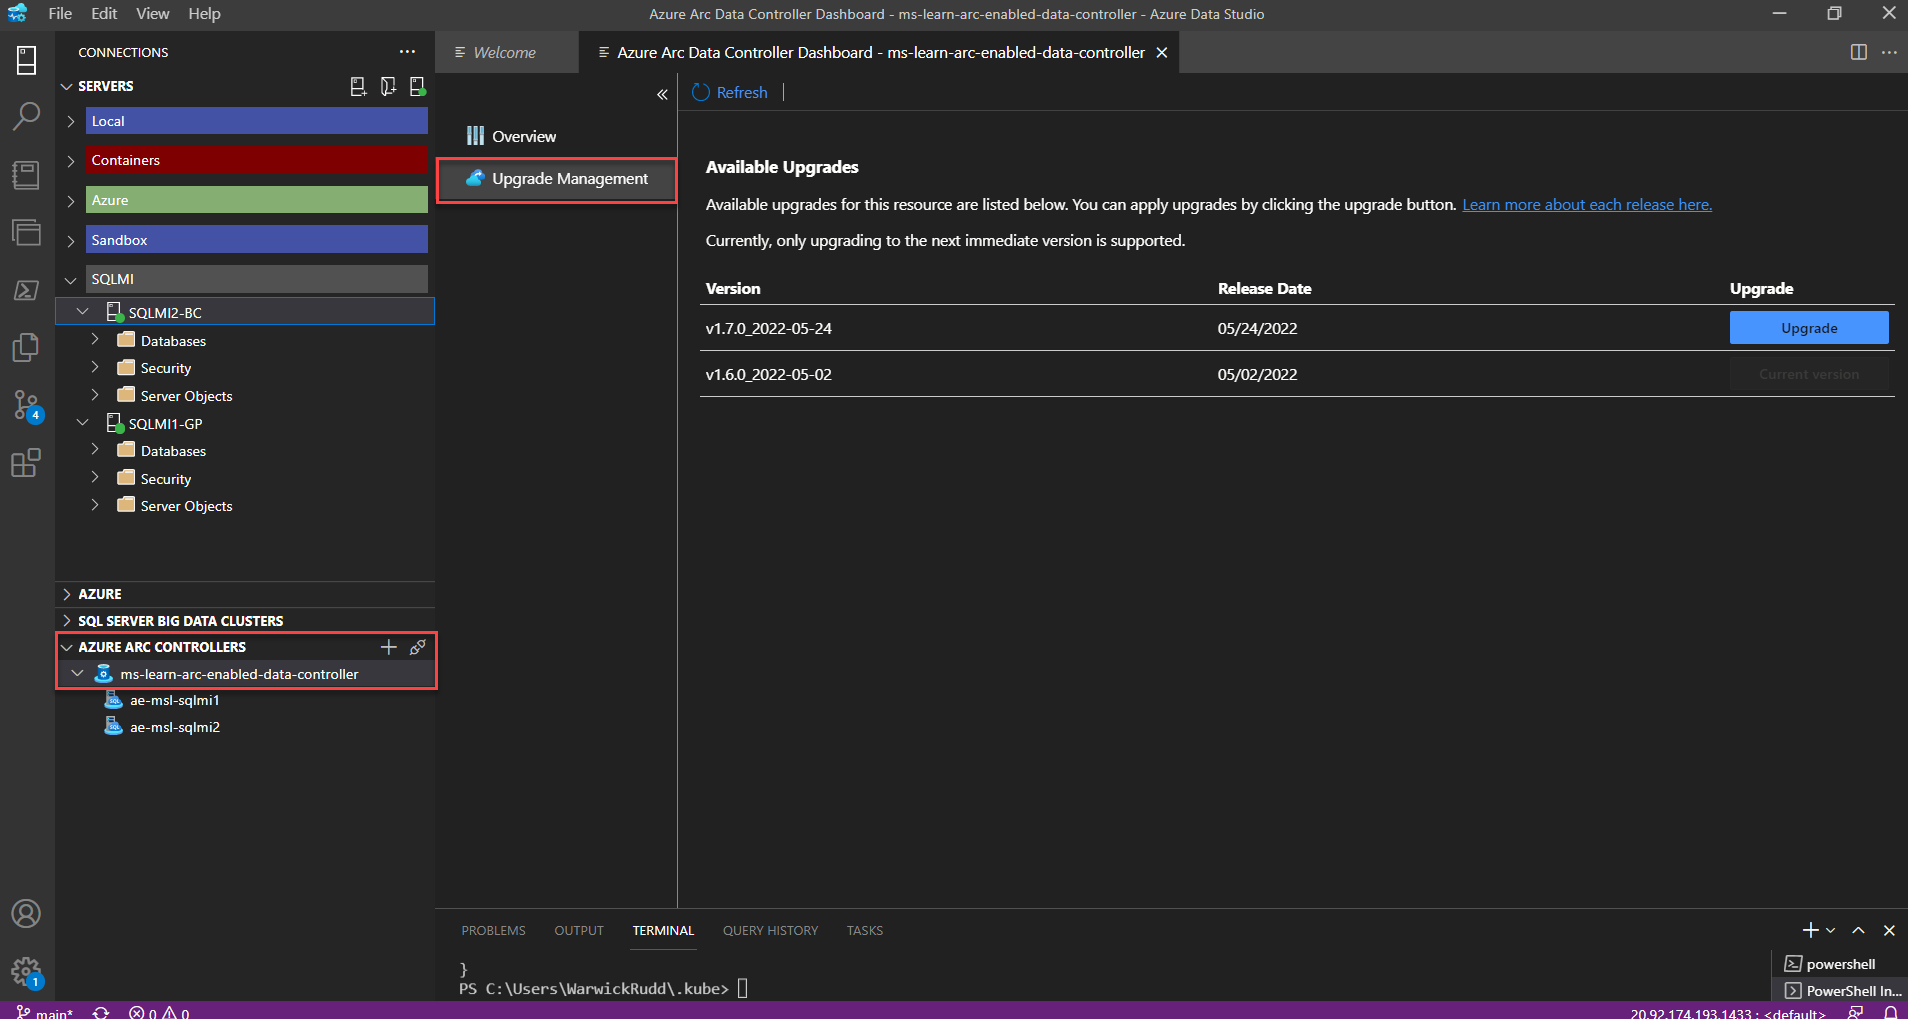
Choose the version you would like to upgrade to and select Upgrade.
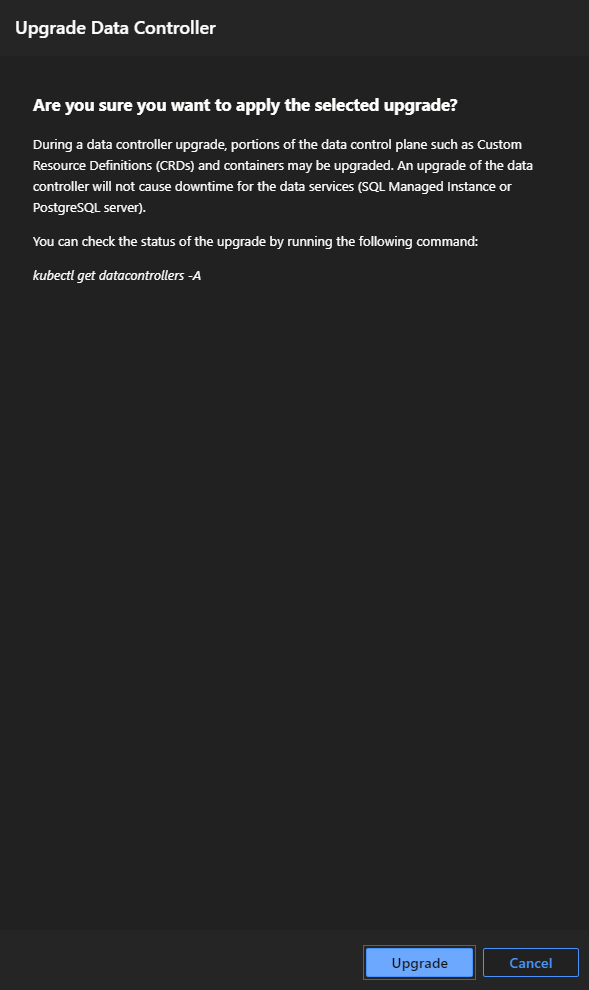
In the terminal window, run the following command to track the status of the upgrade:
kubectl get datacontrollers -AThe upgrade process upgrades the data controller first and then upgrades the monitoring stack.
You successfully upgraded the data controller to the latest version.
Exercise 5: Export and upload metrics, logs, and usage details
A Service Principal is required to upload metric and usage data to your Azure subscription. In this exercise, you upload the data to your Azure subscription.
In directly connected mode, usage data for billing purposes is automatically uploaded. You can automatically or manually upload metrics and log data as well.
In indirectly connected mode, you must manually upload usage data regularly for billing purposes. Optionally, you can manually upload metrics and log data as well.
Create and assign a Service Principal
You can run the steps for this exercise with any of the following options:
- Azure portal Cloud Shell
- Azure Data Studio Terminal window
- Azure CLI window
For this exercise, all statements are run in the Azure Data Studio Terminal window.
Register the
Microsoft.AzureArcDataresource provider with the following command:az provider register -n Microsoft.AzureArcData --waitPrepare your CLI parameters:
$Env:MySuscriptionID = 'enter your subscription id here'
$Env:MyNameSpace = 'enter your namespace where your SQL Managed Instance is deployed here'
$Env:MyResourceGroup = 'enter your resource group name here'
$Env:MyServicePrincipal = 'enter your service principal name here'
$Env:MyScope = "/subscriptions/$Env:MySuscriptionID/resourceGroups/$Env:MyResourceGroup"
Run the following command:
az ad sp create-for-rbac --name $Env:MyServicePrincipal `
    --role Contributor `
    --scopes $Env:MyScope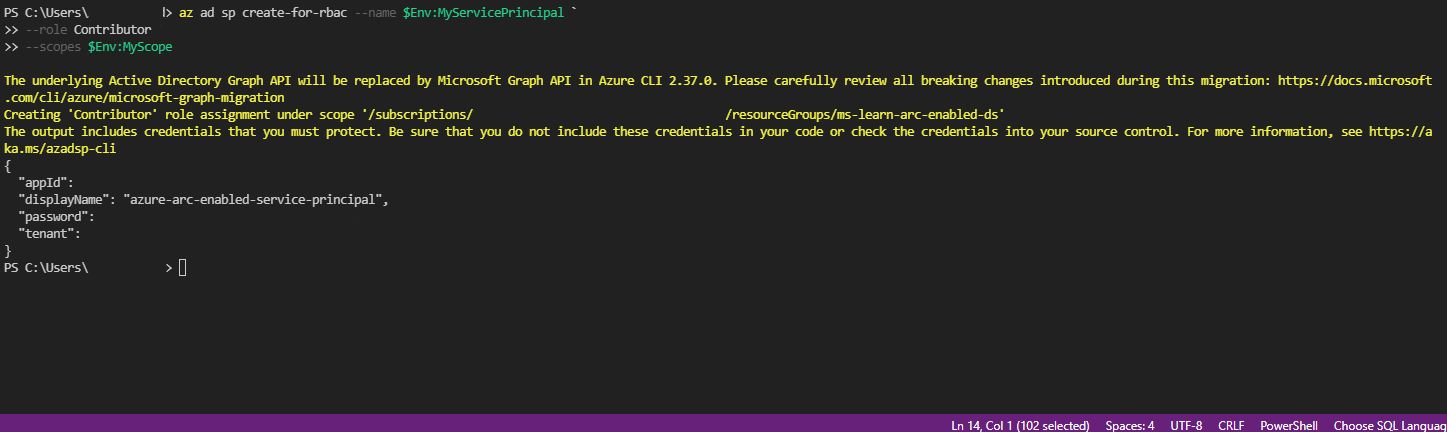
Take the
appIdfrom the create command results in the previous step. Run the following commands:$Env:Assignee = 'Enter appid here' az role assignment create --assignee $Env:Assignee ` --role "Monitoring Metrics Publisher" ` --scope $Env:MyScopeVerify the Service Principal role with the following command:
az role assignment list --scope $Env:MyScope -o table
Export and upload logs, metrics, or usage data
The following example uploads usage data from an Arc data controller in indirectly connected mode:
az arcdata dc export --type usage `
    --path usage.json `
    --k8s-namespace $Env:MyNamespace `
    --use-k8s azdata_verify_ssl=no

## Copy your exported usage.json file to a location with access to your Azure subscription.

az arcdata dc upload --path usage.json
The following steps configure automated metrics data upload from an Arc data controller in directly connected mode:
Assign role to data controller custom location extension:
$Env:MyCluster='enter your cluster name here'
$Env:MyCustomlocationExtension='enter your custom location extension name here'

$Env:MSI_OBJECT_ID = '
    (az k8s-extension show --resource-group $Env:MyResourceGroup `
                            --cluster-name $Env:MyCluster `
                            --cluster-type connectedClusters `
                            --name $Env:MyCustomlocationExtension | convertFrom-json).identity.principalId

az role assignment create --assignee $Env:MSI_OBJECT_ID `
    --role 'Monitoring Metrics Publisher' `
    --scope $Env:MyScope
Enable automatic uploads of metrics:
$Env:MyDataController='enter your data controller name here'
az arcdata dc update --name $Env:MyDataController `
    --resource-group $Env:MyResourceGroup `
    --auto-upload-metrics true
Run the following commands to upload metrics data from your Arc data controller in indirectly connected mode:
Export the metrics data:
az arcdata dc export --type metrics `
    --path metrics.json `
    --k8s-namespace $Env:MyNamespace `
    azdata_verify_ssl=no
Set environment variables in preparation for the metric data upload:
az ad sp credential reset --name $Env:MyServicePrincipal
$Env:SPN_Authority='https://login.microsoft.online.com'
$Env:PSN_CLIENT_ID = 'enter appID here'
$Env:SPN_CLIENT_SECRET = 'enter password here'
$Env:SPN_Tenant_ID='enter tenant here'
Upload metric data:
az account set --subscription $Env:MySuscriptionID
az arcdata dc upload --path metrics.json
The following steps configure automated log data upload from your Arc data controller in directly connected mode:
Prepare environment variables with log analytics workspace details:
$Env:WorkSpace_ID='enter customerID here'
az monitor log-analytics workspace get-shared-keys `
    --resource-group $Env:MyResourceGroup `
    --workspace-name $Env:MyLogAnalyticsWSName

$Env:WorkSpace_Shared_Key = 'enter primary shared key here'
Enable automatic uploads of metrics:
$Env:MyDataController='enter your data controller name here'
az arcdata dc update --name $Env:MyDataController `
    --resource-group $Env:MyResourceGroup `
    --auto-upload-logs true
The following commands upload logs data from your Arc data controller in indirectly connected mode:
Export the log data:
az arcdata dc export --type logs `
    --path logs.json `
    --k8s-namespace $Env:MyNamespace `
    azdata_verify_ssl=no
    ```
Prepare environment variables with log analytics workspace details:
$Env:WorkSpace_ID='enter customerID here'
az monitor log-analytics workspace get-shared-keys `
    --resource-group $Env:MyResourceGroup `
    --workspace-name $Env:MyLogAnalyticsWSName

$Env:WorkSpace_Shared_Key = 'enter primary shared key here'
Upload metric data:
az account set --subscription $Env:MySuscriptionID
az arcdata dc upload --path logs.json