Interop
Authenticate Linux Clients with Active Directory
Gil Kirkpatrick
At a Glance:
- How authentication works in Windows and Linux
- Using Samba and Winbind
- Implementation strategies
- Walking through the Linux-to-Active Directory integrationItem
Contents
Windows Authentication
Linux Authentication
Samba and Winbind
Three Authentication Strategies
Our Implementation Plan
Finding the Right Software
Building Samba
Configuring Linux Networking
Configuring Linux Time Synchronization
Configuring PAM and NSS
Installing and Configuring Samba
The ID Mapping Problem
Joining the Domain and Logging In
What if It Doesn't Work?
Now that It Works, What Do You Have?
Third-Party Solutions
Republicans and Democrats. Toothpaste and orange juice. Linux and Windows. Some things just don’t mix, right? Every IT shop I’ve ever been involved with has been divided into two camps: the Windows team and the Linux team. They don’t really compete with each other, but they sure don't collaborate either. In fact, some places even go so far as to put a yellow line on the floor just to make absolutely sure that there's no inappropriate fraternization between the two groups.
I'm a Windows guy, and I've certainly poked fun at my Linux-oriented colleagues, but we all have the same goal of providing high-quality and cost-effective IT services to the organization. One way we can do that is by sharing core software infrastructure like Active Directory. Just about all IT organizations have settled on Active Directory to provide authentication services to their Windows desktops and servers. Instead of maintaining a separate authentication infrastructure for the Linux environment (along with a separate set of user names and passwords), wouldn't it be better if the Linux computers used Active Directory as well? I think it would, and I'll show you how to do it in this article.
Windows Authentication
Windows has shipped with an integrated network authentication and single sign-on system for quite some time now. Before Windows 2000, Windows NT domain controllers (DCs) provided authentication services to Windows clients using the NT LAN Manager (NTLM) protocol. Although NTLM was not as secure as was originally thought, it was very helpful because it neatly solved the problem of needing to maintain duplicate user accounts across multiple servers on the network.
Starting with Windows 2000, Microsoft moved from NTLM to Active Directory and its integrated Kerberos authentication services. Kerberos was considerably more secure than NTLM, and it scaled better, too. And Kerberos was an industry standard already used by Linux and UNIX systems, which opened the door to integrating those platforms with Windows.
Linux Authentication
Originally, Linux (and the GNU tools and libraries that run on it) was not built with a single authentication mechanism in mind. As a result of this, Linux application developers generally took to creating their own authentication scheme. They managed to accomplish this by either looking up names and password hashes in /etc/passwd (the traditional text file containing Linux user credentials) or providing an entirely different (and separate) mechanism.
The resulting plethora of authentication mechanisms was unmanageable. In 1995, Sun proposed a mechanism called Pluggable Authentication Modules (PAM). PAM provided a common set of authentication APIs that all application developers could use, along with an administrator-configured back end that allowed for multiple "pluggable" authentication schemes. By using the PAM APIs for authentication and the Name Server Switch (NSS) APIs for looking up user information, Linux application developers could write less code, and Linux administrators could have a single place to configure and manage the authentication process.
Most Linux distributions come with several PAM authentication modules, including modules that support authentication to an LDAP directory and authentication using Kerberos. You can use these modules to authenticate to Active Directory, but there are some significant limitations, as I will discuss later in this article.
Samba and Winbind
Samba is an open-source project that aims to provide integration between Windows and Linux environments. Samba contains components that give Linux machines access to Windows file and print services as well as provide Linux-based services that emulate Windows NT 4.0 DCs. Using the Samba client components, Linux machines can take advantage of Windows authentication services provided by Windows NT and Active Directory DCs.
The particular part of Samba that is most interesting to us for this project is called Winbind. Winbind is a daemon (service in Windows parlance) that runs on Samba clients and acts as a proxy for communication between PAM and NSS running on the Linux machine and Active Directory running on a DC. In particular, Winbind uses Kerberos to authenticate with Active Directory and LDAP to retrieve user and group information. Winbind also provides additional services such as the ability to locate DCs using an algorithm similar to the DCLOCATOR in Active Directory and the ability to reset Active Directory passwords by communicating with a DC using RPC.
Winbind solves a few problems that simply using Kerberos with PAM doesn't. In particular, instead of hard-coding a DC to authenticate to the way the PAM Kerberos module does, Winbind selects a DC by searching DNS locator records similar to the way the Microsoft DC LOCATOR module does.
Three Authentication Strategies
Given the availability of LDAP, Kerberos, and Winbind on Linux machines, there are three different implementation strategies we can employ to allow our Linux machine to use Active Directory for authentication.
Using LDAP Authentication The easiest but least satisfactory way to use Active Directory for authentication is to configure PAM to use LDAP authentication, as shown in Figure 1. Although Active Directory is an LDAPv3 service, Windows clients use Kerberos (with fallback to NTLM), not LDAP, for authentication purposes.
LDAP authentication (called LDAP binding) passes the user name and password in clear text over the network. This is insecure and unacceptable for most purposes.
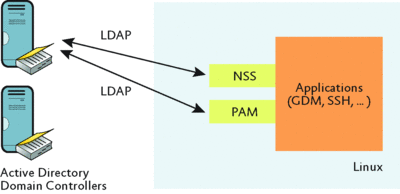
Figure 1 Authenticating to Active Directory using LDAP (Click the image for a larger view)
The only way to mitigate this risk of passing credentials in the clear is to encrypt the client-Active Directory communication channel using something such as SSL. While this is certainly doable, it imposes the additional burden of managing the SSL certificates on both the DC and the Linux machine. Furthermore, using the PAM LDAP module does not support changing reset or expired passwords.
Using LDAP and Kerberos Another strategy for leveraging Active Directory for Linux authentication is to configure PAM to use Kerberos authentication and NSS to use LDAP to look up user and group information, as shown in Figure 2. This scheme has the advantage of being relatively more secure, and it leverages the "in-the-box" capabilities of Linux. But it doesn't take advantage of the DNS Service Location (SRV) records that Active Directory DCs publish, so you are forced to pick a specific set of DCs to authenticate to. It also doesn't provide a very intuitive way of managing expiring Active Directory passwords or, until recently, for proper group membership lookups.

Figure 2 Authenticating to Active Directory using LDAP and Kerberos (Click the image for a larger view)
Using Winbind The third way to use Active Directory for Linux authentication is to configure PAM and NSS to make calls to the Winbind daemon. Winbind will translate the different PAM and NSS requests into the corresponding Active Directory calls, using either LDAP, Kerberos, or RPC, depending on which is most appropriate. Figure 3 shows this strategy.

Figure 3 Authenticating to Active Directory using Winbind (Click the image for a larger view)
Our Implementation Plan
Because of the enhanced integration with Active Directory, I chose to use Winbind on Red Hat Enterprise Linux 5 (RHEL5) for my Linux-to-Active Directory integration project. RHEL5 is the current version of the commercial Red Hat Linux distribution, and it is fairly popular in enterprise datacenters.
Getting RHEL5 to authenticate to Active Directory basically requires five separate steps, as follows:
- Locate and download the appropriate Samba and other dependent components.
- Build Samba.
- Install and configure Samba.
- Configure Linux, specifically PAM and NSS.
- Configure Active Directory.
The next few sections in this article describe these steps in more detail.
Finding the Right Software
One of the biggest differences between Linux and Windows is that Linux consists of a small operating system kernel and a huge collection of separately downloadable and installable components. This makes it possible to create very specific Linux configurations optimized for certain tasks, but it can also make configuration and management of a server extremely complicated. Different distributions handle this in different ways. Red Hat (and its non-commercial cousin Fedora) use the Red Hat Package Manager (RPM) to install and manage these components.
Linux components for Red Hat come in two forms. RPM files contain binary files that have been pre-compiled and built for a specific combination of component version, Linux distribution, and CPU architecture. So you could download and install, for instance, the 1.3.8-5 version of the Common UNIX Printing System (CUPS) built for Fedora version 10 running on an Intel x86 architecture CPU. Given that there are a dozen different CPU architectures, more than 100 Linux distributions, and thousands of packages and versions, you can see that there are an incredible number of binary RPMs from which to choose.
Source RPM files, on the other hand, contain the actual source code for a given package. The expectation is that you will download and install the sources, configure the build options, and compile and link the binaries yourself. The idea of building your own operating system components is daunting for a Windows guy used to installing whatever Microsoft provides on the Windows installation CD, but the package manager makes the process fairly painless and surprisingly reliable. The Samba group releases updates and security patches at a furious rate; in July and August 2008 alone, there were four releases of Samba 3.2, with a total of more than 100 bug and security fixes. For this project, I downloaded the sources for the latest stable version of Samba, version 3.0.31.
Why did I download the Samba sources instead of a pre-compiled set of binaries? That was certainly what I attempted to do first. What I discovered after many hours with a debugger was that the binaries I downloaded were not built with the correct options to support Active Directory authentication. In particular, the code that supports Linux ID mapping in Active Directory was turned off in the default builds; hence I had to rebuild Samba with the appropriate build options. I'll talk more about ID mapping later in this article.
Even though Linux is natively a small kernel, the Red Hat Enterprise distribution comes with many packages preinstalled. Normally this makes life much easier because you start out with a complete working operating system, but the packages that are preinstalled sometimes conflict with software you wish to install later.
I did not include Samba when I installed Red Hat (normally Samba is installed by default) because I wanted to use a more current version. However, the newer version of Samba requires new versions of several other libraries and utilities that were already installed. These sorts of dependency problems are quite annoying, but they are easily solved using the RPM.
There are many Web sites that host binary RPM packages. The one I used (for no other reason that it was the first one I found) is called PBONE, located at rpm.pbone.net. It has a convenient way of searching for packages and had all the binaries that I needed for my CPU architecture (i386) and operating system distribution (Red Hat Enterprise Linux 5/Fedora 7&8).
I had to download and update the packages listed in Figure 4 to build and install the latest 3.0 version of Samba (there is an even later 3.2 version tree that I have not tried). Note that these packages target the Fedora Core (fc) distribution. Red Hat is based on the same sources Fedora uses and is completely interoperable with it. Packages built for Fedora Core 7 and later will run on RHEL5 with no modification. Place the downloaded RPM files in the /usr/src/redhat/RPMS directory.
Figure 4 Packages needed for building and installing Samba 3.0.31
| samba-3.031-0.fc8.src.rpm | Samba 3.0.31 source RPM |
|---|---|
| gnutls1.6.3-3.fc7.i386 | GNU Transport Layer Security (TLS) libraries |
| gnutils-devel-1.6.3-3.fc7.i386 | GNU TLS development files |
| popt-1.12-3.fc8.i386 | Command-line argument parsing libraries |
| popt-devel-1.12-3.fc8.i386 | Command-line argument parsing development files |
| cups-libs-1.2.12-11.fc7.i386 | Common UNIX Printer System libraries |
| cups-devel-1.2.12-11.fc7.i386 | Common UNIX Printer System development files |
| cups-1.2.12.11.fc7.i386 | Common UNIX Printer System binaries |
Building Samba
The first step in building Samba is to download the proper source RPM. I downloaded the source RPM for Samba 3.0.31 from the PBONE site. Next, place the downloaded source RPM file in /usr/src/redhat/SRPMS; this is the standard directory for source RPMs during the build process.
Open a terminal session (command-line window in Windows parlance) and move to the SRPMS folder. Once that is done, install the source package using the command, as shown in Figure 5.
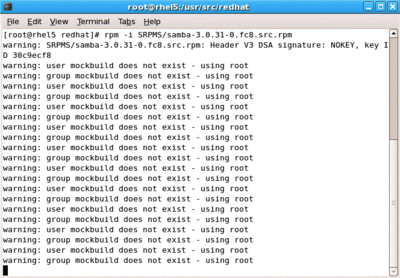
Figure 5 Installing the Samba source RPM (Click the image for a larger view)
If you see the error warning "user mockbuild does not exist—using root," don't worry. This error indicates that the Mock build utilities aren't installed. The build process will work without them.
Next, move to the /usr/src/redhat/SPECS directory and edit the file SAMBA.SPEC, which contains the Samba build options. Search for the line that starts with "CFLAGS=", and make sure the option "--with-shared-modules=idmap_ad,idmap_rid" is present. This option ensures that the build process will include the code that translates Linux UIDs (unique identifiers) properly to Active Directory. Figure 6 shows this option.
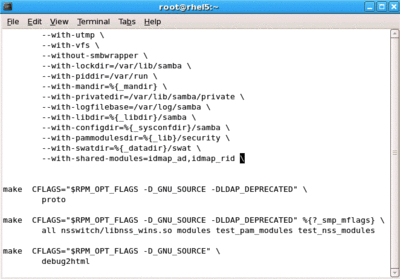
Figure 6 The with-shared-modules build option (Click the image for a larger view)
Next, you may have to update some of the libraries on your machine to properly build and install Samba; it depends on what versions of the libraries you happen to have installed. In my case, I had to install the packages listed in Figure 4 using the rpm --install command; in some cases I had to use the --force option to get past some of the dependency problems.
To build Samba, move to the /usr/src/redhat directory and run the command rpmbuild –bb SPECS/samba.spec, as shown in Figure 7. The process will leave a new samba-3.0.31-0.i386 RPM file in the /usr/src/redhat/RPMS directory. We will install this RPM file later in the project.

Figure 7 Creating the Samba binary RPM file (Click the image for a larger view)
Configuring Linux Networking
In order to authenticate with Active Directory, your Linux machine must be able to communicate with a DC. You have to configure three networking settings in order for this to happen.
First, it's important to make sure that the network interface for your Linux machine is configured properly, either by using Dynamic Host Configuration Protocol (DHCP) or by assigning it an appropriate IP address and netmask using the ifconfig command. Under RHEL5, you configure the network by selecting Network from the System | Administration menu, as shown in Figure 8.
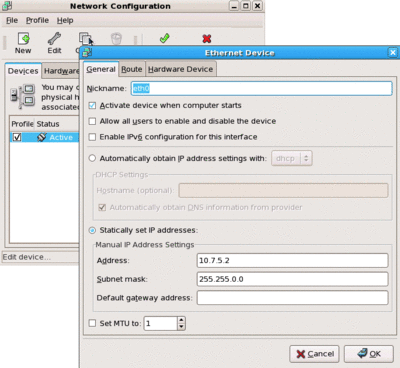
Figure 8 Configuring the network (Click the image for a larger view)
Next, ensure that the DNS resolver for the Linux machine is set to use the same DNS name server that your DCs use; in the majority of cases, this is a DC in the domain to which you want to join the Linux machine, assuming you are using Active Directory-integrated DNS. You configure the DNS resolver on the DNS tab of the same Network configuration utility you used to configure the network, as shown in Figure 9.

Figure 9 Setting the primary DNS resolver (Click the image for a larger view)
Finally, once you have completed those steps, you must set the host name of the Linux computer to reflect its name in the domain. Even though you can set the host name using the Network configuration app, this doesn't seem to always work properly.
Instead, edit the /etc/hosts file directly, and add an entry below the localhost.localdomain entry that has the form <ip address> <FQDN> <host name>. (An example would be "10.7.5.2 rhel5.linuxauth.local linuxauth".) I should note that failure to do this will result in the creation of an incorrect computer object in the directory after you join the Linux computer to the domain.
Configuring Linux Time Synchronization
The Kerberos protocol is dependent on the authenticating systems having clocks that are synchronized within a relatively small value. By default, Active Directory allows a maximum time skew of five minutes. To ensure that your Linux systems and your DCs' system clocks stay within this value, you should configure your Linux systems to use the Network Time Protocol (NTP) service of a DC.
Next, on the Linux server, run the Date & Time utility from the System | Administration menu, and then click on the Network Time Protocol tab. Check the Enable Network Time Protocol box, and then add the IP address of the DC you want to use as a network time source. Note that this should typically be the DC in the domain that holds the primary domain controller (PDC) emulator Flexible Single Master Operations (FSMO) role. Figure 10 is an example of how to set the Linux network time source.
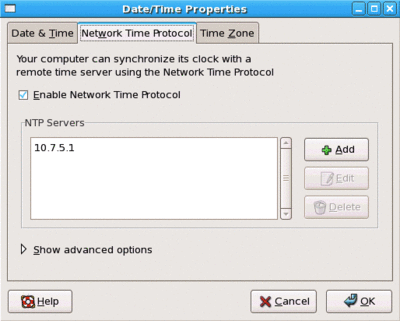
Figure 10 Configuring the Network Time Protocol (Click the image for a larger view)
Configuring PAM and NSS
PAM and NSS provide the glue between a Linux application, such as the desktop, and Winbind. Like many Linux services, you configure PAM and NSS through text files. We'll look at configuring PAM first.
PAM provides four authentication-related facilities to apps that use it. The authentication facility lets an application determine who is using it. The account facility provides account management functions that aren't specifically related to authentication, such as login time restriction. The password facility provides mechanisms for soliciting and managing passwords. The session facility performs user-related setup and tear-down tasks for the application, such as logging or creating files in a user-specific directory.
PAM under Red Hat stores its configuration files in the /etc/pam.d directory, which will contain a text file for each application that uses PAM for authentication. For instance, the file /etc/pam.d/gdm contains the PAM configuration information for the Gnome Desktop Manager (GDM), the default windowing environment for Red Hat. Each PAM configuration file contains multiple lines, with each line defining some aspect of the PAM authentication process. Figure 11 shows the contents of the PAM configuration file for GDM.

Figure 11 PAM configuration file for Gnome Desktop Manager (Click the image for a larger view)
Each entry in a PAM configuration file has the form <management group> <control> <module> <parameters>, where <management group> corresponds to the facility the configuration entry pertains to: auth, account, password, or session. The control keywords, which are described in Figure 12, tell PAM how to process the configuration entry. The third column of the file contains the name of a PAM shared library in the /lib/security directory. Shared libraries contain dynamically loadable executable code, similar to DLLs in Windows. Additional terms after the module name are parameters that PAM passes to the shared library.
Figure 12 PAM control keywords
| Keyword | Description |
|---|---|
| Required | If the module succeeds, PAM continues evaluating the remaining entries for the management group, and the results will be determined by the results of the remaining modules. If the module fails, PAM continues evaluation but will return failure to the calling application. |
| Requisite | If the module succeeds, PAM continues evaluating the management group entries. If the module fails, PAM returns to the calling application with no further processing. |
| Sufficient | If the module succeeds, PAM will return success to the calling application. If the module fails, PAM continues evaluation, but the results will be determined by subsequent modules. |
| Optional | PAM ignores the results of the module unless it is the only module specified for the management group. |
| Include | PAM includes the contents of the referenced PAM configuration file and processes the entries it contains. |
You can see that each management group has several entries. PAM processes the entries in order by calling the named module. The module then returns either success or failure, and PAM proceeds according to the control keyword.
You'll notice that the PAM configuration file for GDM includes system-auth in all of its management groups. This is how PAM establishes default authentication behavior for GDM. By modifying system-auth, you can modify the authentication behavior for all of the applications that include the system-auth file in their PAM configurations. The default system-auth file is shown in Figure 13.

Figure 13 PAM system-auth file (Click the image for a larger view)
The Name Service Switch (NSS) module hides the specifics of system data storage from the application developer, in much the same way that PAM hides the details of authentication. NSS lets the administrator specify the way system databases are stored. In particular, the administrator can specify how user name and password information is stored. Because we want applications to look up user information in Active Directory using Winbind, we have to modify the NSS configuration file to show that.
Red Hat includes a little graphical applet for configuring PAM and NSS called system-config-authentication. It takes care of most (but not all) of the changes you need to make to the system-auth and nss.conf files.
Run the system-config-authentication application and you will see a dialog like the one shown in Figure 14. Check the Winbind option on both the User Information tab (which configures the nss.conf file) and the Authentication tab (which modifies system-auth file).
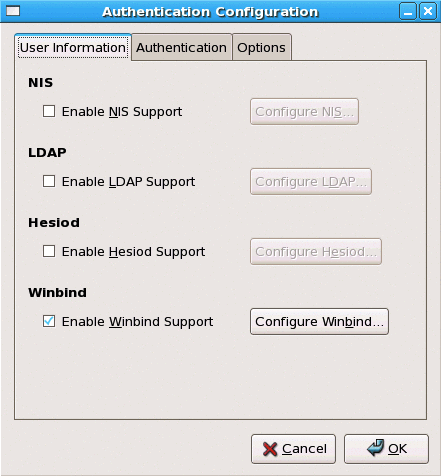
Figure 14 The systemconfig-authentication dialog
Click the Configure Winbind button and you will see the dialog in Figure 15. Enter the name of the domain you want users to authenticate to in the Winbind Domain field, and select "ads" as the security model. Enter the DNS domain name of the Active Directory domain in the Winbind ADS Realm field. In the Winbind Domain Controllers field, enter either the name of a DC you want this Linux system to authenticate with or an asterisk, indicating that Winbind should select a DC by querying DNS SRV records.
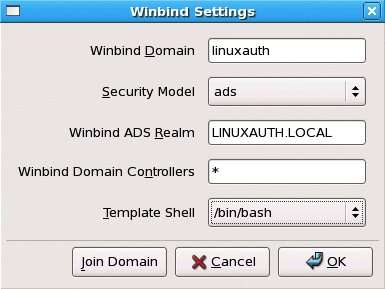
Figure 15 Configure Winbind dialog
Select the appropriate default command shell your Active Directory users should have; in this case, I selected the Bourne-again Shell, or BASH. Don't try the "Join Domain" button at this point. You will join the machine to the domain later on.
There is one additional change to make to the /etc/pam.d/system-auth file after you have modified it to support Winbind. When a Linux user logs in, the system requires that the user have a home directory. The home directory contains many user-specific preferences and configuration items, much like the Windows registry. The problem is that because you are creating your users in Active Directory, Linux will not automatically create the user's home directory. Luckily, you can configure PAM to do this as part of its session configuration.
Open the /etc/pam.d/system-auth file, then scroll down toward the bottom and insert a line before the last line in the session section that reads "session optional map_mkhomedir.so skel=/etc/skel umask=0644" (see Figure 16). This line configures PAM to create a home directory for a user if one doesn't exist. It will use the directory /etc/skel as a "skeleton" or template, and it will assign the permissions mask 0644 (read and write for owner, read for the primary group, and read for everyone else) to the new folder.

Figure 16 Creating a home directory for users (Click the image for a larger view)
Installing and Configuring Samba
To install the Samba binaries you just created, change to the /usr/src/redhat/RPMS directory. All of the RPM files created by the rpmbuild command will appear in this directory. Remember that Samba includes binaries that allow a Linux client to access a Windows (or Samba) file share, as well as code that allows a Linux system to act as a Windows file server, a Windows printer server, and a Windows NT 4.0-style DC.
We don't need all of that to allow Linux to authenticate to Active Directory; all we really need are the Samba common files and the Samba client binaries. These files are conveniently split out into two RPM files: samba-client-3.0.31-0.i386.rpm and samba-common-3.0.31-0.i386.rpm. Install the RPM files using the rpm --install command. Here is an example: rpm --install samba-common-3.0.31-0.i386.rpm. (Note that you will need to install the –common RPM file first.)
Once you've installed the Samba client binaries, you must modify the default Samba configuration to make sure Winbind handles authentication properly with Active Directory. All of the Samba configuration information (both client and server) can be found in the smb.conf text file, which by default is in the /etc/samba directory. Smb.conf can contain an enormous number of configuration options, and a complete discussion of its contents is beyond the scope of this article. The samba.org Web site and the Linux man pages discuss smb.conf in some detail.
The first step is to configure Winbind to use Active Directory for authentication. You must set the security model in smb.conf to "ads". The system-config-authentication utility should have set this for you already, but it's always good to check. Edit the smb.conf file and search for the section labeled Domain Member Options. Find the line that starts with "security" and make sure it reads "security = ads". The next configuration step determines how Winbind will map Windows security principals such as users and groups to Linux identifiers, and that requires a little more explanation.
The ID Mapping Problem
There's one big problem I haven't mentioned yet with authenticating Linux users with Active Directory, and that is the problem of UIDs for users and groups. Internally, neither Linux nor Windows refer to users by user name; instead they use a unique internal identifier. Windows uses the Security Identifier, or SID, which is a variable-length structure that uniquely identifies each user within a Windows domain. The SID also contains a unique domain identifier so that Windows can distinguish between users in different domains.
Linux has a much simpler scheme. Each user on a Linux machine has a UID that is simply a 32-bit integer. But the scope of the UID is limited to the machine itself. There is no guarantee that the user with UID 436 on one Linux machine is the same as the user with UID 436 on another Linux machine. Consequently, a user will have to login to each machine he needs to access, clearly not a desirable situation.
Linux network administrators usually address this problem by providing network authentication using either Network Information System (NIS) or a shared LDAP directory. The network authentication system provides the UID for the user, and all the Linux machines that use that authentication system will share the same user and group identifiers. In this situation, I will use Active Directory to provide the unique user and group identifiers.
There are two strategies I can use in order to address this problem. The first (and also most obvious) strategy is to create a UID for each user and group and store that identifier with the respective object in Active Directory. This way, when Winbind authenticates a user, it can look up the UID for the user and provide it to Linux as the user's internal identifier. Winbind refers to this scheme as Active Directory ID mapping, or idmap_ad. Figure 17 shows the process of Active Directory ID mapping.

Figure 17 Active Directory ID mapping (Click the image for a larger view)
The only downside to Active Directory ID mapping is that we have to provide a mechanism to ensure that every user and group has an identifier, and that these identifiers are all unique in the forest. See the sidebar, "Configuring Active Directory for Active Directory ID Mapping," for more information.
Happily, there is another ID mapping strategy that has a lot less administrative overhead. Recall that the Windows SID uniquely identifies the user within a domain as well as the domain itself. The portion of the SID that uniquely identifies the user within the domain is called the Relative Identifier, or RID, and is in fact a 32-bit integer. So, Winbind can simply extract the RID from the SID when the user logs in and then use the RID as the unique internal UID. Winbind refers to this strategy as RID mapping, or idmap_rid. Figure 18 illustrates how RID mapping actually works.

Figure 18 RID mapping (Click the image for a larger view)
RID mapping has the benefit of zero administrative overhead, but you can't use it in a multi-domain environment because of the likelihood of users in different domains having the same RID value. But if you have a single Active Directory domain, RID mapping is the way to go.
To configure the Winbind ID mapping strategy, edit the /etc/samba/smb.conf file again and add the line "idmap backend = ad" to use the Active Directory mapping strategy, or "idmap backend = rid" if you want to use the RID mapping strategy. Make sure that there are no other lines specifying the mapping strategy in the file.
There are a couple of other configuration options we need to add to the smb.conf file for Winbind. Even though we set up PAM to make the home directory for each user when they log in, we need to tell Winbind what the name of that home directory is. We do this by adding the line "template homedir = /home/%U" to smb.conf (see Figure 19). This tells Winbind that the home directory for each user that authenticates using Active Directory will be /home/<user name>. Be sure to create the /home directory beforehand.

Figure 19 Specifying the name of the home directory (Click the image for a larger view)
Joining the Domain and Logging In
Now that the network, PAM, NSS, and Samba Winbind are all configured properly, it's time to join the Linux machine to the domain. You do this using the Samba NET command. At a shell prompt, run "net ads join –U <administrator name>". Replace <administrator name> with the name of an account that has sufficient privileges to join a machine to the domain.
The net command will prompt you for the user's password. If everything works properly, the net command will join your machine to the domain. You can use Active Directory Users and Computers to locate the newly created computer account.
You can test the state of the join using the Winbind test tool called wbinfo. Running wbinfo –t will test the trust relationship between the machine and the domain. Running wbinfo –u lists all the users in the domain, and wbinfo –g lists all the groups.
If you successfully join the Linux machine to the domain, the next step is to try to log in using an Active Directory user account and password. Log off the Linux machine, and log in using an Active Directory user name. If everything works properly, you should be able to log in.
Configuring Active Directory for Active Directory ID Mapping
This information applies only if you're using Active Directory ID mapping. If you've decided to use RID mapping, feel free to skip this sidebar.
Before you can start logging in to your Red Hat server using an Active Directory account, you have to make some changes to Active Directory itself. First, the Active Directory schema has to accommodate the attributes that Winbind uses to store user information. If you are running Windows Server 2003 R2, the schema is ready to go. If you have an earlier version of the Active Directory schema, you will have to extend it using the Microsoft Services for UNIX (SFU) package.
You can find more on Services for UNIX on TechNet. SFU also includes an additional property page for the Active Directory Users and Computers Microsoft Management Console (MMC) snap-in that lets you manage the user ID and group ID information that Linux requires.
Once the schema is properly set up, you have to provide Linux identifiers for all of the users (and the groups to which they are members) that might log in to your Linux machine. This means that you have to define values for the uidNumber and gidNumber attributes for the users and groups that might log in to your Linux machines. But you should be aware of some requirements for these attributes:
- Linux requires a UID for every user that authenticates. Because you want to manage user information in Active Directory, every user account that will log in to a Linux machine must have a unique uidNumber attribute. The specific value you use for a uidNumber isn't important, but it must be unique across all the users that might log in to the Linux machine.
- Every Linux user must also have a default group identifier, so each Active Directory user that will log in to a Linux machine requires a value for the gidNumber attribute as well. This value doesn't have to be unique among users, but it must uniquely identify the group.
- Every group in Active Directory should have a unique value for its gidNumber attribute. Strictly speaking, it's OK for groups to not have a value for the gidNumber attribute, but Winbind expects, when it authenticates a user, that every group to which that user is a member will have a unique gidNumber value. It's probably easiest just to make sure that every group has a unique gidNumber value.
- Winbind expects that every user it looks up in Active Directory is a member of the Domain Users group, so it also expects that the Domain Users group has a value for its gidNumber attribute.
What if It Doesn't Work?
Setting up a Linux machine to authenticate with Active Directory using Winbind is not a trivial project. There are lots of pieces to configure and lots of things that can go wrong. The fact that every version of Linux and every version of Samba is a little different doesn't help matters. But there are a handful of places you can look to help determine what's going on.
First, there is the Linux system log file, which is maintained in /var/log/messages. Samba will place messages within this file for significant events such as missing files or bad configuration. In addition to the system log file, there are also the log files for Samba and Winbind. You can find these in /var/log/samba, and they will provide you with some additional information.
You can increase the detail (and the volume) of the log messages emitted by Winbind by modifying its startup script to set the debug level. Edit the /etc/init.d/winbind shell script, and add "-d 5" to the winbindd command. This will increase the debug level to 5 (allowable values are from 1 to 10), which will cause winbind to generate more detailed error messages.
If Winbind is getting as far as communicating with a DC, you can run a network packet capture utility such as Netmon 3.1. This lets you analyze exactly what Winbind is trying to do. And you can also inspect the Windows security log on the DC, which will show authentication attempts.
Now that It Works, What Do You Have?
If you've managed to get everything to work, you now have the ability to log into your Linux system using credentials that you maintain in Active Directory. This is a huge improvement over managing identities locally on the Linux machine or using an insecure system such as NIS. It lets you centralize your user management on one identity store: Active Directory.
But there are a several things that are missing to make this solution truly useful. First, getting technical support is a bit of a hit-or-miss operation. Most Linux organizations are somewhat in the dark when it comes to Active Directory, and the support you can get from the Linux community depends entirely on who happens to read your post and how they feel that day.
There are also no migration or deployment tools with Samba. If you have existing Linux accounts with their associated user IDs and permissions, you will have to manually ensure that they maintain their UIDs when you migrate them to Active Directory.
Finally, one of the most important Active Directory apps, Group Policy, isn't yet available with Samba, although it is in the works. Even though you can join a Linux system to Active Directory with Samba, you can't manage it using Group Policy.
Third-Party Solutions
Authenticating Linux machines with Active Directory is clearly A Good Thing, but rolling your own solution using Samba Winbind is tedious if not downright painful. You would think some innovative software vendors would step up with an easier-to-use solution, and you would be right.
There are four commercial software vendors that have developed easy-to-install-and-use versions of what I've demonstrated in this article. They provide the code and migration tools for nearly every popular version of Linux, UNIX, and Apple Macintoshes, as well as support for managing Linux machines using Group Policy.
The four companies are Centrify, Likewise Software, Quest Software and Symark. All four vendors provide similar functionality, including Group Policy management, across a wide array of Linux distributions. Likewise Software has recently open-sourced its implementation, called Likewise Open, although its Group Policy component remains a commercial product. Likewise Open will be available with several major Linux distributions. (Full disclosure: while in the process of writing this article, my company, NetPro, was acquired by Quest Software.)
Does it make sense to build your own authentication system using Samba and Winbind when there are commercial options available? If spending money on integration software isn't in the budget, then going the open-source route with Samba has the advantage of being free. You also get all the source code, which can be a compelling benefit. But migrating existing Linux machines and their existing UIDs is a very thorny problem.
On the other hand, if you want to save installation and implementation time, you have existing Linux machines you need to migrate, or you would rather have someone to call for an authoritative answer to your question, then checking out one of the commercial solutions makes sense. And if you need Group Policy management, then the commercial alternative is your only choice.
But whichever way you go, integrating Linux authentication with Active Directory reduces the effort you spend managing multiple user accounts, improves system security, and provides you with a single identity store to manage and audit. And those are all pretty compelling reasons to give it a try.
Gil Kirkpatrick has designed or developed dozens of successful commercial software products in his 30-year career, and he is the founder of the Directory Experts Conference (now called The Experts Conference). Gil is the author of Active Directory Programming and is a frequent contributor to Windows IT Pro and TechNet Magazine. In his current role as Expert-in-Residence at NetPro (now part of Quest Software), Gil consults on various security, identity, and marketing projects and speaks at technology seminars and conferences around the world.