Note
Access to this page requires authorization. You can try signing in or changing directories.
Access to this page requires authorization. You can try changing directories.
Auditing and reporting scenarios in Microsoft 365 often involve unattended scripts in Exchange Online PowerShell and Security & Compliance PowerShell. In the past, unattended sign in required you to store the username and password in a local file or in a secret vault accessed at run-time. But, as we all know, storing user credentials locally isn't a good security practice.
Certificate based authentication (CBA) or app-only authentication as described in this article supports unattended script and automation scenarios by using Microsoft Entra apps and self-signed certificates.
Note
Did you know that you can connect to Exchange Online PowerShell using managed identities in Azure? Check out Use Azure managed identities to connect to Exchange Online PowerShell.
The features and procedures described in this article require the following versions of the Exchange Online PowerShell module:
- Exchange Online PowerShell (Connect-ExchangeOnline): Version 2.0.4 or later.
- Security & Compliance PowerShell (Connect-IPPSSession): Version 3.0.0 or later.
For instructions on how to install or update the module, see Install and maintain the Exchange Online PowerShell module. For instructions on how to use the module in Azure Automation, see Manage modules in Azure Automation.
CBA or app-only authentication is available in Office 365 operated by 21Vianet in China.
REST API connections in the Exchange Online PowerShell V3 module require the PowerShellGet and PackageManagement modules. For more information, see PowerShellGet for REST-based connections in Windows.
If the procedures in this article don't work for you, verify that you don't have preview versions of the PackageManagement or PowerShellGet modules installed by running the following command:
Get-InstalledModule PackageManagement -AllVersions; Get-InstalledModule PowerShellGet -AllVersions.In Exchange Online PowerShell, you can't use the procedures in this article with the following Microsoft 365 Group cmdlets:
You can use Microsoft Graph to replace most of the functionality from those cmdlets. For more information, see Working with groups in Microsoft Graph.
In Security & Compliance PowerShell, you can't use the procedures in this article with the following Microsoft Purview cmdlets:
Delegated scenarios are supported in Exchange Online. The recommended method for connecting with delegation is using GDAP and App Consent. For more information, see Use the Exchange Online PowerShell v3 Module with GDAP and App Consent. You can also use multitenant applications when CSP relationships aren't created with the customer. The required steps for using multitenant applications are called out within the regular instructions in this article.
Use the SkipLoadingFormatData switch on the Connect-ExchangeOnline cmdlet if you get the following error when using the Windows PowerShell SDK to connect:
The term 'Update-ModuleManifest' is not recognized as a name of a cmdlet, function, script file, or executable program. Check the spelling of the name, or if a path was included, verify that the path is correct and try again.
How does it work?
The Exchange Online PowerShell module uses the Active Directory Authentication Library to fetch an app-only token using the application ID, tenant ID (organization), and certificate thumbprint. The application object provisioned inside Microsoft Entra ID has a Directory Role assigned to it, which is returned in the access token. The session's role based access control (RBAC) is configured using the directory role information that's available in the token.
Connection examples
The following examples show how to use the Exchange Online PowerShell module with app-only authentication:
Important
In the following connection commands, use the primary .onmicrosoft.com domain for your organization as the value of the Organization parameter.
The following connection commands have many of the same options available as described in Connect to Exchange Online PowerShell and Connect to Security & Compliance PowerShell. For example:
Microsoft 365 GCC High, Microsoft 365 DoD, or Microsoft 365 China (operated by 21Vianet) environments require the following extra parameters and values:
Microsoft 365 GCC High
Connect-ExchangeOnline -ExchangeEnvironmentName O365USGovGCCHighConnect-IPPSSession -ConnectionUri https://ps.compliance.protection.office365.us/powershell-liveid/ -AzureADAuthorizationEndpointUri https://login.microsoftonline.us
Microsoft 365 DoD
Connect-ExchangeOnline -ExchangeEnvironmentName O365USGovDoDConnect-IPPSSession -ConnectionUri https://compliance.dod.microsoft.com/powershell-liveid -AzureADAuthorizationEndpointUri https://login.microsoftonline.us
Microsoft 365 operated by 21Vianet (China)
Connect-ExchangeOnline -ExchangeEnvironmentName O365ChinaConnect-IPPSSession -ConnectionUri https://ps.compliance.protection.partner.outlook.cn/powershell-liveid -AzureADAuthorizationEndpointUri https://login.chinacloudapi.cn/common
If a Connect-IPPSSession command presents a sign in prompt, run the command:
$Global:IsWindows = $truebefore the Connect-IPPSSession command.
Connect using a certificate thumbprint:
Note
The CertificateThumbprint parameter is supported only in Microsoft Windows.
The certificate needs to be installed on the computer where you're running the command. The certificate should be installed in the user certificate store.
Exchange Online PowerShell:
Connect-ExchangeOnline -CertificateThumbPrint "012THISISADEMOTHUMBPRINT" -AppID "36ee4c6c-0812-40a2-b820-b22ebd02bce3" -Organization "contosoelectronics.onmicrosoft.com"Security & Compliance PowerShell:
Connect-IPPSSession -CertificateThumbPrint "012THISISADEMOTHUMBPRINT" -AppID "36ee4c6c-0812-40a2-b820-b22ebd02bce3" -Organization "contosoelectronics.onmicrosoft.com"
Connect using a certificate object:
The certificate doesn't need to be installed on the computer where you're running the command. You can store the certificate object remotely. The certificate is fetched when the script is run.
Exchange Online PowerShell:
Connect-ExchangeOnline -Certificate <%X509Certificate2 Object%> -AppID "36ee4c6c-0812-40a2-b820-b22ebd02bce3" -Organization "contosoelectronics.onmicrosoft.com"Security & Compliance PowerShell:
Connect-IPPSSession -Certificate <%X509Certificate2 Object%> -AppID "36ee4c6c-0812-40a2-b820-b22ebd02bce3" -Organization "contosoelectronics.onmicrosoft.com"
Connect using a local certificate:
Note
Using a ConvertTo-SecureString command to store the password of the certificate locally defeats the purpose of a secure connection method for automation scenarios. Using a Get-Credential command to prompt you for the password of the certificate securely isn't ideal for automation scenarios. In other words, there's really no automated and secure way to connect using a local certificate.
Exchange Online PowerShell:
Connect-ExchangeOnline -CertificateFilePath "C:\Users\navin\Desktop\automation-cert.pfx" -CertificatePassword (Get-Credential).password -AppID "36ee4c6c-0812-40a2-b820-b22ebd02bce3" -Organization "contosoelectronics.onmicrosoft.com"Security & Compliance PowerShell:
Connect-IPPSSession -CertificateFilePath "C:\Users\navin\Desktop\automation-cert.pfx" -CertificatePassword (Get-Credential).password -AppID "36ee4c6c-0812-40a2-b820-b22ebd02bce3" -Organization "contosoelectronics.onmicrosoft.com"
Set up app-only authentication
An initial onboarding is required for authentication using application objects. Application and service principal are used interchangeably, but an application is like a class object while a service principal is like an instance of the class. For more information, see Application and service principal objects in Microsoft Entra ID.
For a detailed visual flow about creating applications in Microsoft Entra ID, see https://aka.ms/azuread-app.
Assign API permissions to the application.
An application object has the Delegated API permission Microsoft Graph > User.Read by default. For the application object to access resources in Exchange, it needs the Application API permission Office 365 Exchange Online > Exchange.ManageAsApp.
Generate a self-signed certificate
For app-only authentication in Microsoft Entra ID, you typically use a certificate to request access. Anyone who has the certificate and its private key can use the app with the permissions granted to the app.
Create and configure a self-signed X.509 certificate, which is used to authenticate your Application against Microsoft Entra ID, while requesting the app-only access token.
This procedure is similar to generating a password for user accounts. The certificate can be self-signed as well. See this section later in this article for instructions to generate certificates in PowerShell.
Note
Cryptography: Next Generation (CNG) certificates aren't supported for app-only authentication with Exchange. CNG certificates are created by default in modern versions of Windows. You must use a certificate from a CSP key provider. This section section covers two supported methods to create a CSP certificate.
Assign Microsoft Entra roles to the application
The application needs to have the appropriate RBAC roles assigned. Because the apps are provisioned in Microsoft Entra ID, you can use any of the supported built-in roles.
Step 1: Register the application in Microsoft Entra ID
Note
If you encounter problems, check the required permissions to verify that your account can create the identity.
Open the Microsoft Entra admin center at https://portal.azure.com/.
In the Search box at the top of the page, start typing App registrations, and then select App registrations from the results in the Services section.
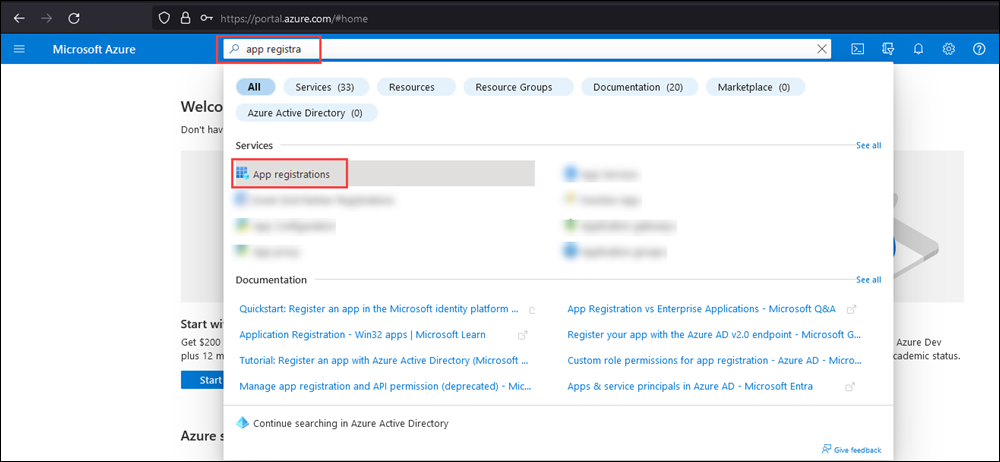
Or, to go directly to the App registrations page, use https://portal.azure.com/#view/Microsoft_AAD_RegisteredApps/ApplicationsListBlade.
On the App registrations page, select New registration.
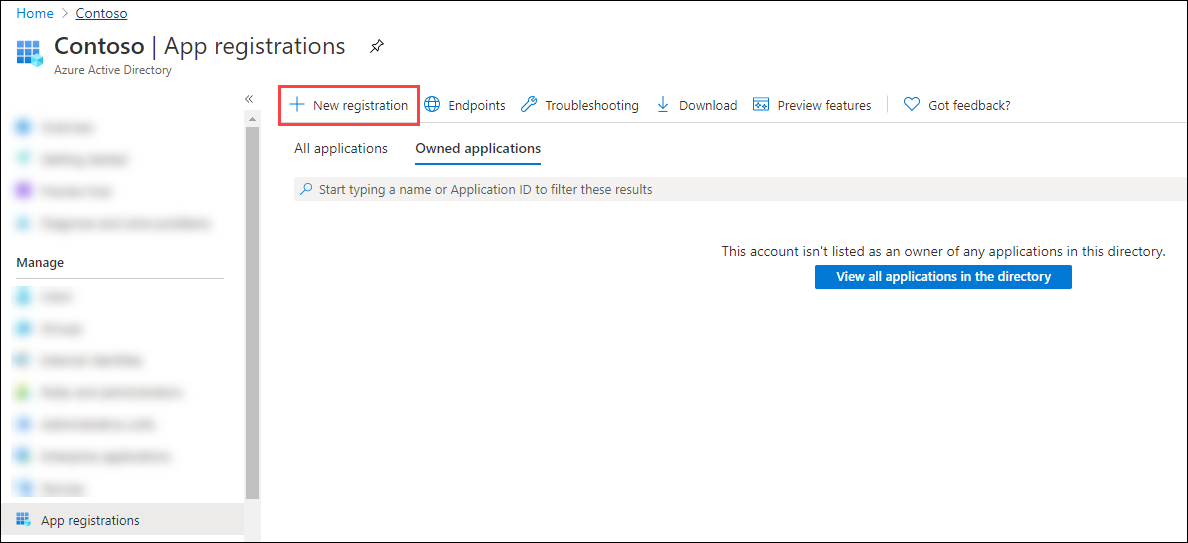
On the Register an application page that opens, configure the following settings:
Name: Enter something descriptive. For example, ExO PowerShell CBA.
Supported account types: Verify that Accounts in this organizational directory only (<YourOrganizationName> only - Single tenant) is selected.
Note
To make the application multitenant for Exchange Online delegated scenarios, select the value Accounts in any organizational directory (Any Microsoft Entra directory - Multitenant).
Redirect URI (optional): This setting is optional. If you need to use it, configure the following settings:
- Platform: Select Web.
- URI: Enter the URI where the access token is sent.
Note
You can't create credentials for native applications, because you can't use native applications for automated applications.

When you're finished on the App registrations page, select Register.
You're taken to the Overview page of the app you just registered. Leave this page open. You use it in the next step.
Step 2: Assign API permissions to the application
Choose one of the following methods in this section to assign API permissions to the app:
- Select and assign the API permissions from the portal.
- Modify the app manifest to assign API permissions. (Microsoft 365 GCC High and DoD organizations should use this method).
Select and assign the API permissions from the portal
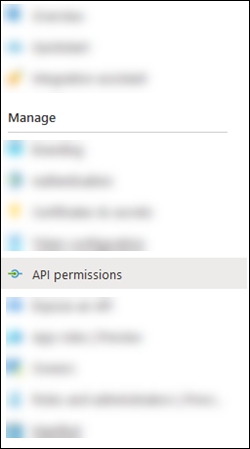
On the app Overview page, select API permissions from the Manage section.
On the app API Permissions page, select Add a permission.
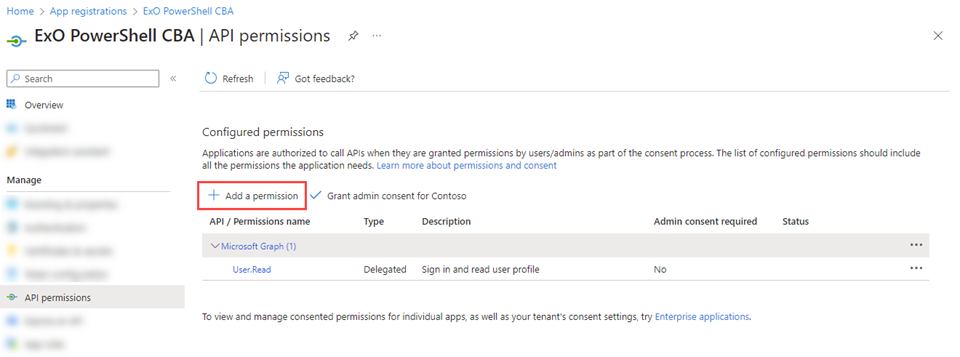
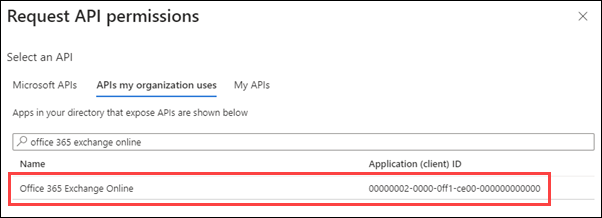
In the Request API permissions flyout that opens, select the APIs my organization uses tab, start typing Office 365 Exchange Online in the Search box, and then select it from the results.
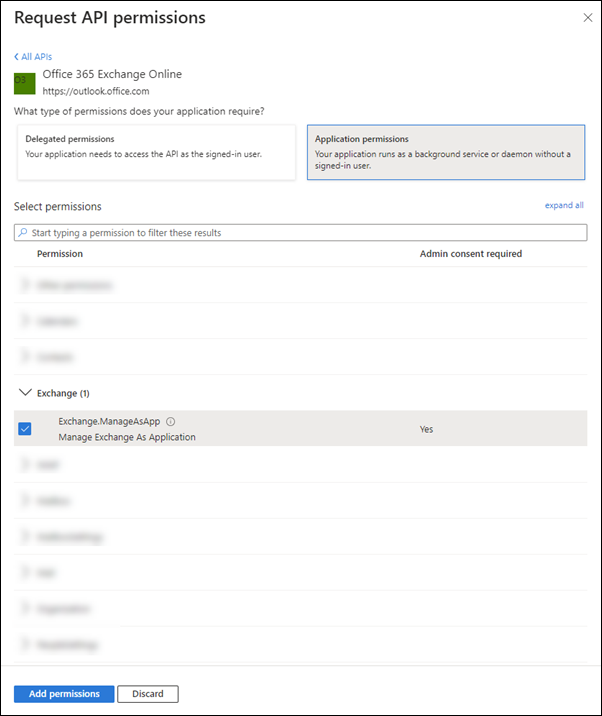
On the What type of permissions does your application require? flyout that appears, select Application permissions.
In the permissions list that appears, expand Exchange, select Exchange.ManageAsApp, and then select Add permissions.
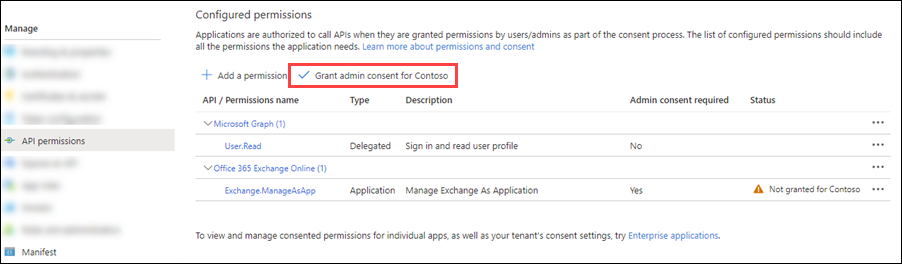
Back on the app API permissions page, verify Office 365 Exchange Online > Exchange.ManageAsApp is listed and contains the following values:
Type: Application.
Admin consent required: Yes.
Status: The current incorrect value is Not granted for <Organization>.
Change this value by selecting Grant admin consent for <Organization>, read the confirmation dialog that opens, and then select Yes.
The Status value is now Granted for <Organization>.
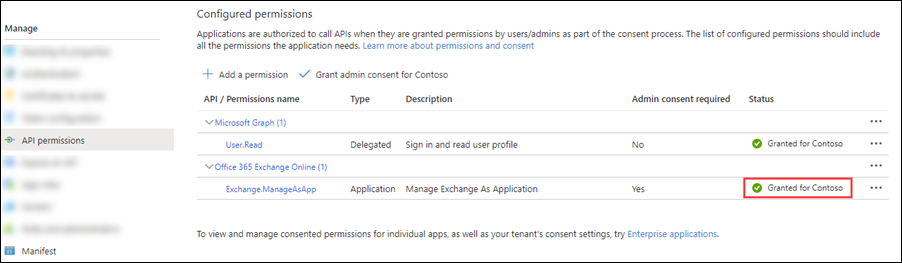
For the default Microsoft Graph > User.Read entry, select ... > Revoke admin consent, and then select Yes in the confirmation dialog that opens to return Status back to the default blank value.

Close the current API permissions page (not the browser tab) to return to the App registrations page. You use the App registrations page in an upcoming step.
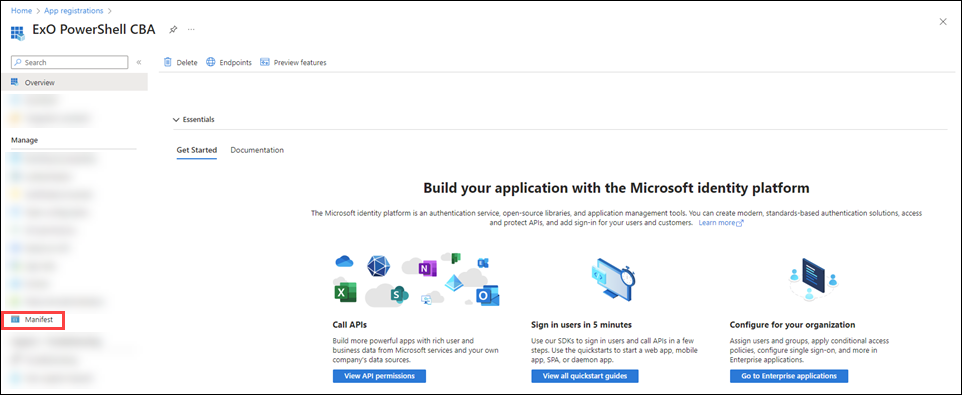
Modify the app manifest to assign API permissions
Note
The procedures in this section append the existing default permissions on the app (delegated User.Read permissions in Microsoft Graph) with the required application Exchange.ManageAsApp permissions in Office 365 Exchange Online.
On the app Overview page, select Manifest from the Manage section.
On the app Manifest page, find the
requiredResourceAccessentry (on or about line 42), and make the entry look like the following code snippet:"requiredResourceAccess": [ { "resourceAppId": "00000002-0000-0ff1-ce00-000000000000", "resourceAccess": [ { "id": "dc50a0fb-09a3-484d-be87-e023b12c6440", "type": "Role" } ] }, { "resourceAppId": "00000003-0000-0000-c000-000000000000", "resourceAccess": [ { "id": "e1fe6dd8-ba31-4d61-89e7-88639da4683d", "type": "Scope" } ] } ],Note
Microsoft 365 GCC High or DoD environments have access to Security & Compliance PowerShell only. Use the following values for the
requiredResourceAccessentry:"requiredResourceAccess": [ { "resourceAppId": "00000007-0000-0ff1-ce00-000000000000", "resourceAccess": [ { "id": "455e5cd2-84e8-4751-8344-5672145dfa17", "type": "Role" } ] }, { "resourceAppId": "00000003-0000-0000-c000-000000000000", "resourceAccess": [ { "id": "e1fe6dd8-ba31-4d61-89e7-88639da4683d", "type": "Scope" } ] } ],When you're finished on the Manifest page, select Save.
Still on the Manifest page, select API permissions from the Manage section.
On the API permissions page, verify Office 365 Exchange Online > Exchange.ManageAsApp is listed and contains the following values:
Type: Application.
Admin consent required: Yes.
Status: The current incorrect value is Not granted for <Organization> for the Office 365 Exchange Online > Exchange.ManageAsApp entry.
Change the Status value by selecting Grant admin consent for <Organization>, read the confirmation dialog that opens, and then select Yes.
The Status value is now Granted for <Organization>.
For the default Microsoft Graph > User.Read entry, select ... > Revoke admin consent, and then select Yes in the confirmation dialog that opens to return Status back to the default blank value.
Close the current API permissions page (not the browser tab) to return to the App registrations page. You use the App registrations page in an upcoming step.
Step 3: Generate a self-signed certificate
Create a self-signed x.509 certificate using one of the following methods:
(Recommended) Use the New-SelfSignedCertificate, Export-Certificate, and Export-PfxCertificate cmdlets in an elevated (run as administrator) Windows PowerShell session to request a self-signed certificate and export it to
.cerand.pfx(SHA1 by default). For example:# Create certificate $mycert = New-SelfSignedCertificate -DnsName "contoso.org" -CertStoreLocation "cert:\CurrentUser\My" -NotAfter (Get-Date).AddYears(1) -KeySpec KeyExchange # Export certificate to .pfx file $mycert | Export-PfxCertificate -FilePath mycert.pfx -Password (Get-Credential).password # Export certificate to .cer file $mycert | Export-Certificate -FilePath mycert.cerUse the Create-SelfSignedCertificate script script to generate SHA1 certificates.
.\Create-SelfSignedCertificate.ps1 -CommonName "MyCompanyName" -StartDate 2021-01-06 -EndDate 2022-01-06
Step 4: Attach the certificate to the Microsoft Entra application
After you register the certificate with your application, you can use the private key (.pfx file) or the thumbprint for authentication.
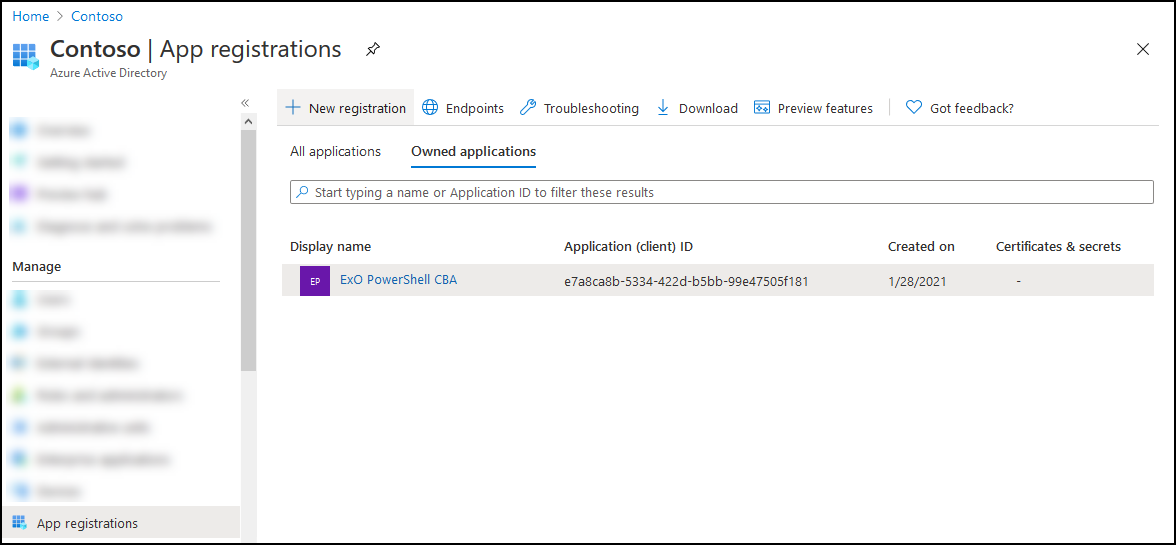
On the Owned applications tab on the Apps registration page from the end of Step 2, select your application.
If you need to get back to Apps registration page, use https://portal.azure.com/#view/Microsoft_AAD_IAM/ActiveDirectoryMenuBlade/~/RegisteredApps, verify the Owned applications tab is selected, and then select your application.
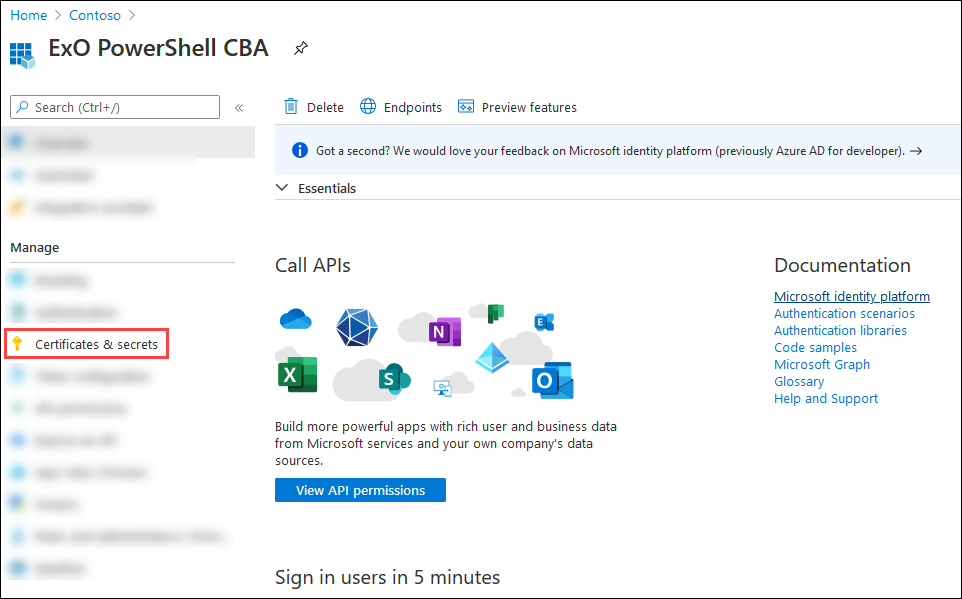
On the application page that opens, select Certificates & secrets from the Manage section.
On the Certificates & secrets page, select Upload certificate.
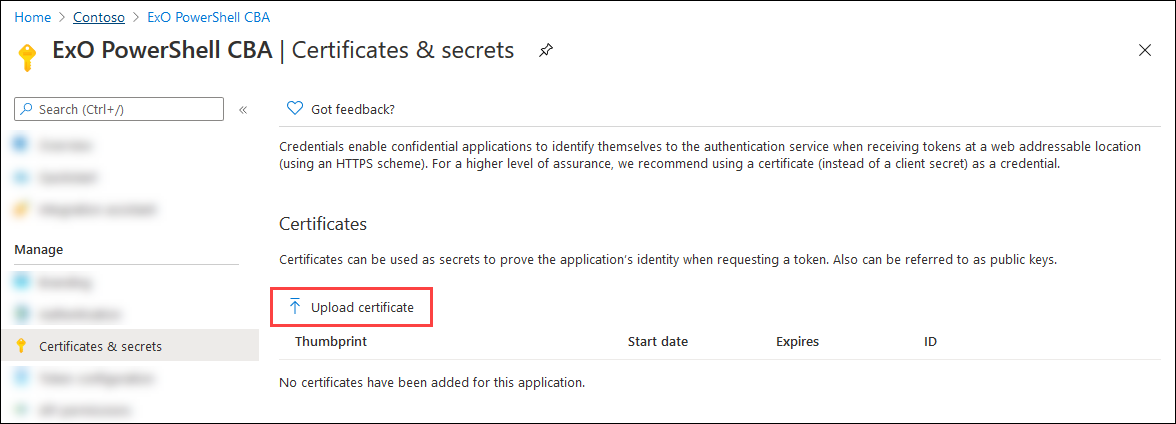
In the dialog that opens, browse to the self-signed certificate (
.cerfile) that you created in Step 3.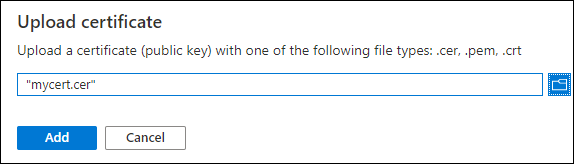
When you're finished, select Add.
The certificate is now shown in the Certificates section.
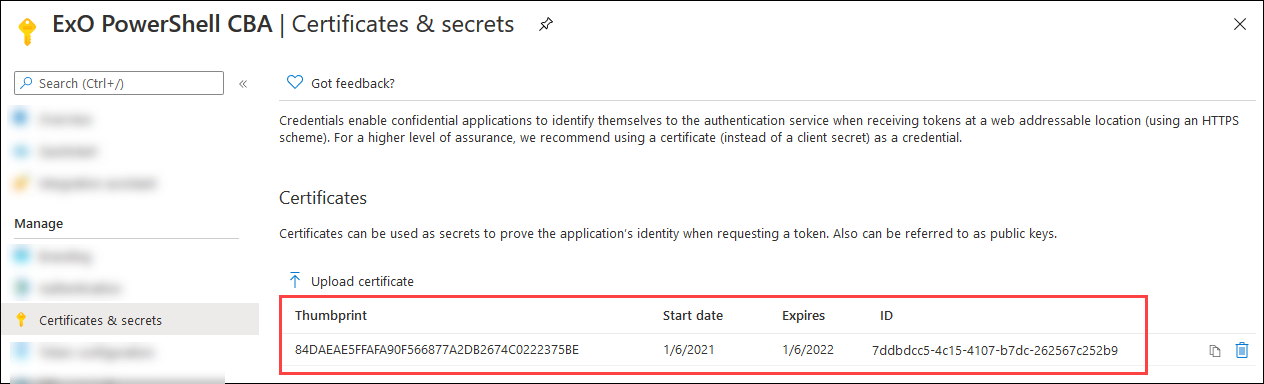
Close the current Certificates & secrets page, and then the App registrations page to return to the main https://portal.azure.com/ page. You use it in the next step.
Step 4b: Exchange Online delegated scenarios only: Grant admin consent for the multitenant app
If you made the application multitenant for Exchange Online delegated scenarios in Step 1, you need to grant admin consent to the Exchange.ManageAsApp permission so the application can run cmdlets in Exchange Online in each tenant organization. You need to generate an admin consent URL for each customer tenant. Before anyone uses the multitenant application to connect to Exchange Online in the tenant organization, an admin in the customer tenant should open the following URL:
https://login.microsoftonline.com/<tenant-id>/adminconsent?client_id=<client-id>&scope=https://outlook.office365.com/.default
<tenant-id>is the customer's tenant ID.<client-id>is the ID of the multitenant application.- The default scope is used to grant application permissions.
For more information about the URL syntax, see Request the permissions from a directory admin.
Step 5: Assign Microsoft Entra roles to the application
You have two options:
- Assign Microsoft Entra roles to the application
- Assign custom role groups to the application using service principals: This method is supported only when you connect to Exchange Online PowerShell or Security & Compliance PowerShell in REST API mode. Security & Compliance PowerShell supports REST API mode in v3.2.0 or later.
Note
You can also combine both methods to assign permissions. For example, you can use Microsoft Entra roles for the "Exchange Recipient Administrator" role and also assign your custom RBAC role to extend the permissions.
For multitenant applications in Exchange Online delegated scenarios, you need to assign permissions in each customer tenant.
Assign Microsoft Entra roles to the application
The supported Microsoft Entra roles are described in the following table:
| Role | Exchange Online PowerShell |
Security & Compliance PowerShell |
|---|---|---|
| Compliance Administrator | ✔ | ✔ |
| Exchange Administrator¹ | ✔ | |
| Exchange Recipient Administrator | ✔ | |
| Global Administrator¹ ² | ✔ | ✔ |
| Global Reader | ✔ | ✔ |
| Helpdesk Administrator | ✔ | |
| Security Administrator¹ | ✔ | ✔ |
| Security Reader | ✔ | ✔ |
¹ The Global Administrator and Exchange Administrator roles provide the required permissions for any task in Exchange Online PowerShell. For example:
- Recipient management.
- Security and protection features. For example, anti-spam, anti-malware, anti-phishing, and the associated reports.
The Security Administrator role doesn't have the necessary permissions for those same tasks.
² Microsoft recommends that you use roles with the fewest permissions. Using lower permissioned accounts helps improve security for your organization. Global Administrator is a highly privileged role that should be limited to emergency scenarios when you can't use an existing role.
For general instructions about assigning roles in Microsoft Entra ID, see Assign Microsoft Entra roles to users.
Note
The following steps are slightly different for Exchange Online PowerShell vs. Security & Compliance PowerShell. The steps for both environments are shown. To configure roles for both environments, repeat the steps in this section.
In Microsoft Entra admin center at https://portal.azure.com/, start typing roles and administrators in the Search box at the top of the page, and then select Microsoft Entra roles and administrators from the results in the Services section.
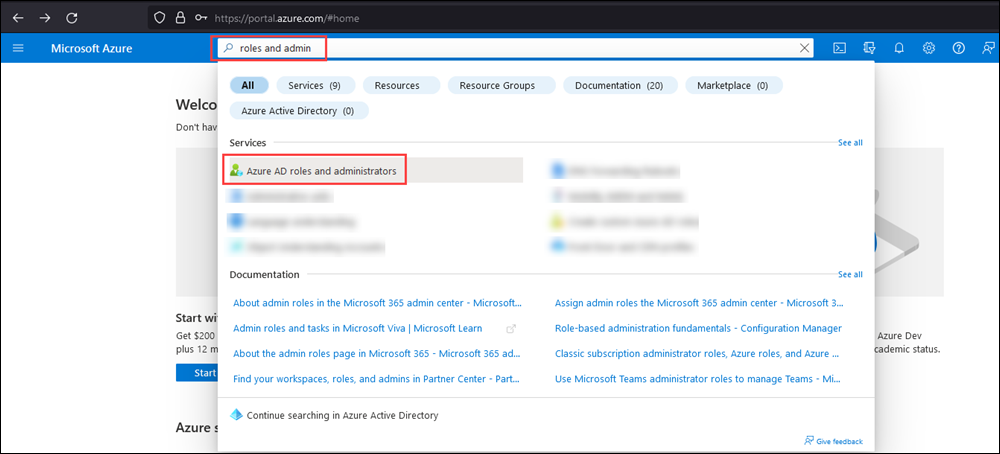
Or, to go directly to the Microsoft Entra roles and administrators page, use https://portal.azure.com/#view/Microsoft_AAD_IAM/AllRolesBlade.
On the Roles and administrators page that opens, find and select one of the supported roles by clicking on the name of the role (not the check box) in the results.
Exchange Online PowerShell: For example, find and select the Exchange administrator role.
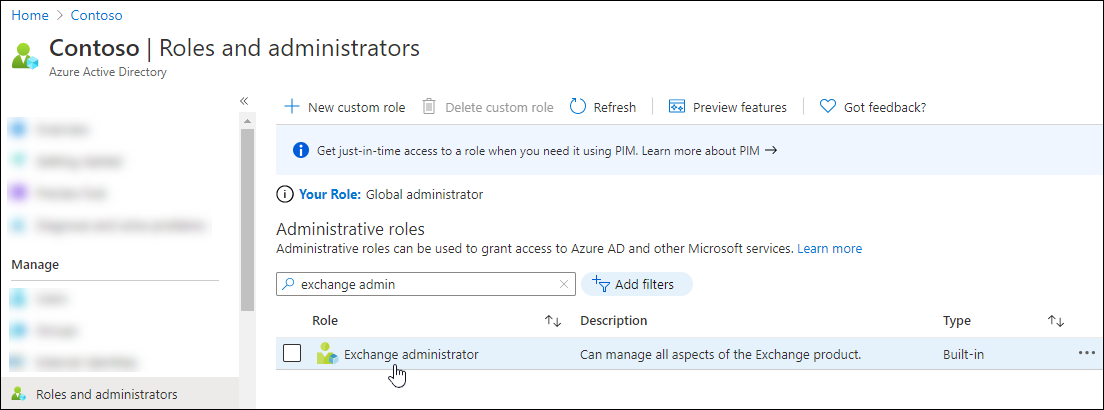
Security & Compliance PowerShell: For example, find and select the Compliance Administrator role.

On the Assignments page that opens, select Add assignments.
Exchange Online PowerShell:

Security & Compliance PowerShell:
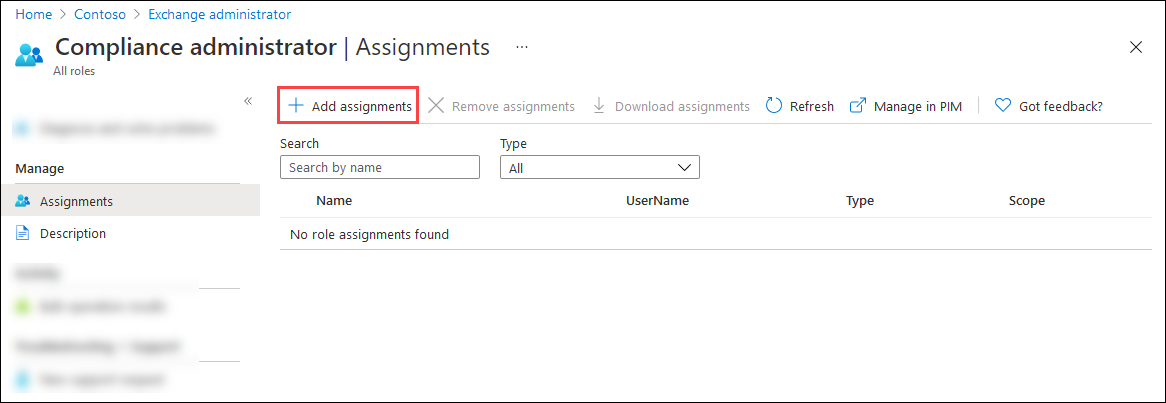
In the Add assignments flyout that opens, find and select the app that you created in Step 1.
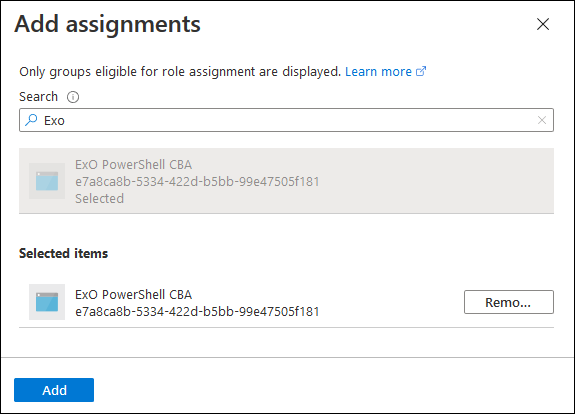
When you're finished in the Add assignments flyout, select Add.
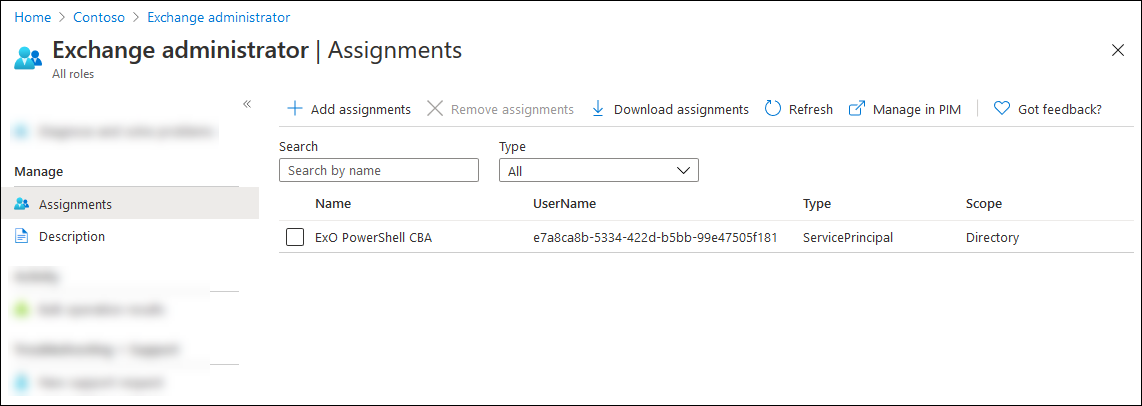
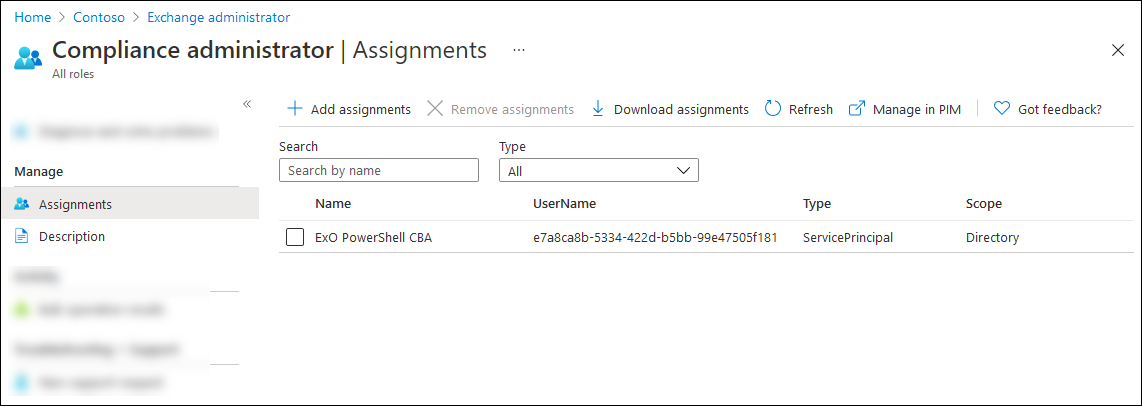
Back on the Assignments page, verify that the role is assigned to the app.
Exchange Online PowerShell:
Security & Compliance PowerShell:
Assign custom role groups to the application using service principals
Note
You need to connect to Exchange Online PowerShell or Security & Compliance PowerShell before completing steps to create a new service principal. Creating a new service principal without connecting to PowerShell doesn't work (your Azure App ID and Object ID are needed to create the new service principal).
This method is supported only when you connect to Exchange Online PowerShell or Security & Compliance PowerShell in REST API mode. Security & Compliance PowerShell supports REST API mode in v3.2.0 or later.
For information about creating custom role groups, see Create role groups in Exchange Online and Create Email & collaboration role groups in the Microsoft Defender portal. The custom role group that you assign to the application can contain any combination of built-in and custom roles.
To assign custom role groups to the application using service principals, do the following steps:
In Microsoft Graph PowerShell, run the following commands to store the details of the Microsoft Entra application that you registered in Step 1 in a variable:
Connect-MgGraph -Scopes AppRoleAssignment.ReadWrite.All,Application.Read.All

$<VariableName1> = Get-MgServicePrincipal -Filter "DisplayName eq '<AppName>'"
For example:
Connect-MgGraph -Scopes AppRoleAssignment.ReadWrite.All,Application.Read.All

$AzureADApp = Get-MgServicePrincipal -Filter "DisplayName eq 'ExO PowerShell CBA'"
For detailed syntax and parameter information, see Get-MgServicePrincipal.
In the same PowerShell window, connect to Exchange Online PowerShell or Security & Compliance PowerShell and run the following commands to:
- Create a service principal object for the Microsoft Entra application.
- Store the details of the service principal in a variable to use in the next step.
New-ServicePrincipal -AppId $<VariableName1>.AppId -ObjectId $<VariableName1>.Id -DisplayName "<Descriptive Name>"

$<VariableName2> = Get-ServicePrincipal -Identity "<Descriptive Name>"
For example:
New-ServicePrincipal -AppId $AzureADApp.AppId -ObjectId $AzureADApp.Id -DisplayName "SP for Azure AD App ExO PowerShell CBA"

$SP = Get-ServicePrincipal -Identity "SP for Azure AD App ExO PowerShell CBA"
For detailed syntax and parameter information, see New-ServicePrincipal.
In Exchange Online PowerShell or Security & Compliance PowerShell, run the following command to add the service principal as a member of the custom role group:
Add-RoleGroupMember -Identity "<CustomRoleGroupName>" -Member <$<VariableName2>.Identity | $<VariableName2>.ObjectId | $<VariableName2>.Id>For example:
Add-RoleGroupMember -Identity "Contoso View-Only Recipients" -Member $SP.IdentityFor detailed syntax and parameter information, see Add-RoleGroupMember.