Note
Access to this page requires authorization. You can try signing in or changing directories.
Access to this page requires authorization. You can try changing directories.
[This article is prerelease documentation and is subject to change.]
A prompt column is an AI-powered data type in Microsoft Dataverse that enables you to define natural language prompts tied to other columns in your table. The AI model processes these prompts to generate relevant responses based on specified input columns. The result is immediately stored in the prompt column, ready to be used in apps, workflows, or reports.
The key function is that the prompt column contains generative AI results stored in the table persistently. This is how customer data is enriched using generative AI and brings value to their data.
Example use cases:
- Customer support: Automate responses to frequently asked questions by using AI prompts to generate accurate and timely replies based on customer inquiries stored in Dataverse.
- Content creation: Use prompts to assist in writing articles, reports, or marketing materials by generating text that aligns with the input provided.
- Data analysis: Use AI prompts to analyze complex datasets and generate insights, sentiments, extract, and classify contents or summaries that help in making informed decisions.
- Workflow automation: Integrate AI prompts into business workflows to automatically do tasks such as scheduling, reporting, and data entry.
Important
- This is a preview feature.
- Preview features aren’t meant for production use and might have restricted functionality. These features are subject to supplemental terms of use, and are available before an official release so that customers can get early access and provide feedback.
Prerequisites
- Prompt columns use the same licensing model as AI builder prompts. More information: Prompts overview
- Copilot and AI Prompts features turned On in the Features area for the environment settings. More information: Manage feature settings
Create a prompt column
- Go to Power Apps. Select Tables on the left navigation pane.
- Create a new table or open an existing table. More information: Create a table
- On the Tables page, select New > Column.
- On the column properties page, enter a Display name and Description for your column.
- Under the Data type dropdown list, select Prompt.
- Clear the Allow form fill assistance checkbox.
- Select +Add new prompt. You can create up to five prompt columns per table.
- On the prompt column page, create a prompt. More information: How to write an AI prompt for a prompt column
- Select Save on the prompt page.
- Select Save on the column properties page to save your column.
How to write an AI prompt for a prompt column
Crafting effective AI prompts is crucial for getting accurate and relevant responses from the AI model. You can use the prefilled prompt or write your own custom prompt.
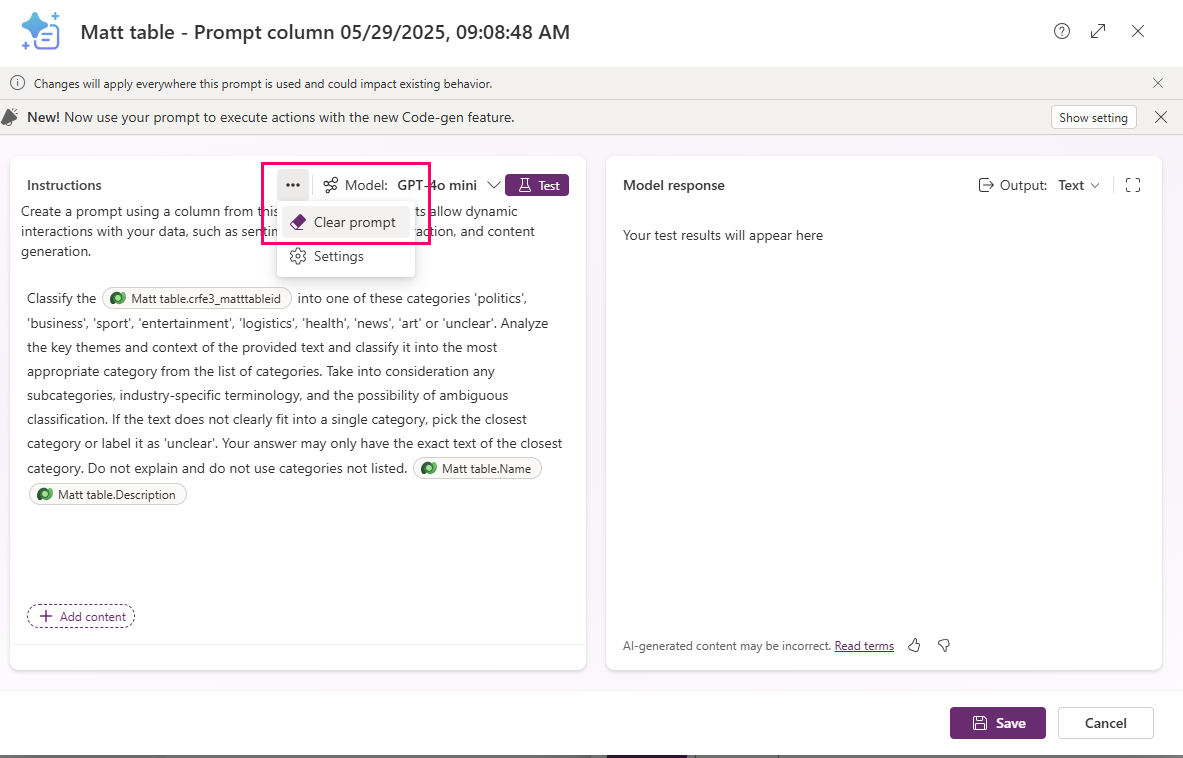
To clear the prefilled prompt, highlight and delete it, or select the three dots to the left of Model, then select Clear prompt.

Write effective prompts
Here are some best practices for writing prompts:
- Write clear instructions. Ensure that your prompts are clear and specific. Avoid ambiguity by being precise about what you want the AI to do. For example, instead of writing Tell me about the weather, write Provide a summary of today's weather in Paris.
- Use structured language. Structured language helps the AI model understand the context and intent of the prompt better. For example, Generate a list of top 10 marketing strategies for 2025 is more effective than Top marketing strategies.
- Include contextual information. Provide necessary context within the prompt to help the AI model generate more accurate responses. For example, Based on the sales data from Q1, suggest ways to improve our marketing campaign. Add an input column in each prompt.
Add input columns
Replace default input text by selecting it and then select Delete.
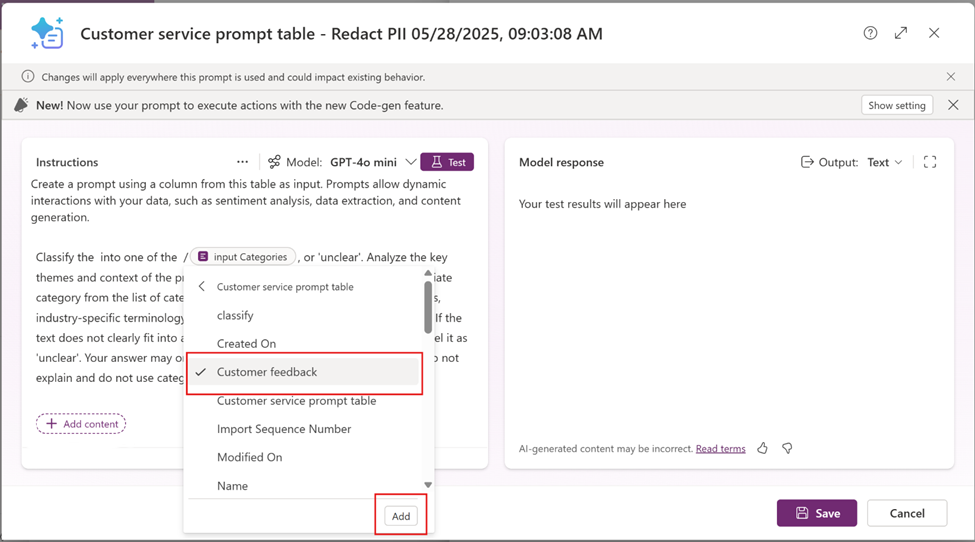
Select +Add content, and then select the table.
The column dropdown list appears. Select the input column from the list of columns from your table, and then select Add. In this example, the Customer feedback column is selected.

- You can use more than one input column in each prompt.
- Input columns can’t be formula columns, file columns, image data type, or another prompt column. If you select these data types, their input value is ignored.
Select Save.
Test and refine prompts
Test your AI prompt. Create a test record with appropriate values in all your input columns for testing. For example, create a Name column in the table and enter some value that is used to identify the test record, such as testing prompts.
- Create or select a prompt column.
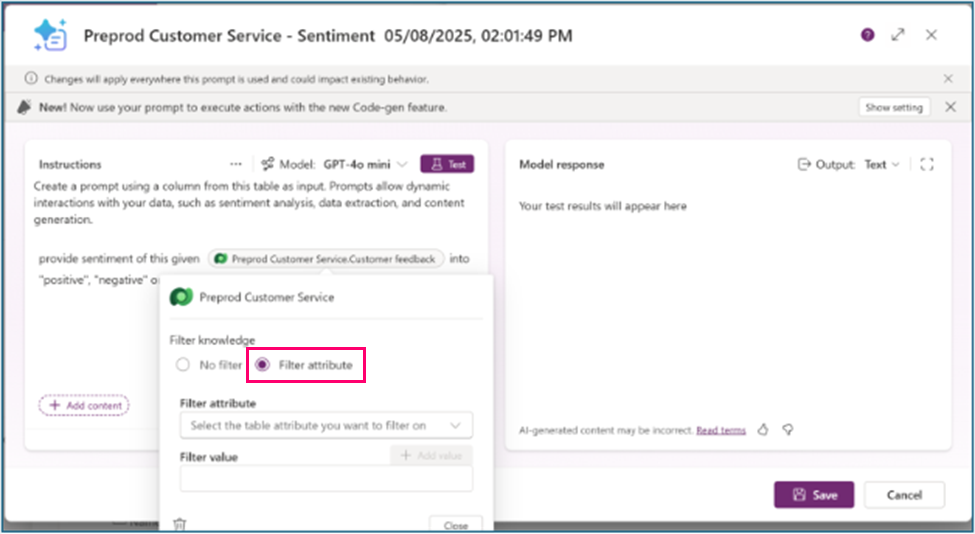
- While editing the prompt in a prompt column, select the input column to open the Filter knowledge pop-up screen.
- Select the Filter attribute option.

- Select the Filter attribute dropdown list and select a filter, such as Name.
- Enter the value of your testing record Name, such as testing prompt.
- Select Close.
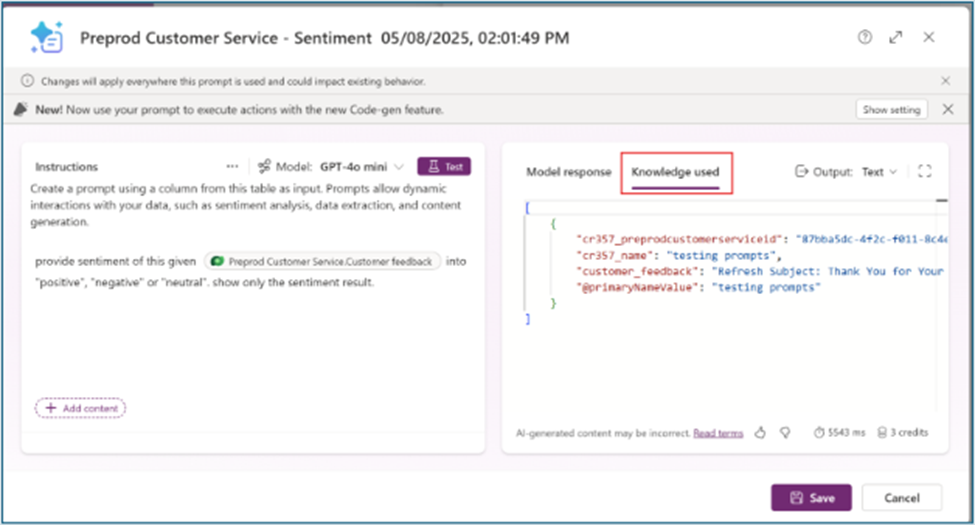
- Select Test and review the Model response.
- Select the Knowledge used tab to confirm that the input came from your test record.

- Modify your prompt until you get the desired results.
- Return to the Filter knowledge pop-up and select No filter when your prompt changes are done.
- Select Save to update your prompt column.
View prompt column results
Create a model-driven app to view and validate your prompt column results.
- Go to Power Apps, and then open an app for editing or create a new app. More information: Create a model-driven app
- In the app designer, select Edit form to edit the table form for the table that has the prompt columns.
- The form designer opens. Select all the input and prompt columns you want to add to the form.
- Select Save and publish.
- Go to the Tables area in Power Apps and select Views.
- Observe the values in the records including new records that contain prompt column values.
Related articles
For information about how the AI is used with this feature, go to FAQ for prompts and text generation capabilities