Test custom triggers before using them
Testing custom triggers before using them in a journey about to be published is the safest way to ensure that your expectations meet your customers' reality. The test-send feature allows you to be confident in the quality and behavior of your custom triggers before you send them out to your audience.
Using the test-send feature, you can:
- Create a custom trigger that is tied to a contact or lead entity.
- Use yourself as a contact to trigger a journey.
- See the inflow of your test journey increase by one every time you test send before using the trigger for a real journey.
Note
If multiple journeys use the custom trigger, you cannot isolate the test-send to a single journey. This means that your test will affect any journey that listens to that trigger. Always make sure you are triggering test journeys and not real journeys.
Example: Test a custom trigger for an abandoned cart scenario
In this example, a journey is triggered when a cart is abandoned by a customer. The journey starts and sends a reminder email with an offer of 30% off if the customer completes the purchase. The abandoned cart signal is created using custom triggers. Learn more: Create custom triggers in Customer Insights - Journeys.
The following steps illustrate how to test the abandoned cart trigger.
In the Customer Insights - Journeys area, go to Triggers and select the custom trigger you want to test.
Note
The test-send feature only works with custom triggers bound by a Contact or Lead entity.
Tip
When you're looking at the list of triggers, custom triggers have a plain lightning bolt icon
 . Out-of-the-box triggers have a lightning bolt with a suitcase icon
  .
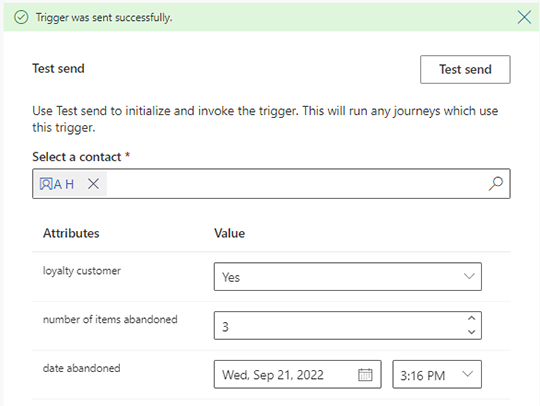
.After the custom trigger details page loads, scroll down to the Test send feature and select a Contact (this could be yourself or an internal colleague).
Add the values to the attributes that will simulate the conditions you want your real customers to fulfill.

Select the Test send button. You'll receive a confirmation message that the trigger was sent successfully.

Once you're done testing, you can go to your journey and select the Total inflow link. You'll see that the inflow increased by one with the name of the contact you tested with. This confirms that the custom trigger worked as expected.
