How to create a data binding (WPF .NET)
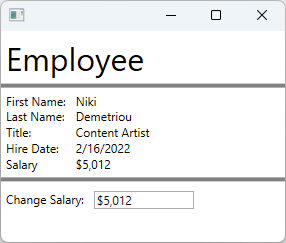
This article describes how to create a binding XAML. The example uses a data object that represents an employee at a company. This data object is bound to a XAML window that uses TextBlock controls to list the employee's details. You'll create a UI that looks like the following image:
To learn more about data binding, see Data binding overview in WPF.
Create a data object
In this example, an employee is used as the data object that the UI is bound to.
Add a new class to your project and name it
Employee.Replace the code with the following snippet:
using System;
using System.ComponentModel;

namespace ArticleSample
{
    public class Employee : INotifyPropertyChanged
    {
        private decimal _salary;
        public event PropertyChangedEventHandler? PropertyChanged;

        public required string FirstName { get; set; }
        public required string LastName { get; set; }
        public required string Title { get; set; }
        public required DateTime HireDate { get; set; }

        public required decimal Salary
        {
            get => _salary;
            set
            {
                _salary = value;

                // Support TwoWay binding
                PropertyChanged?.Invoke(this, new PropertyChangedEventArgs(nameof(Salary)));
            }
        }
    }
}
Imports System.ComponentModel Public Class Employee Implements INotifyPropertyChanged Private _salary As Decimal Public Event PropertyChanged As PropertyChangedEventHandler Implements INotifyPropertyChanged.PropertyChanged Public Property FirstName As String Public Property LastName As String Public Property Title As String Public Property HireDate As DateTime Public Property Salary As Decimal Get Return _salary End Get Set(value As Decimal) _salary = value RaiseEvent PropertyChanged(Me, New PropertyChangedEventArgs(NameOf(Salary))) End Set End Property End Class
The employee data object is a simple class that describes an employee:
- The first and last name of the employee.
- The date the employee was hired.
- The employee's company title.
- How much income the employee earns.
Bind to a data object
The following XAML demonstrates using the Employee class as a data object. The root element's DataContext property is bound to a static resource declared in the XAML. The individual controls are bound to the properties of the Employee.
Add a new Window to the project and name it
EmployeeViewReplace the XAML with the following snippet:
Important
The following snippet is taken from a C# project. If you're using Visual Basic, the
x:Classshould be declared without theArticleSamplenamespace. You can see what the Visual Basic version looks like here.<Window x:Class="ArticleSample.EmployeeView" xmlns="http://schemas.microsoft.com/winfx/2006/xaml/presentation" xmlns:x="http://schemas.microsoft.com/winfx/2006/xaml" xmlns:local="clr-namespace:ArticleSample" Title="" Height="250" Width="300"> <Window.Resources> <local:Employee x:Key="EmployeeExample" FirstName="Niki" LastName="Demetriou" HireDate="2022-02-16" Salary="5012.00" Title="Content Artist" /> </Window.Resources> <StackPanel DataContext="{StaticResource EmployeeExample}"> <Label FontSize="32">Employee</Label> <Border BorderBrush="Gray" BorderThickness="2" /> <Grid Grid.Row="1" Margin="5"> <Grid.RowDefinitions> <RowDefinition Height="Auto"/> <RowDefinition Height="Auto"/> <RowDefinition Height="Auto"/> <RowDefinition Height="Auto"/> <RowDefinition Height="Auto"/> </Grid.RowDefinitions> <Grid.ColumnDefinitions> <ColumnDefinition Width="Auto"/> <ColumnDefinition Width="*"/> </Grid.ColumnDefinitions> <TextBlock Text="First Name:" Grid.Row="0" Margin="0,0,10,0" /> <TextBlock Text="Last Name:" Grid.Row="1" /> <TextBlock Text="Title:" Grid.Row="2" /> <TextBlock Text="Hire Date:" Grid.Row="3" /> <TextBlock Text="Salary" Grid.Row="4" /> <TextBlock Text="{Binding FirstName}" Grid.Row="0" Grid.Column="1" /> <TextBlock Text="{Binding LastName}" Grid.Row="1" Grid.Column="1" /> <TextBlock Text="{Binding Title}" Grid.Row="2" Grid.Column="1" /> <TextBlock Text="{Binding HireDate, StringFormat=d}" Grid.Row="3" Grid.Column="1" /> <TextBlock Text="{Binding Salary, StringFormat=C0}" Grid.Row="4" Grid.Column="1" /> </Grid> <Border BorderBrush="Gray" BorderThickness="2" /> <StackPanel Margin="5,10" Orientation="Horizontal"> <TextBlock Text="Change Salary:" Margin="0,0,10,0" /> <TextBox Text="{Binding Salary, Mode=TwoWay, UpdateSourceTrigger=PropertyChanged, StringFormat=C0}" Width="100" /> </StackPanel> </StackPanel> </Window>
The namespace of the code won't match your project's namespace, unless you created a project named ArticleSample. You can copy and paste the Window.Resources and root element (StackPanel) into you're MainWindow if you created a new project.
To better understand how the previous XAML is using data binding, consider the following points:
A XAML resource is used to create an instance of the
Employeeclass.Typically the data object is passed to or associated with the Window. This example hardcodes the employee for demonstration purposes.
<Window.Resources>
    <local:Employee x:Key="EmployeeExample" FirstName="Niki" LastName="Demetriou"
                                            HireDate="2022-02-16" Salary="5012.00"
                                            Title="Content Artist" />
</Window.Resources>
The root element (
StackPanel) has its data context set to the hardcodedEmployeeinstance.The child elements inherit their
DataContextfrom the parent, unless explicitly set.<StackPanel DataContext="{StaticResource EmployeeExample}">The properties of the
Employeeinstance are bound to theTextBlockcontrols.The
Bindingdoesn't specify aBindingSource, so theDataContextis used as the source.<TextBlock Text="{Binding FirstName}" Grid.Row="0" Grid.Column="1" /> <TextBlock Text="{Binding LastName}" Grid.Row="1" Grid.Column="1" /> <TextBlock Text="{Binding Title}" Grid.Row="2" Grid.Column="1" /> <TextBlock Text="{Binding HireDate, StringFormat=d}" Grid.Row="3" Grid.Column="1" /> <TextBlock Text="{Binding Salary, StringFormat=C0}" Grid.Row="4" Grid.Column="1" />A
TextBoxcontrol is bound withTwoWaymode, allowing theTextBoxto change theEmployee.Salaryproperty.<TextBox Text="{Binding Salary, Mode=TwoWay, UpdateSourceTrigger=PropertyChanged, StringFormat=C0}" Width="100" />
Related content
.NET Desktop feedback