Note
Access to this page requires authorization. You can try signing in or changing directories.
Access to this page requires authorization. You can try changing directories.
.NET Aspire simplifies local cloud-native app development with its compelling AppHost model. This model allows you to run your app locally with the same configuration and services as in Azure. In this article, you learn how to provision Azure resources from your local development environment through the .NET Aspire AppHost.
The .NET Aspire dashboard provides an interactive experience for configuring Azure resources, automatically prompting you for required settings when they're missing. This streamlined approach eliminates the need for manual configuration file editing in most scenarios.
Note
To be clear, resources are provisioned in Azure, but the provisioning process is initiated from your local development environment. To optimize your local development experience, consider using emulator or containers when available. For more information, see Typical developer experience.
Requirements
This article assumes that you have an Azure account and subscription. If you don't have an Azure account, you can create a free one at Azure Free Account. For provisioning functionality to work correctly, you need to be authenticated with Azure. Ensure that you have the Azure Developer CLI installed.
When you run your AppHost with Azure resources, the .NET Aspire dashboard automatically prompts you for any missing configuration values, making the setup process straightforward and interactive.
AppHost provisioning APIs
The AppHost provides a set of APIs to express Azure resources. These APIs are available as extension methods in .NET Aspire Azure hosting libraries, extending the IDistributedApplicationBuilder interface. When you add Azure resources to your AppHost, they add the appropriate provisioning functionality implicitly. In other words, you don't need to call any provisioning APIs directly.
When the AppHost starts, the following provisioning logic is executed:
- The
Azureconfiguration section is validated. - When invalid, the dashboard prompts you to enter the required configuration values or provides detailed error information. For more information, see Configuration prompts and error handling.
- When valid, Azure resources are conditionally provisioned:
- If an Azure deployment for a given resource doesn't exist, the AppHost creates and configures it as a deployment.
- The AppHost stamps the deployment configuration with a checksum to provision resources only when necessary.
Use existing Azure resources
The AppHost automatically manages provisioning of Azure resources. The first time the AppHost runs, it provisions the resources specified in the AppHost. Subsequent runs don't provision the resources again unless the AppHost configuration changes.
To use Azure resources that you provision outside of the AppHost, provide the connection string with the AddConnectionString API, as shown in the following Azure Key Vault example:
// Service registration
var secrets = builder.ExecutionContext.IsPublishMode
    ? builder.AddAzureKeyVault("secrets")
    : builder.AddConnectionString("secrets");

// Service consumption
builder.AddProject<Projects.ExampleProject>()
       .WithReference(secrets)
The preceding code snippet shows how to add an Azure Key Vault to the AppHost. The AddAzureKeyVault API is used to add the Azure Key Vault to the AppHost. The AddConnectionString API is used to provide the connection string to the AppHost.
Alternatively, for some Azure resources, you can opt in to running them as an emulator with the RunAsEmulator API. This API is available for Azure Cosmos DB and Azure Storage integrations. For example, to run Azure Cosmos DB as an emulator, you can use the following code snippet:
var cosmos = builder.AddAzureCosmosDB("cosmos")
                    .RunAsEmulator();
The RunAsEmulator API configures an Azure Cosmos DB resource to be emulated using the Azure Cosmos DB emulator with the NoSQL API.
.NET Aspire Azure hosting integrations
If you're using Azure resources in your AppHost, you're using one or more of the .NET Aspire Azure hosting integrations. These hosting libraries provide extension methods to the IDistributedApplicationBuilder interface to add Azure resources to your AppHost.
Configuration
When utilizing Azure resources in your local development environment, you need to provide the necessary configuration values. You can provide these values in two ways:
- Interactive prompting (recommended): Let the .NET Aspire dashboard prompt you for the required values.
- Manual configuration: Specify the values directly in your configuration files.
Interactive configuration prompting
When you run your AppHost and it requires Azure resources, the .NET Aspire dashboard automatically prompts you for any missing Azure configuration values. This interactive approach simplifies the setup process and eliminates the need to manually configure settings files.
When the AppHost detects missing Azure configuration, the dashboard displays a message bar with an Enter values button:

Clicking Enter values opens a dialog where you can provide the required Azure settings:

The configuration values you need to provide are:
- Subscription ID: Your Azure subscription ID.
- Resource Group: The name of the resource group to use (a default name is suggested).
- Location: The Azure region to use.
The dashboard automatically saves these values to your user secrets for future use, so you only need to enter them once per project. For more information on user secrets, see Manage app secrets.
Manual configuration
Alternatively, you can manually specify configuration values under the Azure section in your appsettings.json file or user secrets:
SubscriptionId: The Azure subscription ID.AllowResourceGroupCreation: A boolean value that indicates whether to create a new resource group.ResourceGroup: The name of the resource group to use.Location: The Azure region to use.
Consider the following example appsettings.json configuration:
{
  "Azure": {
    "SubscriptionId": "<Your subscription id>",
    "AllowResourceGroupCreation": true,
    "ResourceGroup": "<Valid resource group name>",
    "Location": "<Valid Azure location>"
  }
}
Important
Store these values as app secrets. For more information, see Manage app secrets.
Once you configure the necessary values—either through interactive prompting or manual configuration—you can provision Azure resources in your local development environment.
Azure provisioning credential store
The .NET Aspire AppHost uses a credential store for Azure resource authentication and authorization. Depending on your subscription, the correct credential store might be needed for multitenant provisioning scenarios.
With the 📦 Aspire.Hosting.Azure NuGet package installed, and if your AppHost depends on Azure resources, the default Azure credential store relies on the DefaultAzureCredential. To change this behavior, you can set the credential store value in the appsettings.json file, as shown in the following example:
{
  "Azure": {
    "CredentialSource": "AzureCli"
  }
}
As with all configuration-based settings, you can configure these with alternative providers, such as user secrets or environment variables. The Azure:CredentialSource value can be set to one of the following values:
AzureCli: Delegates to the AzureCliCredential.AzurePowerShell: Delegates to the AzurePowerShellCredential.VisualStudio: Delegates to the VisualStudioCredential.AzureDeveloperCli: Delegates to the AzureDeveloperCliCredential.InteractiveBrowser: Delegates to the InteractiveBrowserCredential.
Tip
For more information about the Azure SDK authentication and authorization, see Credential chains in the Azure Identity library for .NET.
Tooling support
In Visual Studio, you can use Connected Services to configure the default Azure provisioning settings. Select the AppHost project, right-click on the Connected Services node, and select Azure Resource Provisioning Settings:

This opens a dialog where you can configure the Azure provisioning settings, as shown in the following screenshot:

Configuration prompts and error handling
When the Azure configuration section is missing, has missing values, or is invalid, the .NET Aspire dashboard provides interactive prompts to help you configure the required values. The dashboard displays a message bar prompting you to Enter values for the missing configuration.
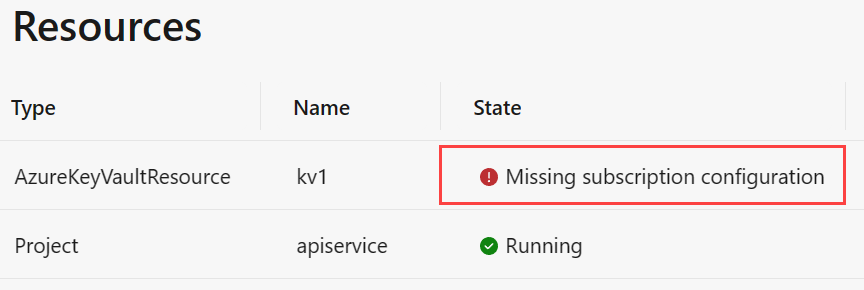
If you dismiss the prompt or there are validation errors, the dashboard provides detailed error information. For example, consider an AppHost that's missing the SubscriptionId configuration value that's attempting to use an Azure Key Vault resource. The Resources page indicates the State as Missing subscription configuration:
Additionally, the Console logs display this information as well, consider the following screenshot:

Known limitations
After provisioning Azure resources in this way, you must manually clean up the resources in the Azure portal as .NET Aspire doesn't provide a built-in mechanism to delete Azure resources. The easiest way to achieve this is by deleting the configured resource group. This can be done in the Azure portal or by using the Azure CLI:
az group delete --name <ResourceGroupName>
Replace <ResourceGroupName> with the name of the resource group you want to delete. For more information, see az group delete.
Collaborate with us on GitHub
The source for this content can be found on GitHub, where you can also create and review issues and pull requests. For more information, see our contributor guide.
.NET Aspire