Make major changes to Microsoft Learn documentation
Important
All repositories that publish to Microsoft Learn have adopted either the Microsoft Open Source Code of Conduct or the .NET Foundation Code of Conduct. For more information, see the Code of Conduct FAQ. Or contact [email protected], or [email protected] with any questions or comments.
Minor corrections or clarifications to documentation and code examples in public repositories are covered by the learn.microsoft.com Terms of Use. Any changes will generate a comment in the pull request, asking you to submit an online Contribution License Agreement (CLA) if you are not an employee of Microsoft. You will need to complete the online form before your pull request can be merged.
This article shows you how to change a Microsoft Learn article using local tools and is suitable for a contributor who needs to make a major change or will be a frequent contributor to a repository. Frequent contributors typically have ongoing or long-running changes that go through multiple build/validation/staging cycles or span multiple days before they sign off on their pull request (PR).
Examples of these types of contributions include:
- Making a large contribution. For instance, your contributions (additions, changes, or deletions) might span multiple articles and need to be committed and tested as one unit of work in a single PR.
- Creating and publishing a new article, which typically requires a more robust local editor.
- Adding new images or updating images, which typically requires you to simultaneously create a new
mediasubdirectory, create image files, update image links in articles, and preview Markdown files in a local editor to test image rendering. - Updating an article over a period of days before you publish. In these cases, you typically need to do regular integration of other changes that occur in the default branch. This integration is easier via Git Bash and local editing. You also run the risk of losing your edits if you do this via the GitHub web editor and wait before you commit the changes.
- Making continual updates to the same article after a PR has been opened. Though you can use the GitHub web editor for this purpose, you might create multiple outstanding PRs for the same file, which may conflict with one another.
Prerequisites
- Identify the GitHub repo that stores the documentation you want to edit.
- Create a GitHub account, if you don't have one.
- Install Git and Markdown tools.
- Set up a local Git repository.
- Review Git and GitHub fundamentals (optional).
Create and check out your working branch
To start, create a new working branch in your local repository to capture your proposed changes. For more background on branches, see Git and GitHub fundamentals.
This tutorial uses Git Bash and Visual Studio Code, but you can use any Git client and editor you prefer.
In VS Code, open the repository folder of your local clone. From the File menu, select Open folder and navigate to the folder on your machine.
Select View from the top menu, and then select Terminal to open the integrated terminal.
In the integrated terminal, make sure you're in the repository folder.
Before you create a working branch, make sure your local main branch is current with everything in the production repo's main branch. This task ensures your working branch captures any changes that have happened in the production repo since the last time you synced with it.
Switch to the main branch in your local repository:
git checkout mainEnsure your local main branch is current:
git pull upstream main
Create a local working branch based on main:
git checkout -b <branch-name><branch-name>is a placeholder. When you run the command, replace it with a unique and meaningful name for your branch and remove the angle brackets.Push the local working branch to the remote branch in your GitHub fork:
git push origin <branch-name> -uThe -u option links the local and remote branches. This option allows you to push commits to your fork by entering just
git pushinstead ofgit push origin <branch-name>.
Find the source Markdown file
To edit an article, find the source file for the article in your local repository clone. Within VS Code, access the repo's Markdown files via the file explorer (a document icon in the top-left sidebar). The file explorer shows the folder structure of the repo, and you can navigate to the file you want to edit.
If you can't find the file, visit the article on Microsoft Learn and select the Edit pencil icon. The relative folder location in the GitHub repo shows in the URL. Here's an example Edit link URL:
https://github.com/Microsoft/azure-docs/blob/main/articles/azure-functions/functions-overview.md
Here's an example file location for this URL.
C:\GitHub\*\azure-docs\articles\azure-functions\functions-overview.md
Edit the file
- Open the file in VS Code by selecting it.
- Make your changes.
- Save your changes by selecting File > Save. Use Save All to save multiple files at once.
Commit and push your changes
If you made substantial edits or reviewed an article for freshness, update ms.date in the metadata block at the top of the file. Format the date as mm/dd/yyyy.
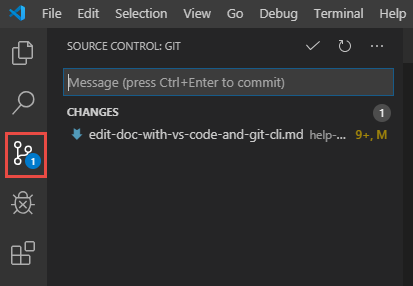
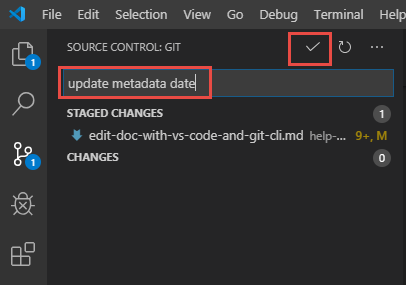
You can use the VS Code terminal or the VS Code UI to commit and push your changes.
Run the
git statuscommand to verify that only the files you edited appear in the list of changed files.git statusRun the
git addcommand followed by the file path and file name to stage the file you changed.git add folder-name/file-name.mdIf you changed multiple files, enter a
git addcommand for each file.Alternatively, you can run
git add .(note the period afteradd) to automatically stage all the changes you made. This method is faster but can cause problems by including changes you made by accident.Run
git statusagain to confirm what changes were staged.Run the
git commitcommand followed by a commit message to save the changes in your local cloned repository.git commit -m "your commit message"Run
git pushto push your changes.git push
You've done it! Your code is now up in your GitHub repository and ready for you to open a PR.
Need to fix something you submitted? It's easy! Just repeat the steps above, starting with Edit the file, to make changes in the same branch and then commit and push again (no need to set the upstream server on subsequent pushes of the same branch). Generally, branches are used to separate streams of work, so you don't need to create a new branch unless you're ready to work on something else.
Make your next change
Ready to make another change, unrelated to this one? Switch back to the default branch, pull from the upstream repository to update your fork, and check out a new branch. Run the following commands in Git Bash:
git checkout main
git pull upstream main
git checkout -b "branchname"
git push origin <branch-name> -u
You're now in a new branch that's linked to your remote branch, and you're ready to make more changes. You're well on your way to becoming an expert contributor!
Next steps
- If you've completed the steps above, now it's time to open a PR to get your changes merged into the main branch.
- To learn more about topics such as Markdown and Markdown extensions syntax, review the Markdown reference.


