Note
Access to this page requires authorization. You can try signing in or changing directories.
Access to this page requires authorization. You can try changing directories.
Data loss prevention (DLP) in Microsoft Defender for Cloud Apps uses content inspection to detect sensitive information in files. When content inspection is enabled, Defender for Cloud Apps analyzes files for text patterns defined by expressions. Text that meets these expressions is treated as a match and can be used to determine a policy violation.
You can use preset or custom expressions and define a threshold for when a match constitutes a violation. For example, you can set a threshold of 10 to alert when a file contains at least 10 credit card numbers.
Matched text is replaced with "X" characters, and the surrounding context (100 characters before and after the match) is masked. Numbers in the context are replaced with "#" and aren't stored. To expose the final four digits of a match, enable the Unmask the last four characters of a match setting in the file policy.
You can also define which file elements are inspected—content, metadata, or file name. By default, inspection applies to both content and metadata. This approach allows inspection of protected files, detection of sensitive data, enforcement of compliance, and application of governance controls, while reducing false positives and aligning enforcement with internal classification standards.
Prerequisites
To inspect encrypted files, and enable scanning of labels a Global Administrator must first grant one‑time admin consent to Defender for Cloud Apps in Microsoft Entra ID.
To do this, in the Defender portal go to Settings > Cloud Apps > Microsoft Information Protection > Inspect protected files, and select Grant permission.
Content inspection for protected files
Once consent is granted, Defender for Cloud Apps provisions the Microsoft Cloud App Security (Internal) app in your tenant. The app uses the Azure Rights Management Services > Content.SuperUser permission to decrypt and inspect protected files.
The following app IDs apply based on your Microsoft cloud environment:
App IDs
| Environment | App ID |
|---|---|
| Public | 25a6a87d-1e19-4c71-9cb0-16e88ff608f1 |
| Fairfax | bd5667e4-0484-4262-a9db-93faa0893899 |
| GCCM | 23105e90-1dfc-497a-bb5d-8b18a44ba061 |
Note
App IDs are internal service principals used by Defender for Cloud Apps in Public, Fairfax, and GCC‑M environments to inspect and enforce DLP policies on protected files. Don't remove or disable these App IDs. Doing so breaks inspection and prevent DLP policies from applying to protected files. Always verify that the App ID for your environment is present and enabled.
Configure Microsoft Information Protection settings
In order to give Defender for Cloud Apps the necessary permissions:
Go to Settings > Microsoft Information Protection.
Under Microsoft Information Protection settings, configure one or both of the following options:
Automatically scan new files for Microsoft Information Protection sensitivity labels and content inspection warnings. When enabled, the App connector scans new files for embedded sensitivity labels from Microsoft Information Protection.
Only scan files for Microsoft Information Protection sensitivity labels and content inspection warnings from this tenant. When enabled, only sensitivity labels applied within your tenant are scanned. Labels applied by external tenants are disregarded.
After selecting your options, select Save to apply your changes.
Configure file policies for protected files
In the Defender portal, go to Settings > Cloud Apps > Policies > Policy management.
Follow the steps to create a new file policy.
Select either Apply to all files, or Apply to selected files to specify which files to scan. This option is useful if you have an inner classification keyword standard that you want to exclude from the policy.
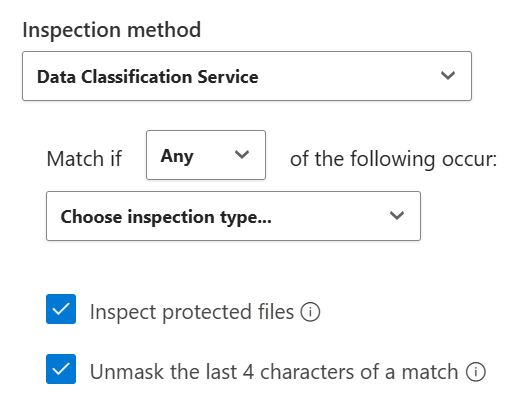
Select Inspection method > Data Classification Service to enable content inspection for the policy.
Check both boxes - Inspect protected files and Unmask the last 4 characters of a match.
Next steps
- Tutorial: Discover and protect sensitive information in your organization
- Learn how to control cloud apps using policies
- Integrate with Microsoft Purview for information protection
If you run into any problems, we're here to help. To get assistance or support for your product issue, please open a support ticket.