Note
Access to this page requires authorization. You can try signing in or changing directories.
Access to this page requires authorization. You can try changing directories.
Autoscale ensures you have the right amount of resources running to handle the load on your application. It adds resources to handle increases in load and also saves money by removing resources that are idle. To learn more about the Autoscale feature of Azure Monitor, see Overview of autoscale in Microsoft Azure.
Service Bus Premium Messaging provides resource isolation at the CPU and memory level so that each customer workload runs in isolation. This resource container is called a messaging unit. To learn more about messaging units, see Service Bus Premium Messaging.
By using the Autoscale feature for Service Bus premium namespaces, you can specify a minimum and maximum number of messaging units and add or remove messaging units automatically based on a set of rules.
For example, you can implement the following scaling scenarios for Service Bus namespaces by using the Autoscale feature:
- Increase messaging units for a Service Bus namespace when the CPU usage of the namespace goes above 75%.
- Decrease messaging units for a Service Bus namespace when the CPU usage of the namespace goes below 25%.
- Use more messaging units during business hours and fewer during off hours.
This article shows you how to automatically scale a Service Bus namespace (update messaging units) by using the Azure portal and an Azure Resource Manager template.
Important
This article applies only to the premium tier of Azure Service Bus.
Configure by using the Azure portal
In this section, you learn how to use the Azure portal to configure autoscaling of messaging units for a Service Bus namespace.
Autoscale setting page
First, follow these steps to go to the Autoscale settings page for your Service Bus namespace.
Sign in to the Azure portal.
In the search bar, type Service Bus, select Service Bus from the list, and press Enter.
Select your premium namespace from the list of namespaces.
Switch to the Scale page.
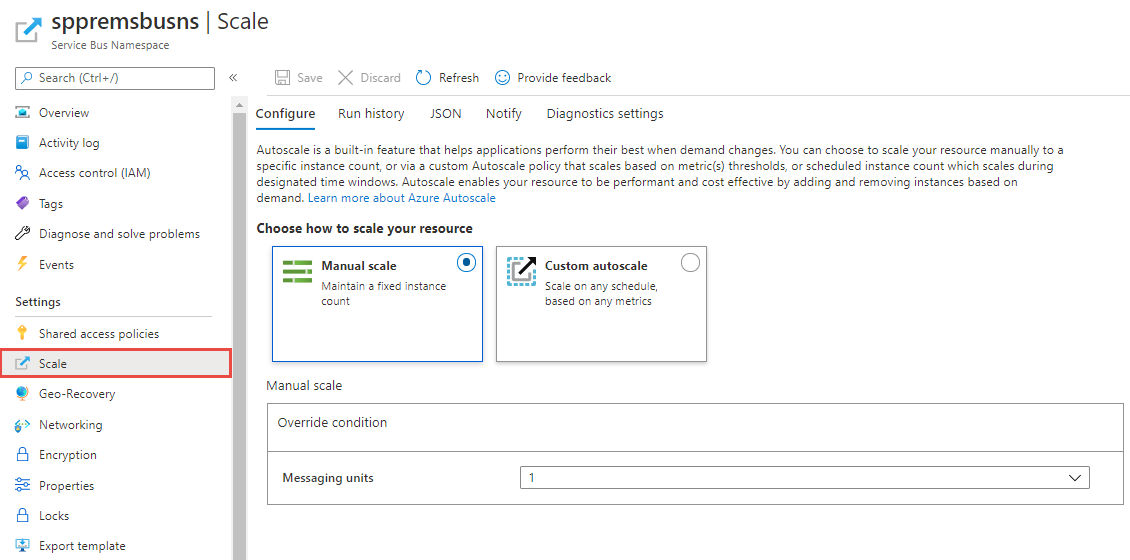
Manual scale
Use this setting to set a fixed number of messaging units for the namespace.
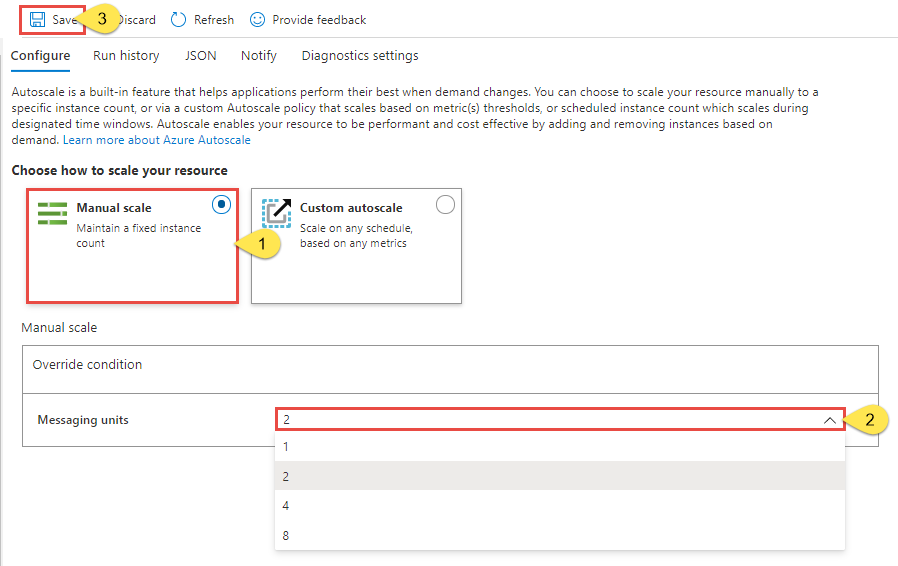
On the Autoscale setting page, select Manual scale if it isn't already selected.
For the Messaging units setting, select the number of messaging units from the list.
Select Save on the toolbar to save the setting.
Custom autoscale - Default condition
You can configure automatic scaling of messaging units by using conditions. This scale condition runs when none of the other scale conditions match. Set the default condition in one of the following ways:
- Scale based on a metric, such as CPU or memory usage
- Scale to a specific number of messaging units
You can't set a schedule to autoscale on specific days or date ranges for a default condition. This scale condition runs when none of the other scale conditions with schedules match.
Important
Both memory and CPU are crucial resources when setting up autoscale. Establish scale-up and scale-down rules for both.
Note
To improve the receive throughput, Service Bus keeps some messages in its cache. Service Bus trims the cache only when memory usage exceeds a certain high threshold, such as 80%. If an entity sends messages but doesn't receive them, the cached messages reflect in increased memory usage. Normally, this condition isn't a concern because Service Bus trims the cache if needed, which eventually causes the memory usage to go down. However, as memory usage can increase quickly, scale up at 60% memory usage to prevent interruptions of your message processing.
Scale based on a metric
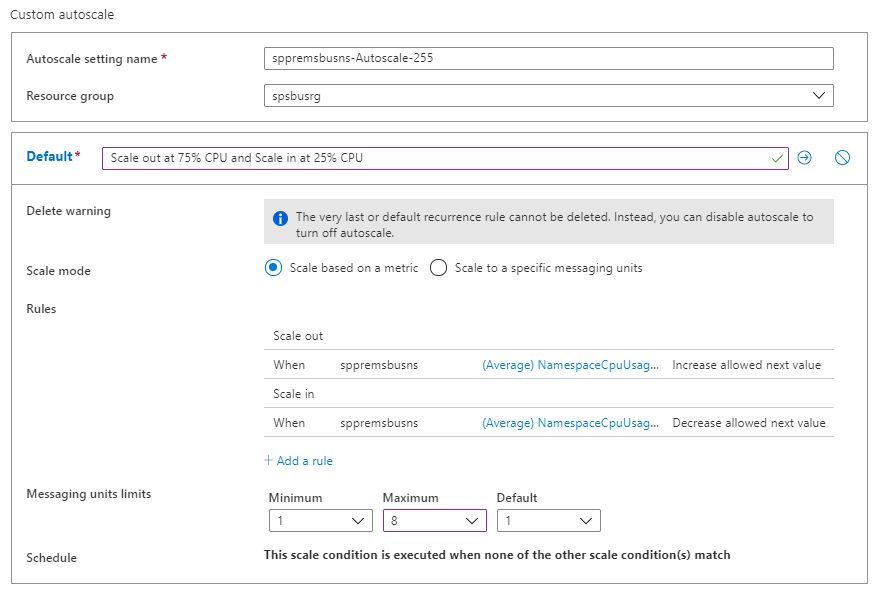
The following procedure shows you how to add a condition to automatically increase messaging units (scale out) when the CPU usage is greater than 75% and decrease messaging units (scale in) when the CPU usage is less than 25%. Increments are done from 1 to 2, 2 to 4, 4 to 8, and 8 to 16. Similarly, decrements are done from 16 to 8, 8 to 4, 4 to 2, and 2 to 1.
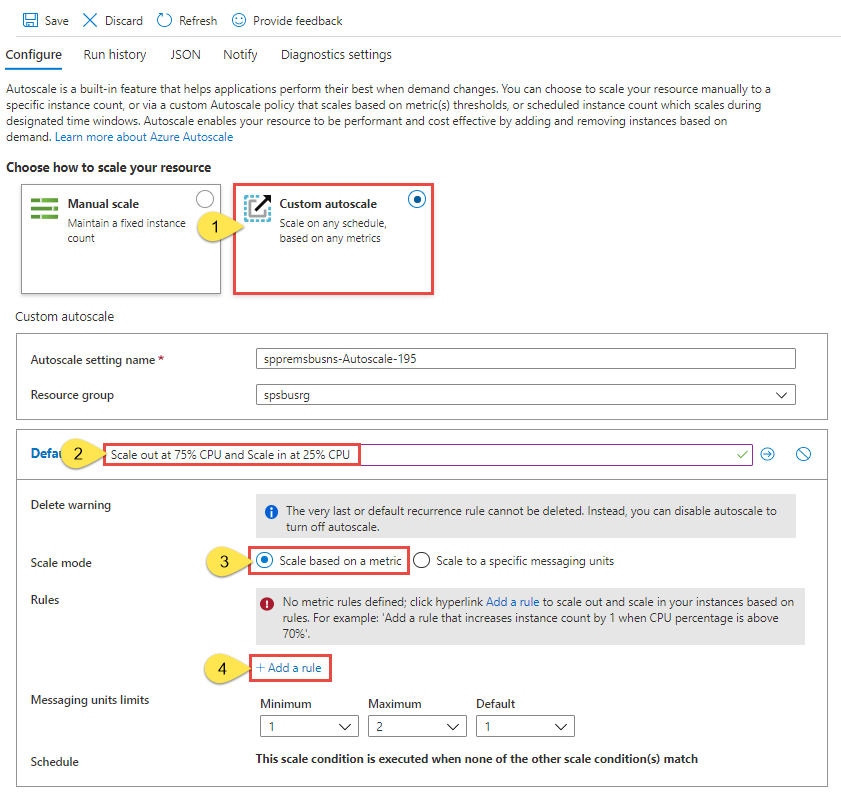
On Autoscale setting, select Custom auto scale for the Choose how to scale your resource option.
In the Default section of the page, enter a name for the default condition. Select the pencil icon to edit the text.
Select Scale based on a metric for Scale mode.
Select + Add a rule.
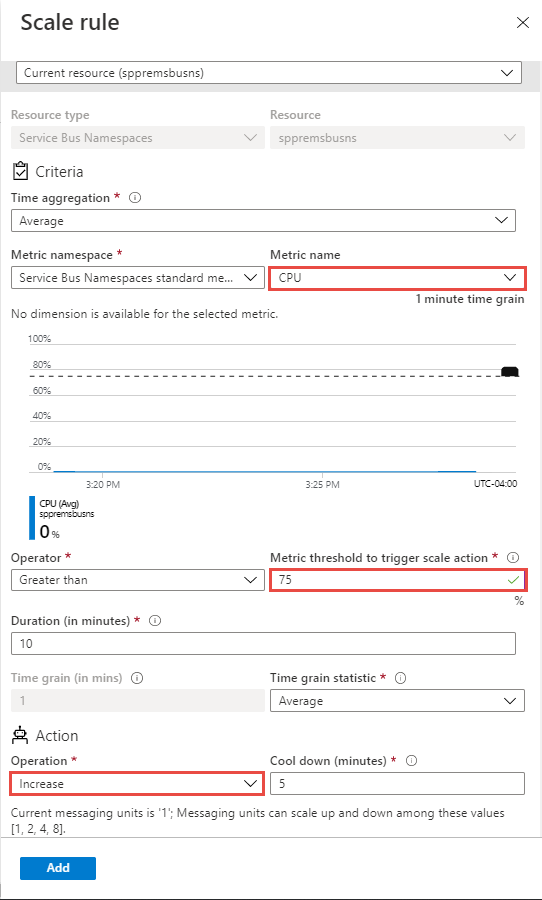
On Scale rule, follow these steps:
Select a metric from the Metric name drop-down list. In this example, it's CPU.
Select an operator and threshold values. In this example, they're Greater than and 75 for Metric threshold to trigger scale action.
Select an operation in the Action section. In this example, it's set to Increase.
Then, select Add.
Note
The autoscale feature increases the messaging units for the namespace if the overall CPU usage goes above 75% in this example. Increments are done from 1 to 2, 2 to 4, 4 to 8, and 8 to 16.
Select + Add a rule again, and follow these steps on Scale rule:
Select a metric from the Metric name drop-down list. In this example, it's CPU.
Select an operator and threshold values. In this example, they're Less than and 25 for Metric threshold to trigger scale action.
Select an operation in the Action section. In this example, it's set to Decrease.
Then, select Add.

Note
The autoscale feature decreases the messaging units for the namespace if the overall CPU usage goes below 25% in this example. Decrements are done from 16 to 8, 8 to 4, 4 to 2, and 2 to 1.
Set the minimum, maximum, and default number of messaging units.
Select Save on the toolbar to save the autoscale setting.
Scale to specific number of messaging units
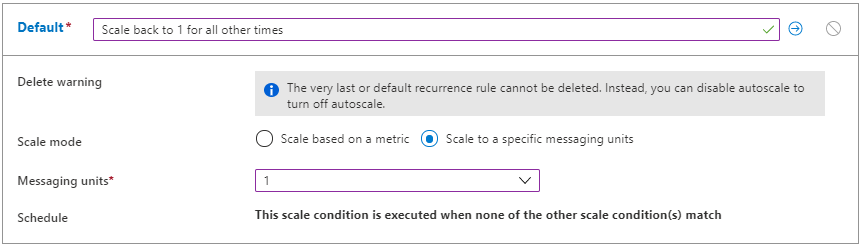
Follow these steps to configure the rule to scale the namespace to use a specific number of messaging units. The default condition applies when none of the other scale conditions match.
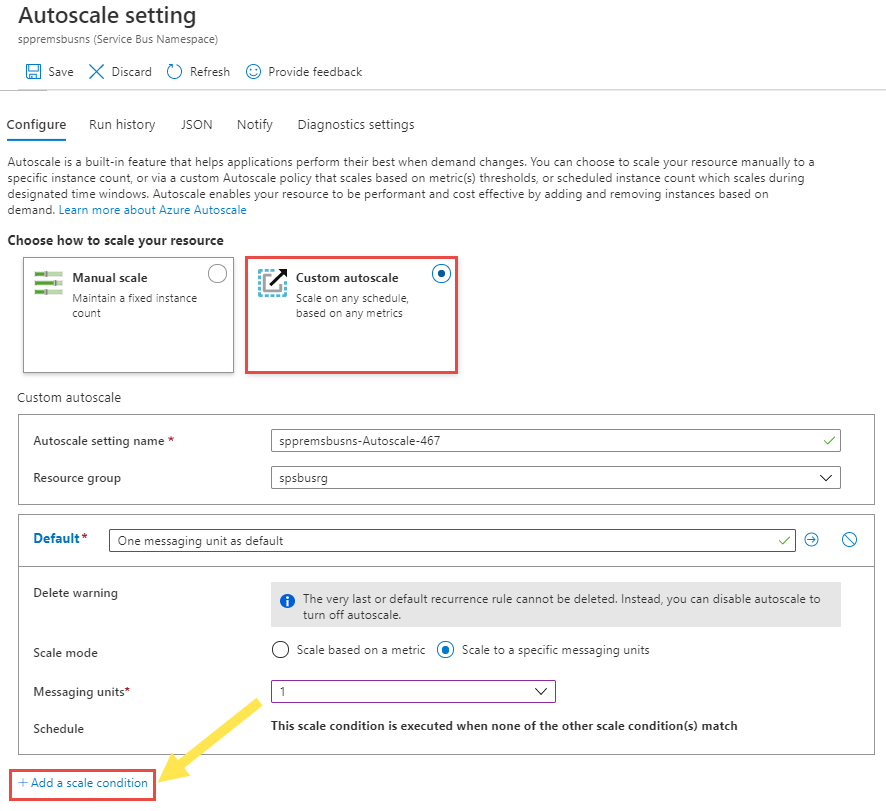
On Autoscale setting, select Custom auto scale for the Choose how to scale your resource option.
In the Default section of the page, enter a name for the default condition.
Select Scale to specific messaging units for Scale mode.
For Messaging units, select the number of default messaging units.
Custom autoscale - additional conditions
The previous section shows how to add a default condition for the autoscale setting. This section shows how to add more conditions to the autoscale setting. For these additional non-default conditions, you can set a schedule based on specific days of a week or a date range.
Scale based on a metric
On Autoscale setting, select Custom auto scale for the Choose how to scale your resource option.
Select Add a scale condition under the Default block.
Enter a name for the condition.
Confirm that the Scale based on a metric option is selected.
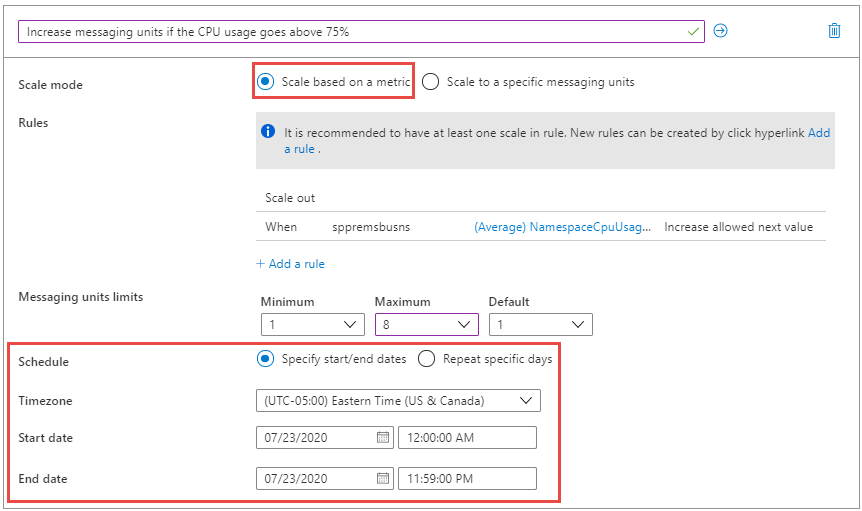
Select + Add a rule to add a rule to increase messaging units when the overall CPU usage goes above 75%. Follow steps from the default condition section.
Set the minimum, maximum, and default number of messaging units.
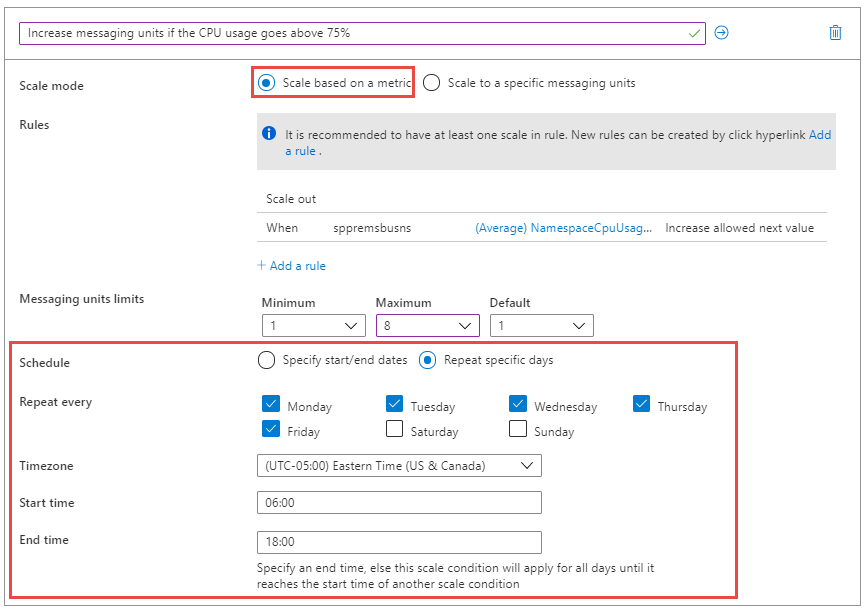
Set a schedule on a custom condition (but not on the default condition). You can either specify start and end dates for the condition or select specific days (Monday, Tuesday, and so on) of a week.
If you select Specify start/end dates, select the Timezone, Start date and time, and End date and time (as shown in the following image) for the condition to be in effect.
If you select Repeat specific days, select the days of the week, timezone, start time, and end time when the condition should apply.
Scale to specific number of messaging units
On Autoscale setting, select Custom auto scale for the Choose how to scale your resource option.
Select Add a scale condition under the Default block.
Enter a name for the condition.
Select the scale to specific messaging units option for Scale mode.
Select the number of messaging units from the drop-down list.
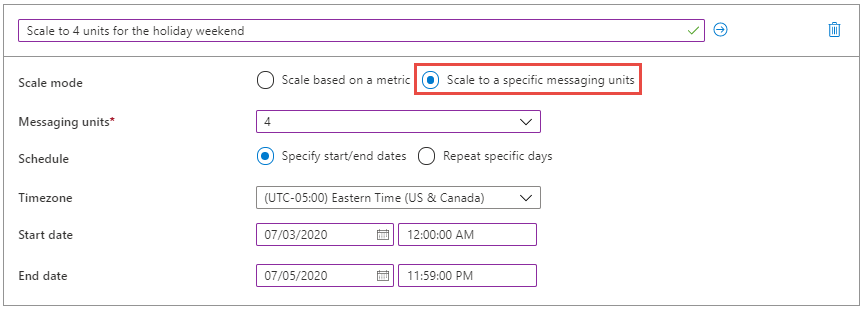
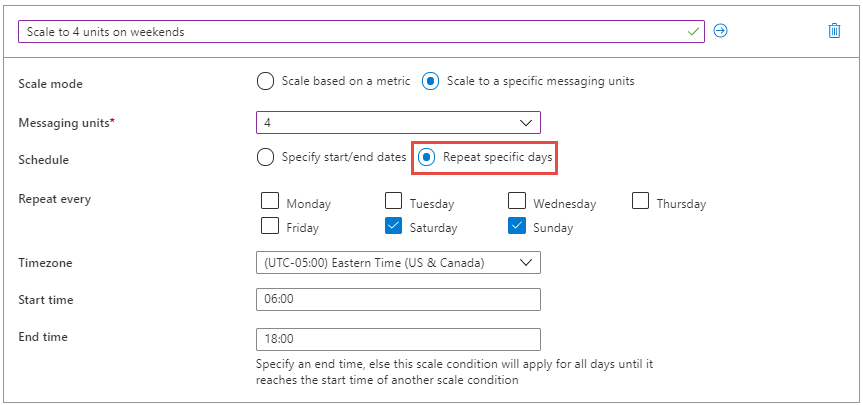
For the schedule, specify either start and end dates for the condition or select specific days (Monday, Tuesday, and so on) of a week and times.
- If you select Specify start/end dates, select the Timezone, Start date and time, and End date and time for the condition to be in effect.
- If you select Repeat specific days, select the days of the week, timezone, start time, and end time when the condition should apply.
To learn more about how autoscale settings work, especially how it picks a profile or condition and evaluates multiple rules, see Understand Autoscale settings.
Note
- The metrics you review to make decisions on autoscaling might be 5-10 minutes old. When you deal with spiky workloads, use shorter durations for scaling up and longer durations for scaling down. Because Service Bus Premium charges per hour, scaling down quickly doesn't reduce the costs for that hour. Instead, keep the scale-down cool-down period to more than 30 minutes to ensure the reduced workload is stable before scaling down. This condition ensures that there are enough messaging units to process spiky workloads and avoids premature scale-down that could cause throttling.
When scaling down, set the threshold to less than half of the scale-up threshold. For example, if the scale-up threshold is 80%, set the scale-down threshold to 30-35% (something below 40%) to prevent continuous scaling up and down. This setting prevents autoscale from switching between scaling up and down continuously.
- If you see failures due to lack of capacity (no messaging units available), raise a support ticket. Capacity fulfillment is subject to the constraints of the environment and is carried out to the best effort.
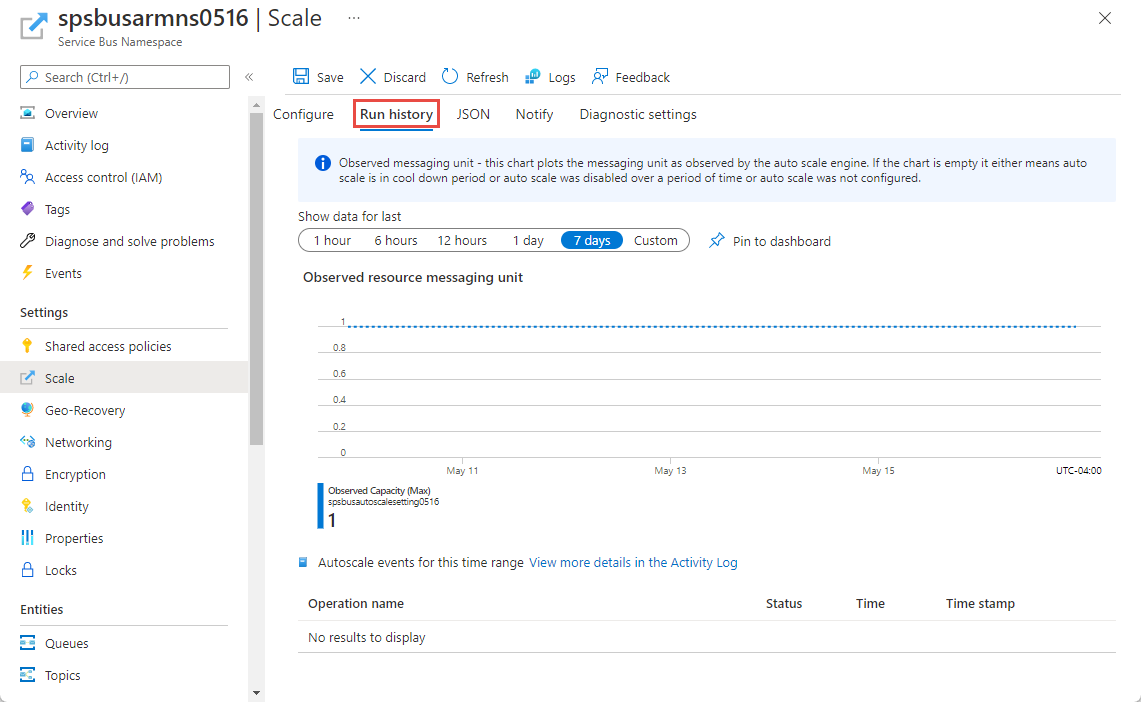
Run history
Switch to the Run history tab on the Scale page to see a chart that plots number of messaging units as observed by the autoscale engine. If the chart is empty, it means either autoscale isn't configured or configured but disabled, or is in a cool down period.
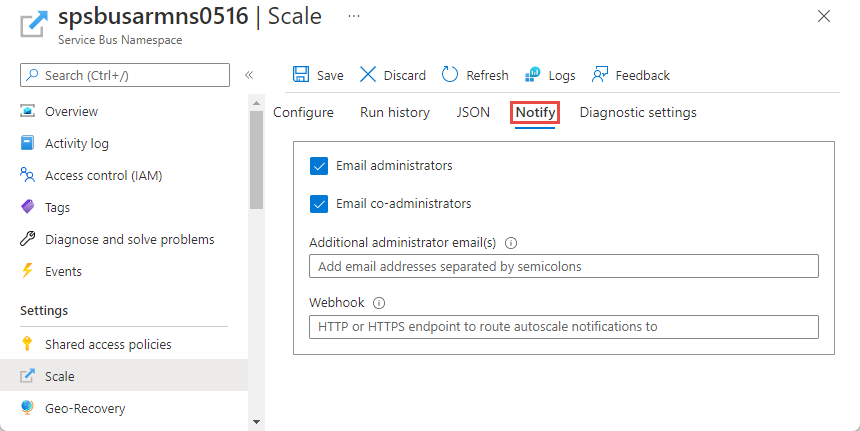
Notifications
Switch to the Notify tab on the Scale page to:
Enable sending notification emails to administrators, co-administrators, and any additional administrators.
Enable sending notification emails to an HTTP or HTTPS endpoints exposed by webhooks.
Configure using a Resource Manager template
You can use the following sample Resource Manager template to create a Service Bus namespace with a queue, and to configure autoscale settings for the namespace. In this example, two scale conditions are specified.
- Default scale condition: increase messaging units when the average CPU usage goes above 75% and decrease messaging units when the average CPU usage goes below 25%.
- Assign two messaging units to the namespace on weekends.
Template
{
	"$schema": "https: //schema.management.azure.com/schemas/2019-04-01/deploymentTemplate.json#",
	"contentVersion": "1.0.0.0",
	"parameters": {
		"serviceBusNamespaceName": {
			"type": "String",
			"metadata": {
				"description": "Name of the Service Bus namespace"
			}
		},
		"serviceBusQueueName": {
			"type": "String",
			"metadata": {
				"description": "Name of the Queue"
			}
		},
		"autoScaleSettingName": {
			"type": "String",
			"metadata": {
				"description": "Name of the auto scale setting."
			}
		},
		"location": {
			"defaultValue": "[resourceGroup().location]",
			"type": "String",
			"metadata": {
				"description": "Location for all resources."
			}
		}
	},
	"resources": [{
			"type": "Microsoft.ServiceBus/namespaces",
			"apiVersion": "2021-11-01",
			"name": "[parameters('serviceBusNamespaceName')]",
			"location": "[parameters('location')]",
			"sku": {
				"name": "Premium"
			},
			"properties": {}
		},
		{
			"type": "Microsoft.ServiceBus/namespaces/queues",
			"apiVersion": "2021-11-01",
			"name": "[format('{0}/{1}', parameters('serviceBusNamespaceName'), parameters('serviceBusQueueName'))]",
			"dependsOn": [
				"[resourceId('Microsoft.ServiceBus/namespaces', parameters('serviceBusNamespaceName'))]"
			],
			"properties": {
				"lockDuration": "PT5M",
				"maxSizeInMegabytes": 1024,
				"requiresDuplicateDetection": false,
				"requiresSession": false,
				"defaultMessageTimeToLive": "P10675199DT2H48M5.4775807S",
				"deadLetteringOnMessageExpiration": false,
				"duplicateDetectionHistoryTimeWindow": "PT10M",
				"maxDeliveryCount": 10,
				"autoDeleteOnIdle": "P10675199DT2H48M5.4775807S",
				"enablePartitioning": false,
				"enableExpress": false
			}
		},
		{
			"type": "Microsoft.Insights/autoscaleSettings",
			"apiVersion": "2021-05-01-preview",
			"name": "[parameters('autoScaleSettingName')]",
			"location": "East US",
			"dependsOn": [
				"[resourceId('Microsoft.ServiceBus/namespaces', parameters('serviceBusNamespaceName'))]"
			],
			"tags": {},
			"properties": {
				"name": "[parameters('autoScaleSettingName')]",
				"enabled": true,
				"predictiveAutoscalePolicy": {
					"scaleMode": "Disabled",
					"scaleLookAheadTime": null
				},
				"targetResourceUri": "[resourceId('Microsoft.ServiceBus/namespaces', parameters('serviceBusNamespaceName'))]",
				"profiles": [{
						"name": "Increase messaging units to 2 on weekends",
						"capacity": {
							"minimum": "2",
							"maximum": "2",
							"default": "2"
						},
						"rules": [],
						"recurrence": {
							"frequency": "Week",
							"schedule": {
								"timeZone": "Eastern Standard Time",
								"days": [
									"Saturday",
									"Sunday"
								],
								"hours": [
									6
								],
								"minutes": [
									0
								]
							}
						}
					},
					{
						"name": "{\"name\":\"Scale Out at 75% CPU and Scale In at 25% CPU\",\"for\":\"Increase messaging units to 4 on weekends\"}",
						"capacity": {
							"minimum": "1",
							"maximum": "8",
							"default": "2"
						},
						"rules": [{
								"scaleAction": {
									"direction": "Increase",
									"type": "ServiceAllowedNextValue",
									"value": "1",
									"cooldown": "PT5M"
								},
								"metricTrigger": {
									"metricName": "NamespaceCpuUsage",
									"metricNamespace": "microsoft.servicebus/namespaces",
									"metricResourceUri": "[resourceId('Microsoft.ServiceBus/namespaces', parameters('serviceBusNamespaceName'))]",
									"operator": "GreaterThan",
									"statistic": "Average",
									"threshold": 75,
									"timeAggregation": "Average",
									"timeGrain": "PT1M",
									"timeWindow": "PT10M",
									"Dimensions": [],
									"dividePerInstance": false
								}
							},
							{
								"scaleAction": {
									"direction": "Decrease",
									"type": "ServiceAllowedNextValue",
									"value": "1",
									"cooldown": "PT5M"
								},
								"metricTrigger": {
									"metricName": "NamespaceCpuUsage",
									"metricNamespace": "microsoft.servicebus/namespaces",
									"metricResourceUri": "[resourceId('Microsoft.ServiceBus/namespaces', parameters('serviceBusNamespaceName'))]",
									"operator": "LessThan",
									"statistic": "Average",
									"threshold": 25,
									"timeAggregation": "Average",
									"timeGrain": "PT1M",
									"timeWindow": "PT10M",
									"Dimensions": [],
									"dividePerInstance": false
								}
							}
						],
						"recurrence": {
							"frequency": "Week",
							"schedule": {
								"timeZone": "Eastern Standard Time",
								"days": [
									"Saturday",
									"Sunday"
								],
								"hours": [
									18
								],
								"minutes": [
									0
								]
							}
						}
					}
				],
				"notifications": [],
				"targetResourceLocation": "East US"
			}
		}
	]
}
You can also generate a JSON example for an autoscale setting resource from the Azure portal. After you configure autoscale settings in the Azure portal, select JSON on the command bar of the Scale page.

Then, include the JSON in the resources section of a Resource Manager template as shown in the preceding example.
Additional considerations
When you use the Custom autoscale option with the Default condition or profile, the number of messaging units increases (1, 2, 4, 8, 16) or decreases (16, 8, 4, 2, 1) gradually.
When you create additional conditions, the number of messaging units might not increase or decrease gradually. Suppose you define two profiles as shown in the following example. At 06:00 UTC, the number of messaging units is set to 16, and at 21:00 UTC, the number is reduced to 1.
{

	"Profiles": [
		{
			"Name": "standardProfile",
			"Capacity": {
				"Minimum": "16",
				"Maximum": "16",
				"Default": "16"
			},
			"Rules": [],
			"Recurrence": {
				"Frequency": "Week",
				"Schedule": {
					"TimeZone": "UTC",
					"Days": ["Monday", "Tuesday", "Wednesday", "Thursday", "Friday"
					],
					"Hours": [6],
					"Minutes": [0]
				}
			}
		},
		{
			"Name": "outOfHoursProfile",
			"Capacity": {
				"Minimum": "1",
				"Maximum": "1",
				"Default": "1"
			},
			"Rules": [],
			"Recurrence": {
				"Frequency": "Week",
				"Schedule": {
					"TimeZone": "UTC",
					"Days": ["Monday", "Tuesday", "Wednesday", "Thursday", "Friday"],
					"Hours": [21],
					"Minutes": [0]
				}
			}
		}
	]
}
Create rules that gradually increase or decrease the number of messaging units.
Next steps
To learn about messaging units, see Premium messaging.