Note
Access to this page requires authorization. You can try signing in or changing directories.
Access to this page requires authorization. You can try changing directories.
Important
This article provides information on using the Azure Machine Learning SDK v1. The SDK v1 is deprecated as of March 31, 2025 and support for it will end on June 30, 2026. You're able to install and use the SDK v1 until that date.
We recommend that you transition to the SDK v2 before June 30, 2026. For more information on the SDK v2, see What is the Azure Machine Learning Python SDK v2 and the SDK v2 reference.
This article explains how to use the Execute Python Script component to add custom logic to the Azure Machine Learning designer. In this guide, you use the Pandas library to do simple feature engineering.
You can use the in-built code editor to quickly add simple Python logic. You should use the zip file method to add more complex code, or to upload more Python libraries.
The default execution environment uses the Anacondas distribution of Python. See the Execute Python Script component reference for a complete list of preinstalled packages.

Important
If you don't see graphical elements mentioned in this document, such as buttons in studio or designer, you might not have the right level of permissions to the workspace. Contact your Azure subscription administrator to verify that you have been granted the correct level of access. For more information, see Manage users and roles.
Execute Python code in the designer
Add the Execute Python Script component
Sign in to the Azure Machine Learning studio, and select the workspace you want to use.
Select Designer from the sidebar menu. Under Classic prebuilt, choose Create a new pipeline using classic prebuilt components.
To the left of the pipeline canvas, select Component.
In the Python Language section, find the Execute Python Script component. Drag and drop the component onto the pipeline canvas.
Connect input datasets
Find the Automobile price data (Raw) sample dataset in the Sample data section. Drag and drop the dataset to the pipeline canvas.
Connect the output port of the dataset to the top-left input port of the Execute Python Script component. The designer exposes the input as a parameter to the entry point script.
The right input port is reserved for zipped Python libraries.
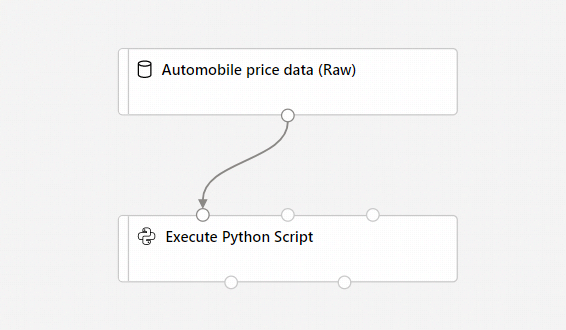
Carefully note the specific input port you use. The designer assigns the left input port to the variable
dataset1, and the middle input port todataset2.
Input components are optional, since you can generate or import data directly in the Execute Python Script component.
Write your Python code
The designer provides an initial entry point script for you to edit and enter your own Python code.
In this example, you use Pandas to combine two of the automobile dataset columns, Price and Horsepower, to create a new column called Dollars per horsepower. This column represents how much you pay for each horsepower unit, which could become a useful information point to decide if a specific car is a good deal for its price.
Double-click the Execute Python Script component.
In the pane that appears to the right of the canvas, select the Python script text box.
Copy and paste the following code into the text box:
import pandas as pd

def azureml_main(dataframe1 = None, dataframe2 = None):
    dataframe1['Dollar/HP'] = dataframe1.price / dataframe1.horsepower
    return dataframe1
Your pipeline should look like this image:

The entry point script must contain the function
azureml_main. The function has two function parameters that map to the two input ports for the Execute Python Script component.The return value must be a Pandas dataframe. You can return at most two dataframes as component outputs.
Submit the pipeline.
Now you have a dataset, which has a new Dollars/HP feature. This new feature could help to train a car recommender. This example shows feature extraction and dimensionality reduction.