Note
Access to this page requires authorization. You can try signing in or changing directories.
Access to this page requires authorization. You can try changing directories.
APPLIES TO:  Azure CLI ml extension v2 (current)
In this article, you see how to deploy your MLflow model to an online endpoint for real-time inference. When you deploy your MLflow model to an online endpoint, you don't need to specify a scoring script or an environment—this functionality is known as no-code deployment.
For no-code-deployment, Azure Machine Learning:
- Dynamically installs Python packages that you list in a conda.yaml file. As a result, dependencies are installed during container runtime.
- Provides an MLflow base image, or curated environment, that contains the following items:
- The
azureml-inference-server-httppackage - The
mlflow-skinnypackage - A scoring script for inferencing
- The
Tip
In workspaces without public network access, before you can deploy MLflow models to online endpoints without egress connectivity, you have to package the models. The model packaging capability is in preview. When you package a model, you can avoid the need for an internet connection, which Azure Machine Learning otherwise requires to dynamically install necessary Python packages for the MLflow models.
Prerequisites
An Azure subscription. If you don't have an Azure subscription, create a free account before you begin.
A user account that has at least one of the following Azure role-based access control (Azure RBAC) roles:
- An Owner role for the Azure Machine Learning workspace
- A Contributor role for the Azure Machine Learning workspace
- A custom role that has
Microsoft.MachineLearningServices/workspaces/onlineEndpoints/*permissions
For more information, see Manage access to Azure Machine Learning workspaces.
Access to Azure Machine Learning:
Install the Azure CLI and the
mlextension to the Azure CLI. For installation steps, see Install and set up the CLI (v2).
About the example
The example in this article shows you how to deploy an MLflow model to an online endpoint to perform predictions. The example uses an MLflow model that's based on the Diabetes dataset. This dataset contains 10 baseline variables: age, sex, body mass index, average blood pressure, and 6 blood serum measurements obtained from 442 diabetes patients. It also contains the response of interest, a quantitative measure of disease progression one year after the date of the baseline data.
The model was trained by using a scikit-learn regressor. All the required preprocessing is packaged as a pipeline, so this model is an end-to-end pipeline that goes from raw data to predictions.
The information in this article is based on code samples from the azureml-examples repository. If you clone the repository, you can run the commands in this article locally without having to copy or paste YAML files and other files. Use the following commands to clone the repository and go to the folder for your coding language:
git clone https://github.com/Azure/azureml-examples --depth 1
cd azureml-examples/cli
Follow along in Jupyter Notebook
To follow along with the steps in this article, see the Deploy MLflow model to online endpoints notebook in the examples repository.
Connect to your workspace
Connect to your Azure Machine Learning workspace:
az account set --subscription <subscription-ID>
az configure --defaults workspace=<workspace-name> group=<resource-group-name> location=<location>
Register the model
You can deploy only registered models to online endpoints. The steps in this article use a model that's trained for the Diabetes dataset. In this case, you already have a local copy of the model in your cloned repository, so you only need to publish the model to the registry in the workspace. You can skip this step if the model you want to deploy is already registered.
MODEL_NAME='sklearn-diabetes'
az ml model create --name $MODEL_NAME --type "mlflow_model" --path "endpoints/online/ncd/sklearn-diabetes/model"

What if your model was logged inside a run?
If your model was logged inside a run, you can register it directly.
To register the model, you need to know its storage location:
- If you use the MLflow
autologfeature, the path to the model depends on the model type and framework. Check the job output to identify the name of the model folder. This folder contains a file named MLModel. - If you use the
log_modelmethod to manually log your models, you pass the path to the model as an argument to that method. For example, if you usemlflow.sklearn.log_model(my_model, "classifier")to log the model,classifieris the path that the model is stored on.
You can use the Azure Machine Learning CLI v2 to create a model from training job output. The following code uses the artifacts of a job with ID $RUN_ID to register a model named $MODEL_NAME. $MODEL_PATH is the path that the job uses to store the model.
az ml model create --name $MODEL_NAME --path azureml://jobs/$RUN_ID/outputs/artifacts/$MODEL_PATH

Deploy an MLflow model to an online endpoint
Use the following code to configure the name and authentication mode of the endpoint that you want to deploy the model to:
Set an endpoint name by running the following command. First replace
YOUR_ENDPOINT_NAMEwith a unique name.export ENDPOINT_NAME="<YOUR_ENDPOINT_NAME>"To configure your endpoint, create a YAML file named create-endpoint.yaml that contains the following lines:
$schema: https://azuremlschemas.azureedge.net/latest/managedOnlineEndpoint.schema.json name: my-endpoint auth_mode: keyCreate the endpoint:
az ml online-endpoint create --name $ENDPOINT_NAME -f endpoints/online/ncd/create-endpoint.yamlConfigure the deployment. A deployment is a set of resources required for hosting the model that does the actual inferencing.
Create a YAML file named sklearn-deployment.yaml that contains the following lines:
$schema: https://azuremlschemas.azureedge.net/latest/managedOnlineDeployment.schema.json name: sklearn-deployment endpoint_name: my-endpoint model: name: mir-sample-sklearn-ncd-model version: 2 path: sklearn-diabetes/model type: mlflow_model instance_type: Standard_DS3_v2 instance_count: 1Note
Automatic generation of the
scoring_scriptandenvironmentis only supported for thePyFuncmodel flavor. To use a different model flavor, see Customize MLflow model deployments.Create the deployment:
az ml online-deployment create --name sklearn-deployment --endpoint $ENDPOINT_NAME -f endpoints/online/ncd/sklearn-deployment.yaml --all-trafficIf your endpoint doesn't have egress connectivity, use model packaging (preview) by including the flag
--package-model:az ml online-deployment create --package-model --name sklearn-deployment --endpoint $ENDPOINT_NAME -f endpoints/online/ncd/sklearn-deployment.yaml --all-trafficAssign all the traffic to the deployment. So far, the endpoint has one deployment, but none of its traffic is assigned to it.
This step isn't required in the Azure CLI if you use the
--all-trafficflag during creation. If you need to change the traffic, you can use theaz ml online-endpoint update --trafficcommand. For more information about how to update traffic, see Progressively update the traffic.Update the endpoint configuration:
This step isn't required in the Azure CLI if you use the
--all-trafficflag during creation. If you need to change traffic, you can use theaz ml online-endpoint update --trafficcommand. For more information about how to update traffic, see Progressively update the traffic.


Invoke the endpoint
When your deployment is ready, you can use it to serve requests. One way to test the deployment is by using the built-in invocation capability in your deployment client. In the examples repository, the sample-request-sklearn.json file contains the following JSON code. You can use it as a sample request file for the deployment.
{"input_data": {
    "columns": [
      "age",
      "sex",
      "bmi",
      "bp",
      "s1",
      "s2",
      "s3",
      "s4",
      "s5",
      "s6"
    ],
    "data": [
      [ 1.0,2.0,3.0,4.0,5.0,6.0,7.0,8.0,9.0,10.0 ],
      [ 10.0,2.0,9.0,8.0,7.0,6.0,5.0,4.0,3.0,2.0]
    ],
    "index": [0,1]
  }}
Note
This file uses the input_data key instead of inputs, which MLflow serving uses. Azure Machine Learning requires a different input format to be able to automatically generate the Swagger contracts for the endpoints. For more information about expected input formats, see Deployment in the MLflow built-in server vs. deployment in Azure Machine Learning inferencing server.
Submit a request to the endpoint:
az ml online-endpoint invoke --name $ENDPOINT_NAME --request-file endpoints/online/ncd/sample-request-sklearn.json
The response should be similar to the following text:
[
11633.100167144921,
8522.117402884991
]
Important
For MLflow no-code-deployment, testing via local endpoints isn't currently supported.
Customize MLflow model deployments
You don't have to specify a scoring script in the deployment definition of an MLflow model to an online endpoint. But you can specify a scoring script if you want to customize your inference process.
You typically want to customize your MLflow model deployment in the following cases:
- The model doesn't have a
PyFuncflavor. - You need to customize the way you run the model. For instance, you need to use
mlflow.<flavor>.load_model()to use a specific flavor to load the model. - You need to do preprocessing or postprocessing in your scoring routine, because the model doesn't do this processing.
- The output of the model can't be nicely represented in tabular data. For instance, the output is a tensor that represents an image.
Important
If you specify a scoring script for an MLflow model deployment, you also have to specify the environment that the deployment runs in.
Deploy a custom scoring script
To deploy an MLflow model that uses a custom scoring script, take the steps in the following sections.
Identify the model folder
Identify the folder that contains your MLflow model by taking the following steps:
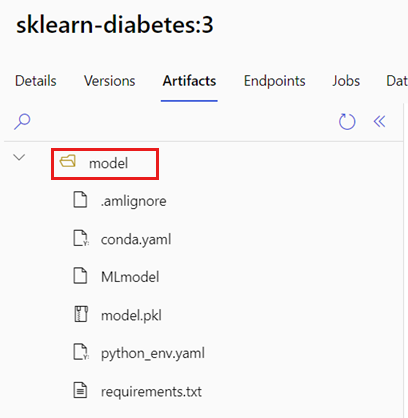
Go to the Models section.
Select the model that you want to deploy and go to its Artifacts tab.
Take note of the folder that's displayed. When you register a model, you specify this folder.

Create a scoring script
The following scoring script, score.py, provides an example of how to perform inference with an MLflow model. You can adapt this script to your needs or change any of its parts to reflect your scenario. Notice that the folder name that you previously identified, model, is included in the init() function.
import logging
import os
import json
import mlflow
from io import StringIO
from mlflow.pyfunc.scoring_server import infer_and_parse_json_input, predictions_to_json
def init():
global model
global input_schema
# "model" is the path of the mlflow artifacts when the model was registered. For automl
# models, this is generally "mlflow-model".
model_path = os.path.join(os.getenv("AZUREML_MODEL_DIR"), "model")
model = mlflow.pyfunc.load_model(model_path)
input_schema = model.metadata.get_input_schema()
def run(raw_data):
json_data = json.loads(raw_data)
if "input_data" not in json_data.keys():
raise Exception("Request must contain a top level key named 'input_data'")
serving_input = json.dumps(json_data["input_data"])
data = infer_and_parse_json_input(serving_input, input_schema)
predictions = model.predict(data)
result = StringIO()
predictions_to_json(predictions, result)
return result.getvalue()
Warning
MLflow 2.0 advisory: The example scoring script works with MLflow 1.X and MLflow 2.X. However, the expected input and output formats on those versions can vary. Check your environment definition to see which MLflow version you use. MLflow 2.0 is only supported in Python 3.8 and later versions.
Create an environment
The next step is to create an environment that you can run the scoring script in. Because the model is an MLflow model, the conda requirements are also specified in the model package. For more information about the files included in an MLflow model, see The MLmodel format. You build the environment by using the conda dependencies from the file. However, you need to also include the azureml-inference-server-http package, which is required for online deployments in Azure Machine Learning.
You can create a conda definition file named conda.yaml that contains the following lines:
channels:
- conda-forge
dependencies:
- python=3.12
- pip
- pip:
- mlflow
- scikit-learn==1.7.0
- cloudpickle==3.1.1
- psutil==7.0.0
- pandas==2.3.0
- azureml-inference-server-http
name: mlflow-env
Note
The dependencies section of this conda file includes the azureml-inference-server-http package.
Use this conda dependencies file to create the environment:
The environment is created inline in the deployment configuration.
Create the deployment
In the endpoints/online/ncd folder, create a deployment configuration file, deployment.yml, that contains the following lines:
$schema: https://azuremlschemas.azureedge.net/latest/managedOnlineDeployment.schema.json
name: sklearn-diabetes-custom
endpoint_name: my-endpoint
model: azureml:sklearn-diabetes@latest
environment:
image: mcr.microsoft.com/azureml/openmpi4.1.0-ubuntu22.04
conda_file: sklearn-diabetes/environment/conda.yaml
code_configuration:
code: sklearn-diabetes/src
scoring_script: score.py
instance_type: Standard_F2s_v2
instance_count: 1
Create the deployment:
az ml online-deployment create -f endpoints/online/ncd/deployment.yml


Serve requests
When your deployment is complete, it's ready to serve requests. One way to test the deployment is to use the invoke method with a sample request file such as the following file, sample-request-sklearn.json:
{"input_data": {
    "columns": [
      "age",
      "sex",
      "bmi",
      "bp",
      "s1",
      "s2",
      "s3",
      "s4",
      "s5",
      "s6"
    ],
    "data": [
      [ 1.0,2.0,3.0,4.0,5.0,6.0,7.0,8.0,9.0,10.0 ],
      [ 10.0,2.0,9.0,8.0,7.0,6.0,5.0,4.0,3.0,2.0]
    ],
    "index": [0,1]
  }}
Submit a request to the endpoint:
az ml online-endpoint invoke --name $ENDPOINT_NAME --request-file endpoints/online/ncd/sample-request-sklearn.json
The response should be similar to the following text:
{
    "predictions": [
    1095.2797413413252,
    1134.585328803727
    ]
}
Warning
MLflow 2.0 advisory: In MLflow 1.X, the response doesn't contain the predictions key.
Clean up resources
If you no longer need the endpoint, delete its associated resources:
az ml online-endpoint delete --name $ENDPOINT_NAME --yes