Note
Access to this page requires authorization. You can try signing in or changing directories.
Access to this page requires authorization. You can try changing directories.
You can use the terminal of a compute instance in your Azure Machine Learning workspace to access Git operations, install packages, and add kernels to the instance.
Prerequisites
- An Azure subscription. You can create a free account.
- An Azure Machine Learning workspace. For more information, see Create workspace resources.
Access a terminal
To access the terminal from your workspace in Azure Machine Learning studio:
Select Notebooks from the left menu.
Select the Terminal icon at the top of the screen.
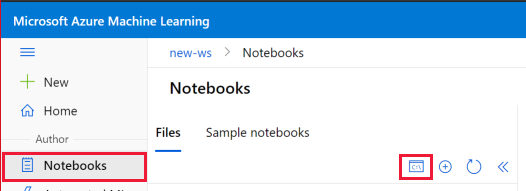
If a compute instance is running, the terminal window for that instance opens. If no compute instance is running, select the Start or Create icon next to Compute to start or create a compute instance.

Other ways to access the terminal
You can also access a compute instance terminal in the following ways:
- In Visual Studio Code, select Terminal > New Terminal from the top menu. For more information about connecting to your workspace from Visual Studio Code, see Work in Visual Studio Code remotely connected to a compute instance.
- In RStudio or Posit Workbench, select the Terminal tab at top left. For more information, see Add custom applications such as RStudio or Posit Workbench.
- In JupyterLab, select the Terminal tile under Other in the Launcher.
- In Jupyter, select File > New > Terminal from the top menu.
- If the compute instance has secure shell (SSH) access enabled, SSH to the machine. If the compute is in a managed virtual network and doesn't have a public IP address, use the
az ml compute connect-sshcommand to connect.
Copy and paste in the terminal
You can copy and paste text between the terminal and Azure Machine Learning studio notebook cells. For Windows, use Ctrl+C to copy and Ctrl+V, Ctrl+Shift+V, or Shift+Insert to paste. For macOS, use Cmd+C to copy and Cmd+V to paste.
Access Git operations and files
You can access all Git operations from the terminal. All Git files and folders are stored in your workspace file system so you can use them from any compute instance in your workspace.
Note
To ensure your files and folders are visible in all your notebook environments, save them anywhere under ~/cloudfiles/code/Users/<your_user_name>.
To integrate Git with your Azure Machine Learning workspace, see Git integration for Azure Machine Learning.
Install packages
You can use a terminal window to install packages into the kernel you want to use for your notebook. The default kernel is python310-sdkv2.
For Python, you can add and execute package install code in a notebook cell. For package management within a Python notebook, use %pip or %conda magic functions to automatically install packages into the current running kernel. Don't use !pip or !conda, which refer to all packages including packages outside the currently running kernel.
You can also install packages directly in Jupyter Notebooks, RStudio, or Posit Workbench. Use the Packages tab at lower right or the Console tab at upper left. For more information, see Add custom applications such as RStudio or Posit Workbench.
Add new kernels
You can run code in the terminal window to add new kernels to the compute instance.
The following code examples install a new Jupyter kernel. You can install any of the available Jupyter kernels.
Run the following command to create a new environment named
newenv.conda create --name newenvActivate the environment.
conda activate newenvInstall the
pipandipykernelpackages and create a kernel for the new Conda environment.conda install pip conda install ipykernel python -m ipykernel install --user --name newenv --display-name "Python (newenv)"
To add a new R kernel to the compute instance:
Use the terminal window to create a new environment. The following command creates
r_env.conda create -n r_env r-essentials r-baseActivate the environment.
conda activate r_envRun R in the new environment.
RAt the R prompt, run
IRkernelto create a new kernel namedirenv.IRkernel::installspec(name = 'irenv', displayname = 'New R Env')Quit the R session.
q()
The new R kernel can take a few minutes to be ready to use. If you see an error saying the kernel is invalid, wait a few minutes and try again.
- For more information about Conda, see Using R language with Anaconda.
- For more information about
IRkernel, see Native R kernel for Jupyter.
Remove added kernels
To remove an added Jupyter kernel from the compute instance, you must remove the kernelspec, and can optionally remove the Conda environment. You can also choose to keep the Conda environment. You must remove the kernelspec to prevent the kernel from remaining selectable and causing unexpected behavior.
Important
When you customize the compute instance, make sure you don't delete Conda environments or Jupyter kernels that you didn't create, which could damage Jupyter or JupyterLab functionality.
To remove the kernelspec:
Use the terminal window to list and find the
kernelspec.jupyter kernelspec listRemove the
kernelspec, replacing<UNWANTED_KERNEL>with the kernel you want to remove.jupyter kernelspec uninstall <UNWANTED_KERNEL>
To also remove the Conda environment:
Use the terminal window to list and find the Conda environment.
conda env listRemove the Conda environment, replacing
<ENV_NAME>with the Conda environment you want to remove.conda env remove -n ENV_NAME
When you refresh, the kernel list in your Notebooks view should reflect your changes.
Manage terminal sessions
Terminal sessions can stay active if you don't properly close terminal tabs. Too many active terminal sessions can affect the performance of your compute instance. Make sure to close any sessions you no longer need to preserve your compute instance resources and optimize performance.
To see a list of all active terminal sessions, select the Manage active sessions icon at far right in the terminal toolbar. Shut down any sessions you no longer need.
For more information about how to manage sessions running on your compute, see Manage notebook and terminal sessions.