Note
Access to this page requires authorization. You can try signing in or changing directories.
Access to this page requires authorization. You can try changing directories.
Applies to: ✔️ Fleet Manager ✔️ Fleet Manager with hub cluster
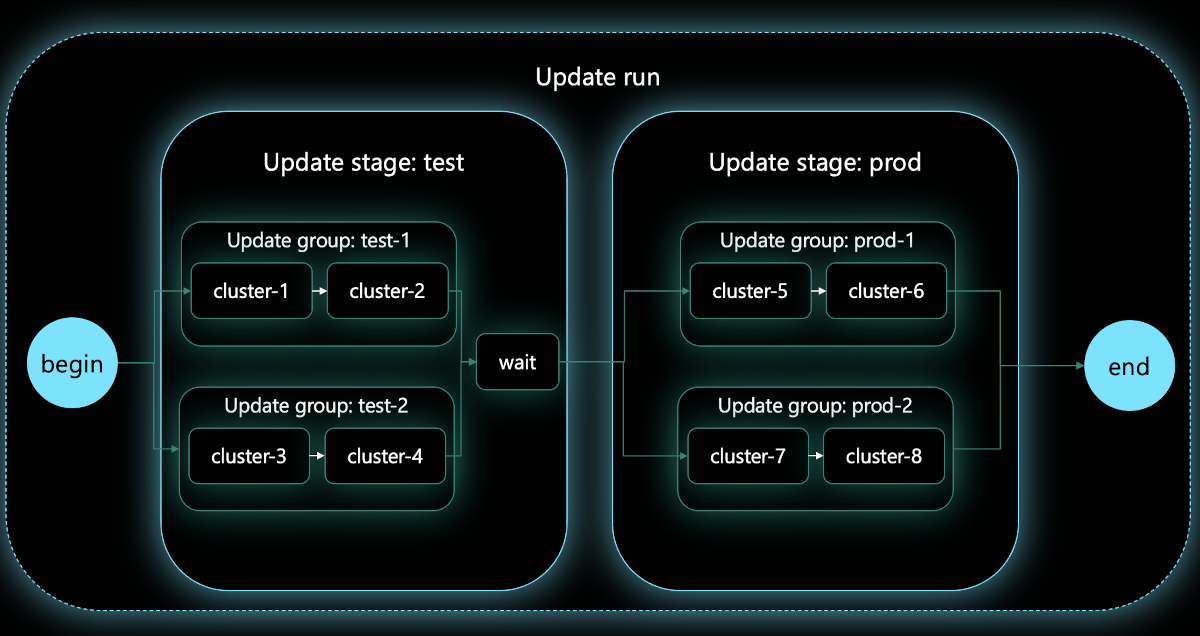
Administrators can control the sequence of updates to Fleet-managed clusters by defining a series of stages and groups. They can configure when approvals and pauses should occur within those stages and groups. The entire configuration can be saved as an update strategy which can be managed independently of update runs or auto-upgrades, allowing strategies to be reused as required.
This article covers how to define update strategies using groups and stages.
Prerequisites
Read the conceptual overview of Fleet updates, which provides an explanation of update runs, stages, groups, and strategies referenced in this guide.
You must have a Fleet resource with one or more member clusters. If not, follow the quickstart to create a Fleet resource and join Azure Kubernetes Service (AKS) clusters as members.
Set the following environment variables:
export GROUP=<resource-group>
export FLEET=<fleet-name>
export CLUSTERID=<aks-cluster-resource-id>
export STRATEGY=<strategy-name>
If you're following the Azure CLI instructions in this article, install the latest version of the Azure CLI. To install or upgrade, see Install the Azure CLI.
You also need the
fleetAzure CLI extension. To install it, run the following command:az extension add --name fleetRun the
az extension updatecommand to update to the latest version of the extension released:az extension update --name fleet
Select clusters for your strategy
There are two ways to select which clusters are included in each stage and group of your update strategy to control update sequence:
- Member labels (recommended): Assign labels to each fleet member and use
memberSelectorto select members by those labels. Each member can have multiple labels. - Update groups: Assign an update group to each fleet member, then define groups in your strategy that match those group names. Each member can only belong to one group.
Create an update strategy using member selectors (preview)
Member labels are the recommended approach for selecting clusters in your update strategies because they provide more flexibility. For conceptual details, see Group clusters using member labels.
Important
Azure Kubernetes Fleet Manager preview features are available on a self-service, opt-in basis. Previews are provided "as is" and "as available," and they're excluded from the service-level agreements and limited warranty. Azure Kubernetes Fleet Manager previews are partially covered by customer support on a best-effort basis. As such, these features aren't meant for production use.
Apply labels on member clusters
Apply labels when adding member cluster to the fleet
Apply labels on your fleet members using the az fleet member create command. The following example applies two labels to the member cluster: env=staging and tier=frontend:
az fleet member create \
    --resource-group $GROUP \
    --fleet-name $FLEET \
    --name member1 \
    --member-cluster-id $CLUSTERID \
    --labels "env=staging tier=frontend"
Apply labels to an existing fleet member
Apply labels on your fleet members using the az fleet member update command
az fleet member update \
 --resource-group $GROUP \
 --fleet-name $FLEET \
 --name member1 \
 --labels "env=staging tier=frontend"
Create an update strategy
An update strategy consists of one or more stages, where a stage can contain one or more update groups.
Note
An Azure portal experience will be available prior to general availability of this capability.
Create a JSON file to define the stages and groups for the update run. Stages run sequentially in the order they appear in the JSON file. Groups run in parallel within each stage. The following example file (example-labels-strategy.json) defines a strategy with two stages using
memberSelectorto select clusters by their labels and includes optionalmaxConcurrencysettings:- The
stagingstage uses a stage-levelmemberSelectorto select all clusters with the labelenv=stagingand create one implicit group. - The
productionstage uses a stage-levelmemberSelectorto prefilter all clusters with the labelenv=production, then defines two groups, each with its ownmemberSelectorto select clusters by thetierlabel.
When
memberSelectoris set on a group, the group'snamefield is used only as a display identifier for status reporting and logging and no longer used for update group based selection of fleet members.{ "stages": [ { "name": "staging", "memberSelector": { "byLabel": "env=staging" }, "maxConcurrency": "1", "afterStageWaitInSeconds": 600 }, { "name": "production", "memberSelector": { "byLabel": "env=production" }, "maxConcurrency": "4", "groups": [ { "name": "frontend", "memberSelector": { "byLabel": "tier=frontend" }, "maxConcurrency": "3" }, { "name": "backend", "memberSelector": { "byLabel": "tier=backend" }, "maxConcurrency": "3" } ] } ] }- The
Note
The maxConcurrency field is optional and controls how many clusters can upgrade concurrently at the stage or group level. Use a larger value to upgrade clusters faster across your fleet, or a smaller value for a more controlled rollout that limits the blast radius if issues arise.
When a stage uses memberSelector without groups (like staging), all matching members form a single implicit group and the stage's maxConcurrency controls concurrency directly. When groups are defined (like production), the stage-level maxConcurrency acts as an overall ceiling across all groups.
In this example, the staging stage sets maxConcurrency to "1", so staging clusters upgrade one at a time. The production stage allows up to "4" clusters concurrently, with the frontend and backend groups each limited to "3".
Values can be a fixed integer (for example, "3") or a percentage (for example, "50%"). If omitted, the system applies default values. For details on how these values are resolved and their upper limits, see Maximum concurrency (preview).
Create a new update strategy using the
az fleet updatestrategy createcommand with the--stagesflag set to the name of your JSON file.az fleet updatestrategy create \ --resource-group $GROUP \ --fleet-name $FLEET \ --name $STRATEGY \ --stages example-labels-strategy.json
Create an update strategy using update groups
Clusters can also be selected in update strategies by assigning them to a single update group. You can define an update strategy that assigns these update groups to stages. Within an update stage, updates are applied to each update group in parallel. Within an update group, member clusters update sequentially.
Note
A fleet member can only be a part of one update group, but an update group can have multiple fleet members assigned to it. An update group itself isn't a separate resource type. Update groups are only strings representing references from the fleet members. So, if all fleet members with references to a common update group are deleted, that specific update group ceases to exist as well.
Assign clusters to update groups
Assign to group when adding member cluster to the fleet
In the Azure portal, navigate to your Azure Kubernetes Fleet Manager resource.
From the service menu, under Settings, select Member clusters > Add.

Select the cluster that you want to add, and then select Next: Review + add.
Enter the name of the update group that you want to assign the cluster to, and then select Add.


Assign a member cluster to an update group when adding the member cluster to the fleet using the az fleet member create command with the --update-group parameter set to the name of the update group.
az fleet member create \
    --resource-group $GROUP \
    --fleet-name $FLEET \
    --name member1 \
    --member-cluster-id $CLUSTERID \
    --update-group group-1a
Assign an existing fleet member to an update group
In the Azure portal, navigate to your Azure Kubernetes Fleet Manager resource.
From the service menu, under Settings, select Member clusters.
Select the clusters that you want to assign to an update group, and then select Assign update group

Enter the name of the update group that you want to assign the cluster to, and then select Assign.


Assign an existing fleet member to an update group using the az fleet member update command with the --update-group flag set to the name of the update group.
az fleet member update \
 --resource-group $GROUP \
 --fleet-name $FLEET \
 --name member1 \
 --update-group group-1
Create an update strategy
An update strategy consists of one or more stages, where a stage can contain one or more update groups.
In the Azure portal, navigate to your Azure Kubernetes Fleet Manager resource.
From the service menu, under Settings, select Multi-cluster update > Strategies, then Create.
Enter a name for the strategy.
The first time you view the page, an update strategy explanation diagram is displayed which can help visualize how strategies function.

Select Create Stage and enter:
- Stage name - name the stage - it must be unique across all stage names in the strategy.
- (Optional) Stage approvals - select this option if you would like to wait for an approval before this stage starts or after it completes. For more information, see Add approvals to update groups and stages.
- (Optional) Pause after stage - select this option if you would like to define a pause before moving to the next stage.
- (Optional) Pause duration - select a predefined duration, or enter a custom value in seconds.

Assign one or more Update Groups to the stage, and then select Create.
Note
The maximum number of Update Groups in each Update Stage is 50.


For this scenario, we create stages and groups to match the details used for the Azure portal process.
Create a JSON file to define the stages and groups for the update run. Stages run sequentially in the order they appear in the JSON file. Groups run in parallel within each stage, so ordering isn't important. The following example file (example-stages.json) defines a strategy with two stages and includes optional
maxConcurrencyandmaxAllowedFailuressettings:{ "stages": [ { "name": "stage-1", "maxConcurrency": "7", "maxAllowedFailures": "2", "groups": [ { "name": "group-1", "maxConcurrency": "3", "maxAllowedFailures": "1" }, { "name": "group-2", "maxConcurrency": "50%", "maxAllowedFailures": "25%" } ], "afterStageWaitInSeconds": 300 }, { "name": "stage-2", "maxConcurrency": "100%", "maxAllowedFailures": "0", "groups": [ { "name": "group-3", "maxConcurrency": "2", "maxAllowedFailures": "0" } ] } ] }maxConcurrencyThe
maxConcurrencyfield is optional and controls how many clusters can upgrade concurrently at the stage or group level. Use a larger value to upgrade clusters faster across your fleet, or a smaller value for a more controlled rollout that limits the blast radius if problems arise.In this example,
stage-1setsmaxConcurrencyto"7", which allows up to"7"clusters in this stage to upgrade concurrently. Withinstage-1,group-1limits concurrency to"3"clusters, which means up to"3"in this group can upgrade concurrently.group-2allows up to"50%"of its clusters to upgrade concurrently (for example, if the group contains 4 clusters, up to 2 can upgrade at the same time).Values can be a fixed integer (for example,
"3") or a percentage (for example,"100%"). If omitted, the system applies default values. For details on how these values are resolved and their upper limits, see Maximum concurrency (preview).maxAllowedFailuresThe
maxAllowedFailuresfield is optional and controls how many member cluster upgrade failures are tolerated before the group or stage is marked as failed. By default (when unset or"0"), a single failure stops the entire update run.This setting evaluates failure count only. It doesn't enforce a minimum success rate. A group or stage can therefore end in
Completedeven if some or all members failed, as long as the failure threshold wasn't exceeded when Fleet made its scheduling decisions.In this example,
stage-1setsmaxAllowedFailuresto"2", tolerating up to two member failures across the stage. Withinstage-1,group-1tolerates"1"failure andgroup-2tolerates"25%"of its members failing (for example, if the group contains 4 clusters, up to 1 failure is tolerated).stage-2setsmaxAllowedFailuresto"0", which means any failure immediately stops the run and is often useful for production stages.For most rollouts, prefer percentage-based values because they scale better across different group sizes. Avoid setting the value equal to the total member count unless you intentionally want effectively "never fail" behavior for that segment.
Values can be a fixed integer (for example,
"3") or a percentage (for example,"25%"). For details on how these values are resolved, see Maximum allowed failures (preview).Create a new update strategy using the
az fleet updatestrategy createcommand with the--stagesflag set to the name of your JSON file.az fleet updatestrategy create \ --resource-group $GROUP \ --fleet-name $FLEET \ --name $STRATEGY \ --stages example-stages.json
Next steps
You can use an update strategy as part of a manual update run or an auto-upgrade profile. See: