Note
Access to this page requires authorization. You can try signing in or changing directories.
Access to this page requires authorization. You can try changing directories.
This article shows you how to attach guardrails to a hosted agent in Microsoft Foundry. Define guardrails in a Responsible AI (RAI) policy that you reference from the agent definition. The platform applies these guardrails at runtime. This article covers two kinds of guardrails:
- Content safety controls screen the prompts your agent receives and the responses it returns, so harmful content is filtered according to your organization's safety configuration.
- Network egress controls (preview) govern the outbound connections your agent makes, so it reaches only the destinations you allow.
You reference the guardrail by its RAI policy resource ID on the agent definition. You can attach it when you deploy by using the Azure Developer CLI (azd), the Python SDK, or the REST API. The same attach steps apply to both kinds of guardrails. To learn what guardrails are, the risks they detect, and how to create one, see Guardrails and controls overview.
Prerequisites
A hosted agent, or a container image ready to deploy as one. See Deploy a hosted agent.
A guardrail (RAI policy) already created on the Foundry resource, and its full Azure Resource Manager (ARM) resource ID. To create one, see Configure guardrails and controls. The ARM resource ID has this form:
/subscriptions/<subscription-id>/resourceGroups/<resource-group>/providers/Microsoft.CognitiveServices/accounts/<account>/raiPolicies/<policy-name>For the Azure Developer CLI method: the
azd ai agentextension, version 1.0.0-beta.1 or later.For the Python SDK method: the Azure AI Projects client library for Python, version 2.2.0 or later:
pip install "azure-ai-projects>=2.2.0"
How guardrails apply to hosted agents
A hosted agent definition has an optional rai_config setting with a rai_policy_name field. Set rai_policy_name to the full ARM resource ID of your guardrail's RAI policy. The platform applies that policy to the agent's prompts and responses.
When you omit rai_config, the agent runs without a content safety guardrail. When you include rai_config but omit rai_policy_name, the platform applies the default policy, Microsoft.DefaultV2. Provide a custom policy when you need stricter or organization-specific filtering.
Always use the full ARM resource ID for rai_policy_name, not the bare policy name.
rai_config is the shape the Foundry API accepts, so the Python SDK and REST examples in this article set it directly. The Azure Developer CLI doesn't expose rai_config in azure.yaml; it uses a policies list instead and maps it to rai_config when it deploys.
Add a guardrail with the Azure Developer CLI
When you use azd, declare the guardrail in the policies list on the azure.ai.agent service in azure.yaml. Add an entry with type: rai_policy and set raiPolicyName to the full ARM resource ID of the RAI policy. When you deploy, azd maps that entry to rai_config.rai_policy_name on the agent definition it sends to Foundry.
In your
azure.yaml, addpoliciesto the agent service:services: my-agent: host: azure.ai.agent project: src/my-agent kind: hosted name: my-hosted-agent description: A hosted agent with a content safety guardrail policies: - type: rai_policy # Full ARM resource ID of the RAI policy on the Foundry resource. raiPolicyName: /subscriptions/<subscription-id>/resourceGroups/<resource-group>/providers/Microsoft.CognitiveServices/accounts/<account>/raiPolicies/<policy-name> protocols: - protocol: responses version: "2.0.0"Deploy the agent:
azd deploy
The platform attaches the guardrail when it creates the agent version.
Add a guardrail with the Python SDK
When you create an agent version with the SDK, pass a RaiConfig to the rai_config parameter of HostedAgentDefinition.
from azure.ai.projects import AIProjectClient
from azure.ai.projects.models import (
    AgentEndpointProtocol,
    ContainerConfiguration,
    HostedAgentDefinition,
    ProtocolVersionRecord,
    RaiConfig,
)
from azure.identity import DefaultAzureCredential

# Format: "https://<resource-name>.services.ai.azure.com/api/projects/<project-name>"
PROJECT_ENDPOINT = "your_project_endpoint"

# Full ARM resource ID of the RAI policy.
RAI_POLICY_ID = (
    "/subscriptions/<subscription-id>/resourceGroups/<resource-group>"
    "/providers/Microsoft.CognitiveServices/accounts/<account>"
    "/raiPolicies/<policy-name>"
)

credential = DefaultAzureCredential()
project = AIProjectClient(
    endpoint=PROJECT_ENDPOINT,
    credential=credential,
    allow_preview=True,
)

agent = project.agents.create_version(
    agent_name="my-agent",
    definition=HostedAgentDefinition(
        cpu="1",
        memory="2Gi",
        container_configuration=ContainerConfiguration(
            image="your-registry.azurecr.io/your-image:tag",
        ),
        protocol_versions=[
            ProtocolVersionRecord(
                protocol=AgentEndpointProtocol.RESPONSES, version="1.0.0"
            )
        ],
        rai_config=RaiConfig(rai_policy_name=RAI_POLICY_ID),
    ),
)

print(f"Agent created: {agent.name}, version: {agent.version}")
Reference: HostedAgentDefinition, ContainerConfiguration, and RaiConfig.
Add a guardrail with the REST API
When you create the agent over REST, include a rai_config object in the definition.
BASE_URL="https://{account}.services.ai.azure.com/api/projects/{project}"
API_VERSION="v1"
TOKEN=$(az account get-access-token --resource https://ai.azure.com --query accessToken -o tsv)

curl -X POST "$BASE_URL/agents?api-version=$API_VERSION" \
  -H "Authorization: Bearer $TOKEN" \
  -H "Content-Type: application/json" \
  -d '{
    "name": "my-agent",
    "definition": {
      "kind": "hosted",
      "container_configuration": {
        "image": "myacr.azurecr.io/my-agent:v1"
      },
      "cpu": "1",
      "memory": "2Gi",
      "protocol_versions": [
        {"protocol": "responses", "version": "1.0.0"}
      ],
      "rai_config": {
        "rai_policy_name": "/subscriptions/<subscription-id>/resourceGroups/<resource-group>/providers/Microsoft.CognitiveServices/accounts/<account>/raiPolicies/<policy-name>"
      }
    }
  }'
Verify the guardrail is applied
Get the agent version and confirm that rai_config.rai_policy_name holds your policy ID.
curl -s -X GET "$BASE_URL/agents/my-agent/versions/1?api-version=$API_VERSION" \
  -H "Authorization: Bearer $TOKEN" | jq '.definition.rai_config'
The response includes the policy you set:
{
  "rai_policy_name": "/subscriptions/<subscription-id>/resourceGroups/<resource-group>/providers/Microsoft.CognitiveServices/accounts/<account>/raiPolicies/<policy-name>"
}
Test content safety filtering
To confirm that the guardrail filters content, send a prompt that violates your safety policy to the agent's Responses endpoint. The platform screens the prompt at the input stage and rejects it before the agent runs.
curl -i -X POST "$BASE_URL/agents/my-agent/endpoint/protocols/openai/responses?api-version=$API_VERSION" \
  -H "Authorization: Bearer $TOKEN" \
  -H "Content-Type: application/json" \
  -d '{"input":"<a prompt that your policy is configured to block>","store":true}'
A blocked prompt returns HTTP 400 with a content_filter error:
{
  "error": {
    "code": "content_filter",
    "message": "The request was blocked due to content safety policy violation at input stage.",
    "type": "content_safety_error"
  }
}
A prompt that passes the policy returns HTTP 200 with the agent's response. If a harmful prompt isn't blocked, confirm that the policy referenced by rai_policy_name is configured to filter the relevant content category and severity.
Network egress controls (preview)
Important
Network egress controls are in preview. They apply to hosted agents only and don't affect prompt-based agents or model deployments. Configure them by using the 2026-05-15-preview API version of the RAI policy. Preview features are provided without a service-level agreement and are not intended to be used in production or in a live operating environment. This feature consists of tooling only. Customers are responsible for understanding the data handling practices of any endpoints receiving data.
Content safety controls screen prompts and responses. Network egress controls govern the outbound connections your hosted agent makes. You define ordered rules that allow, deny, transform, or rewrite outbound requests by destination host, and the platform enforces them inside the agent's sandbox before traffic leaves the runtime. Egress rules are stored in the same RAI policy you attach in the previous sections, so the azd, Python SDK, and REST API attach steps apply them automatically.
How egress rules are evaluated
- The system evaluates rules in order, from top to bottom. The first matching rule wins.
- If no rule matches, the policy's default action applies. Set the default action to Deny for an allowlist (recommended) or Allow for a denylist.
- When you apply an egress policy, the agent runtime automatically allowlists foundational domains it needs to function. A Deny default action doesn't block this required platform connectivity, so you don't need to add rules for it.
- Each rule matches on the request host. Wildcards such as
*.contoso.comare supported. - Rule actions are Allow, Deny, Transform (allow the request and modify its headers), and Rewrite (redirect the request to another destination).
- Evaluation is fail-closed: if the policy can't be evaluated, the request is denied.
Rule limits
The total serialized size of all egress policies on the account (approximately 2 MB) limits egress rules. It's not a count limit on any single policy. In practice, this limit allows roughly 15,000 rules in total across all policies on the account, whether they're in one policy or split across several. Requests that push the account over the limit are rejected. Keep the total number of rules well under this threshold, and consolidate or prune unused rules where possible.
Choose an enforcement mode
| Mode | Behavior | When to use |
|---|---|---|
| Audit | Outbound traffic flows normally. Requests that would be denied are logged but not blocked. | Observe what your agent calls before you enforce. |
| Enforce | Matching rules are applied, and denied requests are blocked. | Production enforcement after you validate rules in Audit mode. |
Deploy in Audit mode first, review the egress decisions, refine your rules, and then switch to Enforce.
Note
Audit mode changes only how Deny actions behave: a request that would be denied is logged instead of blocked. Transform and Rewrite actions are applied in both Audit and Enforce modes, so header transforms and redirects still take effect while you audit.
Add egress rules by using the REST API
An RAI policy stores egress rules in the egressPolicy property. Create or update the policy by using the Azure Resource Manager RAI Policies - Create Or Update operation with the 2026-05-15-preview API version:
TOKEN=$(az account get-access-token --resource "https://management.azure.com" --query accessToken -o tsv)

curl -X PUT \
  "https://management.azure.com/subscriptions/<subscription-id>/resourceGroups/<resource-group>/providers/Microsoft.CognitiveServices/accounts/<account>/raiPolicies/<policy-name>?api-version=2026-05-15-preview" \
  -H "Authorization: Bearer $TOKEN" \
  -H "Content-Type: application/json" \
  -d '{
    "properties": {
      "mode": "Blocking",
      "basePolicyName": "Microsoft.DefaultV2",
      "egressPolicy": {
        "mode": "Enforced",
        "defaultAction": "Deny",
        "rules": [
          {
            "name": "allow-contoso",
            "ruleType": "Fqdn",
            "match": { "host": "*.contoso.com" },
            "action": { "actionType": "Allow" }
          }
        ]
      }
    }
  }'
- Set
egressPolicy.modetoEnforcedto block traffic, orAuditto log would-deny events without blocking. - Set
egressPolicy.defaultActiontoDenyfor an allowlist orAllowfor a denylist. - Set each rule's
action.actionTypetoAllow,Deny,Transform, orRewrite.
To review the configured rules, send a GET request to the same URL and inspect properties.egressPolicy.
For a complete request body that combines a default action with several rule types, see the PutRaiPolicyWithEgress.json example in the Azure REST API specs.
Transform request headers
When a rule's action.actionType is Transform (or Rewrite), you can modify the headers of the outbound request by using an action.headers array. Each entry describes one header operation:
{
  "name": "allow-and-tag-contoso",
  "ruleType": "Fqdn",
  "match": { "host": "*.contoso.com" },
  "action": {
    "actionType": "Transform",
    "headers": [
      { "operation": "Set",    "name": "X-Trace-Source", "value": "hosted-agent" },
      { "operation": "Insert", "name": "X-Request-Id",   "value": "default-id" },
      { "operation": "Remove", "name": "User-Agent" }
    ]
  }
}
Each header object supports the following fields:
| Field | Required | Description |
|---|---|---|
operation |
Yes | The header operation: Set, Insert, or Remove. Operation names are case-insensitive. If you omit it, Set is used. |
name |
Yes | The name of the header to modify. |
value |
For Set and Insert |
The static header value. Not used for Remove. |
You must include headers when actionType is Transform. You can omit headers when actionType is Rewrite. Header transforms apply only to requests that match the rule.
Note
During preview, header transforms support static value only. Dynamic value references (valueRef) that inject a managed identity token or a secret are coming soon and aren't enforced yet. A rule that uses valueRef is accepted but the header isn't injected at runtime.
Header operations
The three operations differ only in how they treat a header that's already present on the outbound request:
| Operation | Header already present | Header not present |
|---|---|---|
Set |
Overwrites the existing value. | Adds the header. |
Insert |
Leaves the existing value unchanged. | Adds the header. |
Remove |
Removes the header. | No effect. |
Use Set to force a header to a specific value regardless of what the agent sent. Use Insert to supply a default only when the agent didn't already set the header. Use Remove to strip a header before the request leaves the runtime.
Add egress rules in the portal
You can also author egress rules in the Foundry portal as a Network control on a guardrail:
In the Foundry portal, create or edit a guardrail, and then expand the Network control.

Select Egress rules, and set the Outbound requests default action to Deny or Allow.
Select Add rules, choose a Mode (Audit or Enforce), enter a Host match and an Action, and then select Add. Reorder rules as needed; the first match wins. For a Transform action, use a Static value for the header. (Managed identity and Secret reference value sources appear in the dialog but aren't enforced yet - see Preview limitations.)
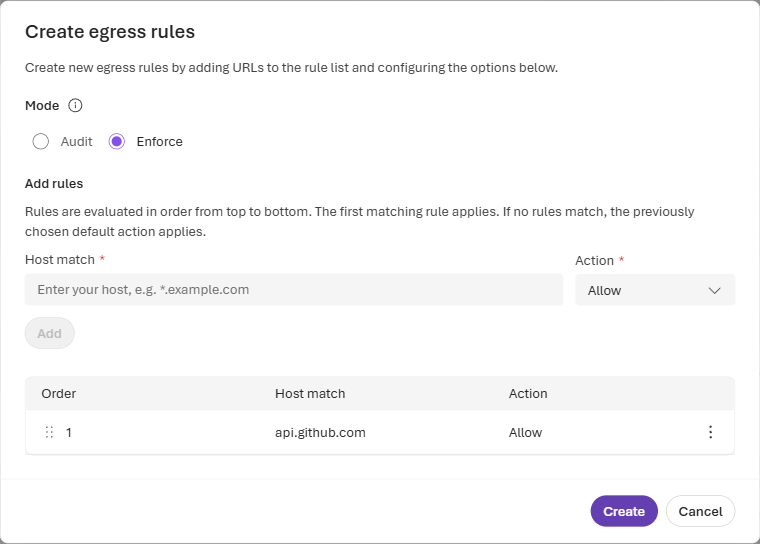
Select Create, and then assign the guardrail to your hosted agent.
For details about creating and assigning guardrails in the portal, see Configure guardrails and controls.
Certificate handling
To inspect HTTPS traffic, the hosted-agent runtime injects the egress proxy's certificate authority (CA) into the sandbox trust bundle. The proxy CA is infrastructure-specific: it can differ across hosted-agent clusters and regions, and it rotates over time (currently about every 30 days). Treat the CA bundle as runtime configuration. Don't pin, copy, or persist it.
Configure TLS clients to read the runtime-provided CA bundle from the standard environment variables that are already present in the sandbox:
| Environment variable | Use |
|---|---|
SSL_CERT_FILE |
Generic PEM CA bundle path for OpenSSL-style TLS clients. |
REQUESTS_CA_BUNDLE |
Python requests and compatible HTTP clients. |
GRPC_DEFAULT_SSL_ROOTS_FILE_PATH |
gRPC clients that support the default roots file override. |
NODE_EXTRA_CA_CERTS |
Node.js additional CA file, read when the process starts. |
For example, with Python requests:
import os
import requests

response = requests.get(
    "https://example.com",
    verify=os.environ["REQUESTS_CA_BUNDLE"],
)
Keep these constraints in mind:
Don't pin the CA subject, public key, thumbprint, or file contents. Any of these values can change on rotation or differ by cluster.
Don't persist the injected CA to a container image, persistent volume, snapshot, or source control. The CA is runtime infrastructure, not application configuration.
Rotation can happen while a sandbox is running. Long-running processes might need to reload their TLS configuration or restart.
If you must build a single custom bundle (for example, to combine enterprise roots with the runtime roots), build it at process startup from the current runtime bundle and treat it as temporary:
cat "$SSL_CERT_FILE" /app/custom-roots.pem > /tmp/runtime-ca-bundle.pem
export SSL_CERT_FILE=/tmp/runtime-ca-bundle.pem
export REQUESTS_CA_BUNDLE=/tmp/runtime-ca-bundle.pem
View egress decisions
The agent sends network egress decisions to the project's Application Insights resource. Each event includes details such as the destination host, matched rule, decision, and enforcement mode. Review these events to confirm that network egress behavior aligns with your configured policy.
To locate the project's Application Insights resource:
- Go to the Foundry portal.
- Select the Operate tab.
- Select Admin.
- Search for and select your project.
- Open the Connected resources tab.
- Find the AppInsights connected resource and copy its Target URI.
Each project should have a single Application Insights connection. If Application Insights isn't configured, select Add connection and add an Application Insights resource for the project.
After you identify the Application Insights resource, open it in the Azure portal and go to Logs. Run the following query to view recent network egress decisions:
traces
| where timestamp > ago(1h)
| where message == "Network egress decision"
What a blocked request looks like
When a rule denies an outbound call, the egress proxy returns an HTTP 403 response to the agent's network client. The agent handles the error with its own logic. For example, if the blocked call was a tool call, the agent typically reports that the tool call failed and tries a different approach. Policy internals aren't exposed to end users.
Preview limitations and what's coming next
Network egress controls are an additive feature. During preview:
- Egress controls apply to hosted agents only.
- Enforcement happens inside the Foundry-managed agent sandbox. Egress controls complement your own network controls, such as Azure Firewall, rather than replace them. They don't delegate enforcement to a customer-managed firewall, and they aren't centrally enforced through Azure Policy.
- In the portal, rules match on host.
The following capabilities aren't available yet and are planned for future updates:
- Dynamic header values — injecting a header value from a managed identity or a secret (
valueRef). During preview, use a staticvalue. - Rule types such as Azure service tags and IP address ranges.
- MCP tool policies, PII and data-loss-prevention inspection, and custom webhook hooks.
Related content
- Guardrails and controls overview — what guardrails are, the risks they detect, and where they intervene.
- Configure guardrails and controls — create the RAI policy you reference here.
- Networking options for Foundry Agent Service — how egress controls fit with virtual network and private networking options.
- Deploy a hosted agent — the full deployment workflow for hosted agents.