Note
Access to this page requires authorization. You can try signing in or changing directories.
Access to this page requires authorization. You can try changing directories.
In this quickstart, you use GitHub Copilot for Azure agent mode to create Azure Cosmos DB resources and import sample data by using Python. Agent mode takes action in Visual Studio Code - creating files, executing commands in the terminal, and more.
Without GitHub Copilot for Azure agent mode, setting up Cosmos DB and importing data requires writing infrastructure-as-code, a Python script, and managing dependencies manually. With GitHub Copilot for Azure agent mode, you describe the outcome and Copilot handles the rest
Prerequisites
- An Azure subscription. If you don't have one, create a free account.
- An Azure resource group. You use this resource group in the following procedure.
- Visual Studio Code with the GitHub Copilot for Azure extension installed.
- Python 3.9 or later.
- Azure CLI. Sign in before you start: run
az loginand select the subscription you want to use. - A GitHub Copilot subscription with access to agent mode.
- Familiarity with getting started with GitHub Copilot for Azure.
Set up your environment
- Create a new directory on your local computer.
- Open Visual Studio Code from that local directory (workspace).
- Download the products data and save it into the new local directory (workspace).
Download the CosmicWorks product data and save it as products.json in your workspace folder.
Build the Azure Cosmos DB import solution
In Visual Studio Code, open the GitHub Copilot chat window.
Switch from Default Approvals to Autopilot (Preview).
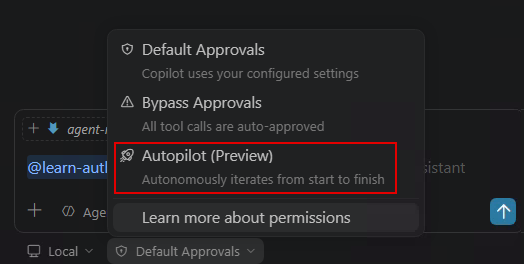
Switch to agent mode and select your preferred model. Enter the following prompt:
Using the products.json file in my workspace, create a Python virtual environment, then set up an Azure Cosmos DB for NoSQL environment in West US (resource group named "<resource-group-name>", account, database, and container with partition key "/categoryId"). Write and run a Python script to import all records into the container. Verify the import by querying the first 5 items. If there are errors, fix them and retry.
Using the products.json file in my workspace, create a Python virtual environment, then set up an Azure Cosmos DB for NoSQL environment in West US (resource group named "<resource-group-name>", account, database, and container with partition key "/categoryId"). Write and run a Python script to import all records into the container. Verify the import by querying the first 5 items. If there are errors, fix them and retry.
Replace <resource-group-name> with your own unique value.
Agent mode handles the entire workflow: creating the virtual environment, provisioning each Azure resource, generating the Python import script, installing dependencies, executing the import, and verifying the results. Review the generated code before allowing execution.
Clean up resources
When you're finished, delete the resource group to avoid ongoing charges:
Use the Azure CLI to delete the resource group `<resource-group-name>` and all its resources.
Or run the command directly in your terminal:
az group delete --name <resource-group-name> --yes --no-wait