Note
Access to this page requires authorization. You can try signing in or changing directories.
Access to this page requires authorization. You can try changing directories.
Apache Kafka is a distributed streaming platform for building real-time streaming data pipelines that reliably move data between systems or applications. Kafka Connect is a tool for scalable and reliable streaming of data between Apache Kafka and other data systems. The Kusto Kafka Sink serves as the connector from Kafka and doesn't require using code. Download the sink connector jar from the Git repo or Confluent Connector Hub.
This article shows how to ingest data with Kafka, using a self-contained Docker setup to simplify the Kafka cluster and Kafka connector cluster setup.
For more information, see the connector Git repo and version specifics.
Prerequisites
- An Azure subscription. Create a free Azure account.
- An Azure Data Explorer cluster and database with the default cache and retention policies.
- Azure CLI.
- Docker and Docker Compose.
Create a Microsoft Entra service principal
The Microsoft Entra service principal can be created through the Azure portal or programatically, as in the following example.
This service principal is the identity used by the connector to write data your table in Kusto. You grant permissions for this service principal to access Kusto resources.
Sign in to your Azure subscription via Azure CLI. Then authenticate in the browser.
az loginChoose the subscription to host the principal. This step is needed when you have multiple subscriptions.
az account set --subscription YOUR_SUBSCRIPTION_GUIDCreate the service principal. In this example, the service principal is called
my-service-principal.az ad sp create-for-rbac -n "my-service-principal" --role Contributor --scopes /subscriptions/{SubID}From the returned JSON data, copy the
appId,password, andtenantfor future use.{ "appId": "00001111-aaaa-2222-bbbb-3333cccc4444", "displayName": "my-service-principal", "name": "my-service-principal", "password": "00001111-aaaa-2222-bbbb-3333cccc4444", "tenant": "00001111-aaaa-2222-bbbb-3333cccc4444" }
You've created your Microsoft Entra application and service principal.
Create a target table
From your query environment, create a table called
Stormsusing the following command:.create table Storms (StartTime: datetime, EndTime: datetime, EventId: int, State: string, EventType: string, Source: string)Create the corresponding table mapping
Storms_CSV_Mappingfor ingested data using the following command:.create table Storms ingestion csv mapping 'Storms_CSV_Mapping' '[{"Name":"StartTime","datatype":"datetime","Ordinal":0}, {"Name":"EndTime","datatype":"datetime","Ordinal":1},{"Name":"EventId","datatype":"int","Ordinal":2},{"Name":"State","datatype":"string","Ordinal":3},{"Name":"EventType","datatype":"string","Ordinal":4},{"Name":"Source","datatype":"string","Ordinal":5}]'Create an ingestion batching policy on the table for configurable queued ingestion latency.
Tip
The ingestion batching policy is a performance optimizer and includes three parameters. The first condition satisfied triggers ingestion into the table.
.alter table Storms policy ingestionbatching @'{"MaximumBatchingTimeSpan":"00:00:15", "MaximumNumberOfItems": 100, "MaximumRawDataSizeMB": 300}'Use the service principal from Create a Microsoft Entra service principal to grant permission to work with the database.
.add database YOUR_DATABASE_NAME admins ('aadapp=YOUR_APP_ID;YOUR_TENANT_ID') 'AAD App'
Run the lab
The following lab is designed to give you the experience of starting to create data, setting up the Kafka connector, and streaming this data. You can then look at the ingested data.
Clone the git repo
Clone the lab's git repo.
Create a local directory on your machine.
mkdir ~/kafka-kusto-hol
cd ~/kafka-kusto-hol
Clone the repo.
cd ~/kafka-kusto-hol
git clone https://github.com/Azure/azure-kusto-labs
cd azure-kusto-labs/kafka-integration/dockerized-quickstart
Contents of the cloned repo
Run the following command to list the contents of the cloned repo:
cd ~/kafka-kusto-hol/azure-kusto-labs/kafka-integration/dockerized-quickstart
tree
This result of this search is:
├── README.md
├── adx-query.png
├── adx-sink-config.json
├── connector
│   └── Dockerfile
├── docker-compose.yaml
└── storm-events-producer
    ├── Dockerfile
    ├── StormEvents.csv
    ├── go.mod
    ├── go.sum
    ├── kafka
    │   └── kafka.go
    └── main.go
Review the files in the cloned repo
The following sections explain the important parts of the files in the file tree.
adx-sink-config.json
This file contains the Kusto sink properties file where you update specific configuration details:
{
    "name": "storm",
    "config": {
        "connector.class": "com.microsoft.azure.kusto.kafka.connect.sink.KustoSinkConnector",
        "flush.size.bytes": 10000,
        "flush.interval.ms": 10000,
        "tasks.max": 1,
        "topics": "storm-events",
        "kusto.tables.topics.mapping": "[{'topic': 'storm-events','db': '<enter database name>', 'table': 'Storms','format': 'csv', 'mapping':'Storms_CSV_Mapping'}]",
        "aad.auth.authority": "<enter tenant ID>",
        "aad.auth.appid": "<enter application ID>",
        "aad.auth.appkey": "<enter client secret>",
        "kusto.ingestion.url": "https://ingest-<name of cluster>.<region>.kusto.windows.net",
        "kusto.query.url": "https://<name of cluster>.<region>.kusto.windows.net",
        "key.converter": "org.apache.kafka.connect.storage.StringConverter",
        "value.converter": "org.apache.kafka.connect.storage.StringConverter"
    }
}
Replace the values for the following attributes as per your setup: aad.auth.authority, aad.auth.appid, aad.auth.appkey, kusto.tables.topics.mapping (the database name), kusto.ingestion.url, and kusto.query.url.
Connector - Dockerfile
This file has the commands to generate the docker image for the connector instance. It includes the connector download from the git repo release directory.
Storm-events-producer directory
This directory has a Go program that reads a local "StormEvents.csv" file and publishes the data to a Kafka topic.
docker-compose.yaml
version: "2"
services:
  zookeeper:
    image: debezium/zookeeper:1.2
    ports:
      - 2181:2181
  kafka:
    image: debezium/kafka:1.2
    ports:
      - 9092:9092
    links:
      - zookeeper
    depends_on:
      - zookeeper
    environment:
      - ZOOKEEPER_CONNECT=zookeeper:2181
      - KAFKA_ADVERTISED_LISTENERS=PLAINTEXT://localhost:9092
  kusto-connect:
    build:
      context: ./connector
      args:
        KUSTO_KAFKA_SINK_VERSION: 1.0.1
    ports:
      - 8083:8083
    links:
      - kafka
    depends_on:
      - kafka
    environment:
      - BOOTSTRAP_SERVERS=kafka:9092
      - GROUP_ID=adx
      - CONFIG_STORAGE_TOPIC=my_connect_configs
      - OFFSET_STORAGE_TOPIC=my_connect_offsets
      - STATUS_STORAGE_TOPIC=my_connect_statuses
  events-producer:
    build:
      context: ./storm-events-producer
    links:
      - kafka
    depends_on:
      - kafka
    environment:
      - KAFKA_BOOTSTRAP_SERVER=kafka:9092
      - KAFKA_TOPIC=storm-events
      - SOURCE_FILE=StormEvents.csv
Start the containers
In a terminal, start the containers:
docker-compose upThe producer application starts sending events to the
storm-eventstopic. You should see logs similar to the following logs:.... events-producer_1 | sent message to partition 0 offset 0 events-producer_1 | event 2007-01-01 00:00:00.0000000,2007-01-01 00:00:00.0000000,13208,NORTH CAROLINA,Thunderstorm Wind,Public events-producer_1 | events-producer_1 | sent message to partition 0 offset 1 events-producer_1 | event 2007-01-01 00:00:00.0000000,2007-01-01 05:00:00.0000000,23358,WISCONSIN,Winter Storm,COOP Observer ....To check the logs, run the following command in a separate terminal:
docker-compose logs -f | grep kusto-connect
Start the connector
Use a Kafka Connect REST call to start the connector.
In a separate terminal, launch the sink task with the following command:
curl -X POST -H "Content-Type: application/json" --data @adx-sink-config.json http://localhost:8083/connectorsTo check the status, run the following command in a separate terminal:
curl http://localhost:8083/connectors/storm/status
The connector starts queueing ingestion processes.
Note
If you have log connector issues, create an issue.
Managed identity
By default, the Kafka connector uses the application method for authentication during ingestion. To authenticate using managed identity:
Assign your cluster a managed identity and grant your storage account read permissions. For more information, see Ingest data using managed identity authentication.
In your adx-sink-config.json file, set
aad.auth.strategytomanaged_identityand ensure thataad.auth.appidis set to the managed identity client (application) ID.Use a private instance metadata service token instead of the Microsoft Entra service principal.
Note
When using a managed identity, appId and tenant are deduced from the context of the call site and password isn't needed.
Query and review data
Confirm data ingestion
Once data has arrived in the
Stormstable, confirm the transfer of data, by checking the row count:Storms | countConfirm that there are no failures in the ingestion process:
.show ingestion failuresOnce you see data, try out a few queries.
Query the data
To see all the records, run the following query:
Storms
| take 10
Use
whereandprojectto filter specific data:Storms | where EventType == 'Drought' and State == 'TEXAS' | project StartTime, EndTime, Source, EventIdUse the
summarizeoperator:Storms | summarize event_count=count() by State | where event_count > 10 | project State, event_count | render columnchart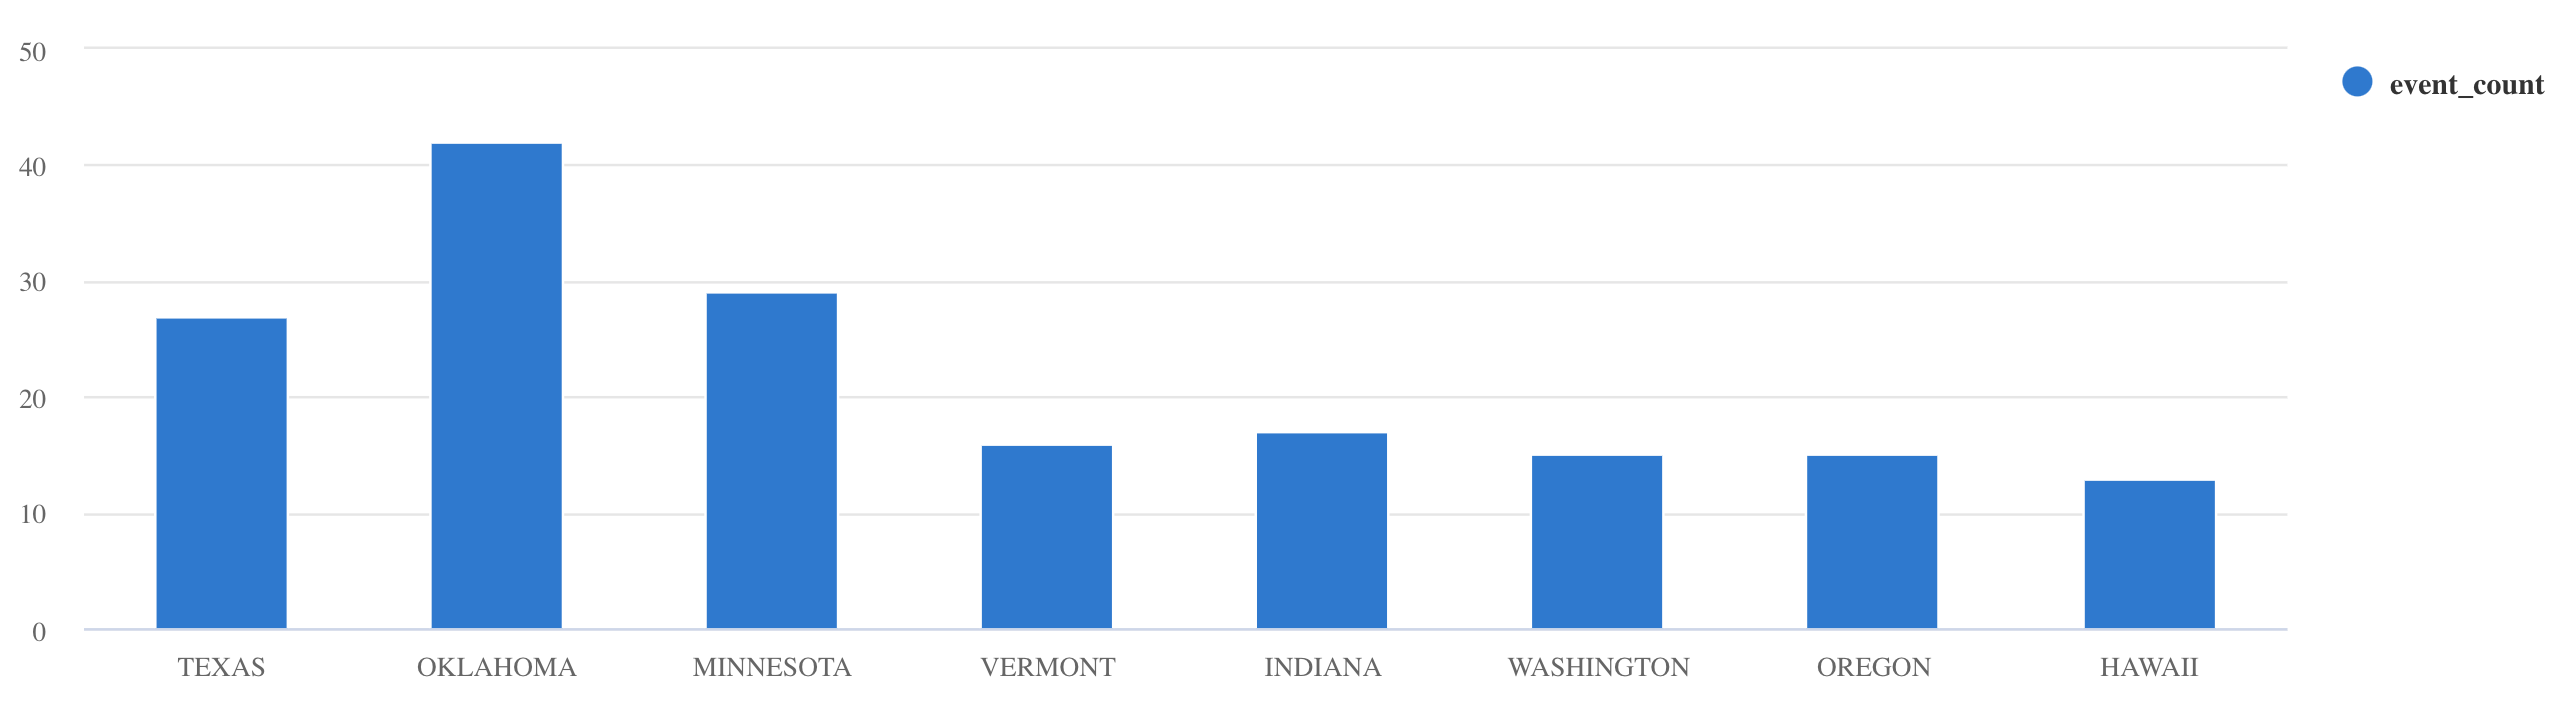
For more query examples and guidance, see Write queries in KQL and Kusto Query Language documentation.
Reset
To reset, do the following steps:
- Stop the containers (
docker-compose down -v) - Delete (
drop table Storms) - Re-create the
Stormstable - Recreate table mapping
- Restart containers (
docker-compose up)
Clean up resources
To delete the Azure Data Explorer resources, use az kusto cluster delete (kusto extension) or az kusto database delete (kusto extension):
az kusto cluster delete --name "<cluster name>" --resource-group "<resource group name>"
az kusto database delete --cluster-name "<cluster name>" --database-name "<database name>" --resource-group "<resource group name>"
You can also delete your cluster and database via the Azure portal. For more information, see Delete an Azure Data Explorer cluster and Delete a database in Azure Data Explorer.
Tuning the Kafka Sink connector
Tune the Kafka Sink connector to work with the ingestion batching policy:
- Tune the Kafka Sink
flush.size.bytessize limit starting from 1 MB, increasing by increments of 10 MB or 100 MB. - When using Kafka Sink, data is aggregated twice. On the connector side data is aggregated according to flush settings, and on the service side according to the batching policy. If the batching time is too short so data can't be ingested by both connector and service, batching time must be increased. Set batching size at 1 GB and increase or decrease by 100 MB increments as needed. For example, if the flush size is 1 MB and the batching policy size is 100 MB, the Kafka Sink connector aggregates data into a 100-MB batch. That batch is then ingested by the service. If the batching policy time is 20 seconds and the Kafka Sink connector flushes 50 MB in a 20-second period, then the service ingests a 50-MB batch.
- You can scale by adding instances and Kafka partitions. Increase
tasks.maxto the number of partitions. Create a partition if you have enough data to produce a blob the size of theflush.size.bytessetting. If the blob is smaller, the batch is processed when it reaches the time limit, so the partition doesn't receive enough throughput. A large number of partitions means more processing overhead.
Related content
- Learn more about Big data architecture.
- Learn how to ingest JSON formatted sample data into Azure Data Explorer.
- Learn more with Kafka labs: