A managed identity from Microsoft Entra ID allows your cluster to access other Microsoft Entra protected resources such as Azure Key Vault. The Azure platform manages the identity and doesn't require you to provision or rotate any secrets.
This article shows you how to add and remove managed identities on your cluster. For more information on managed identities, see Managed identities overview.
Note
Managed identities for Azure Data Explorer don't behave as expected if you migrate your Azure Data Explorer cluster across subscriptions or tenants. The app needs to obtain a new identity, which you can get by removing a system-assigned identity and then adding a system-assigned identity. You also need to update the access policies of downstream resources to use the new identity.
For code samples based on previous SDK versions, see the archived article.
Types of managed identities
You can grant your Azure Data Explorer cluster two types of identities:
System-assigned identity: Tied to your cluster and deleted if you delete the resource. A cluster can only have one system-assigned identity.
User-assigned identity: A standalone Azure resource that you can assign to your cluster. A cluster can have multiple user-assigned identities.
Add a system-assigned identity
Assign a system-assigned identity that's tied to your cluster and deleted if you delete the cluster. A cluster can only have one system-assigned identity. When you create a cluster with a system-assigned identity, you need to set an additional property on the cluster. Add the system-assigned identity by using the Azure portal, C#, or Resource Manager template as detailed in the following sections.
Add a system-assigned identity by using the Azure portal
Sign in to the Azure portal.
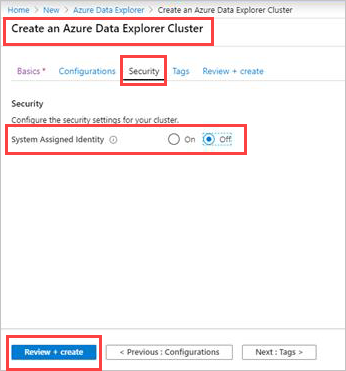
New Azure Data Explorer cluster
Create an Azure Data Explorer cluster
In the Security tab, under System assigned identity, select On. To remove the system assigned identity, select Off.
Select Next : Tags > or Review + create to create the cluster.
Existing Azure Data Explorer cluster
Open an existing Azure Data Explorer cluster.
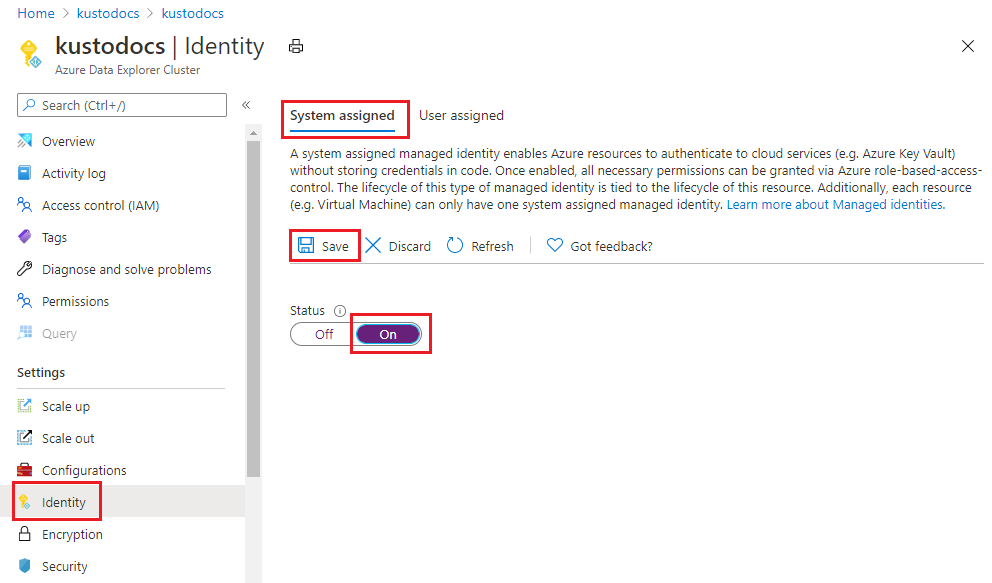
Select Settings > Identity in the left pane of the portal.
In the Identity pane, under the System assigned tab:
- Move the Status slider to On.
- Select Save.
- In the pop-up window, select Yes.
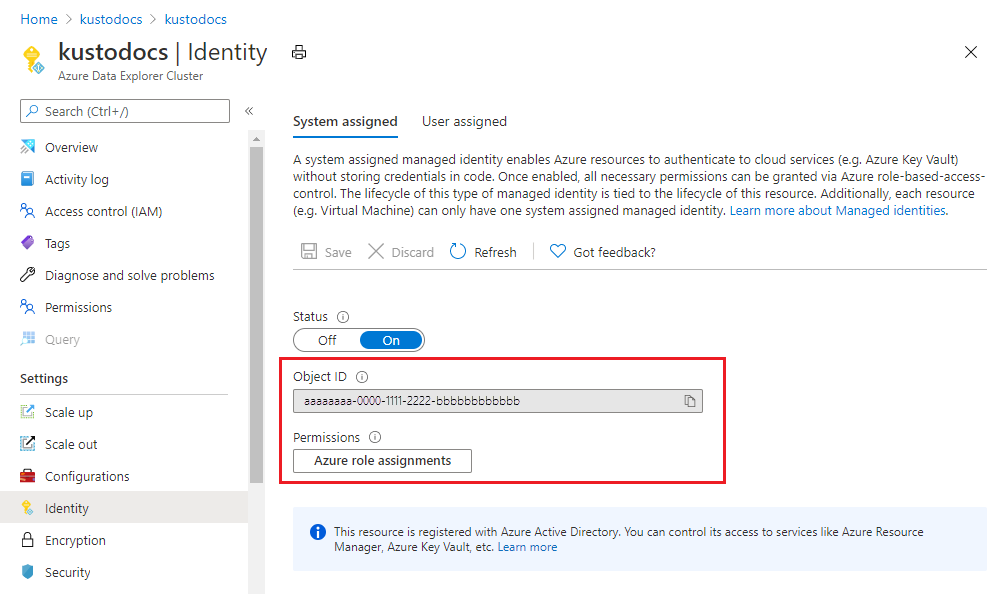
After a few minutes, the screen shows:
- Object ID - Used for customer-managed keys
- Permissions - Select relevant role assignments
Add a system-assigned identity using C#
Prerequisites
To set up a managed identity using the Azure Data Explorer C# client:
Create or update your cluster
Create or update your cluster by using the Identity property:
var tenantId = "xxxxxxxx-xxxxx-xxxx-xxxx-xxxxxxxxx"; //Directory (tenant) ID
var clientId = "xxxxxxxx-xxxxx-xxxx-xxxx-xxxxxxxxx"; //Application ID
var clientSecret = "PlaceholderClientSecret"; //Client Secret
var subscriptionId = "xxxxxxxx-xxxxx-xxxx-xxxx-xxxxxxxxx";
var credentials = new ClientSecretCredential(tenantId, clientId, clientSecret);
var resourceManagementClient = new ArmClient(credentials, subscriptionId);
var resourceGroupName = "testrg";
var subscription = await resourceManagementClient.GetDefaultSubscriptionAsync();
var resourceGroup = (await subscription.GetResourceGroupAsync(resourceGroupName)).Value;
var clusters = resourceGroup.GetKustoClusters();
var clusterName = "mykustocluster";
var clusterData = new KustoClusterData(
    location: AzureLocation.CentralUS,
    sku: new KustoSku(KustoSkuName.StandardE8adsV5, KustoSkuTier.Standard) { Capacity = 5 }
) { Identity = new ManagedServiceIdentity(ManagedServiceIdentityType.SystemAssigned) };
await clusters.CreateOrUpdateAsync(WaitUntil.Completed, clusterName, clusterData);
Run the following command to check if you successfully created or updated your cluster with an identity:
clusterData = (await clusters.GetAsync(clusterName)).Value.Data;
If the result contains ProvisioningState with the Succeeded value, then the cluster was created or updated, and has the following properties:
var principalGuid = clusterData.Identity.PrincipalId.GetValueOrDefault();
var tenantGuid = clusterData.Identity.TenantId.GetValueOrDefault();
PrincipalId and TenantId are replaced with GUIDs. The TenantId property identifies the Microsoft Entra tenant to which the identity belongs. The PrincipalId is a unique identifier for the cluster's new identity. Within Microsoft Entra ID, the service principal has the same name that you gave to your App Service or Azure Functions instance.
Add a system-assigned identity by using an Azure Resource Manager template
You can use an Azure Resource Manager template to automate deployment of your Azure resources. To learn more about deploying to Azure Data Explorer, see Create an Azure Data Explorer cluster and database by using an Azure Resource Manager template.
When you add the system-assigned type, you tell Azure to create and manage the identity for your cluster. You can create any resource of type Microsoft.Kusto/clusters with an identity by including the following property in the resource definition:
{
   "identity": {
      "type": "SystemAssigned"
   }
}
For example:
{
   "identity": {
      "type": "SystemAssigned",
      "tenantId": "<TENANTID>",
      "principalId": "<PRINCIPALID>"
   }
}
Note
A cluster can have both system-assigned and user-assigned identities at the same time. The type property would be SystemAssigned,UserAssigned
When you create the cluster, it has the following additional properties:
{
    "identity": {
        "type": "SystemAssigned",
        "tenantId": "<TENANTID>",
        "principalId": "<PRINCIPALID>"
    }
}
<TENANTID> and <PRINCIPALID> are replaced with GUIDs. The TenantId property identifies the Microsoft Entra tenant to which the identity belongs. The PrincipalId is a unique identifier for the cluster's new identity. Within Microsoft Entra ID, the service principal has the same name that you gave to your App Service or Azure Functions instance.
Remove a system-assigned identity
When you remove a system-assigned identity, you also delete it from Microsoft Entra ID. System-assigned identities are also automatically removed from Microsoft Entra ID when you delete the cluster resource. You can remove a system-assigned identity by disabling the feature. Use the Azure portal, C#, or Resource Manager template to remove the system-assigned identity as detailed in the following section.
Remove a system-assigned identity by using the Azure portal
Sign in to the Azure portal.
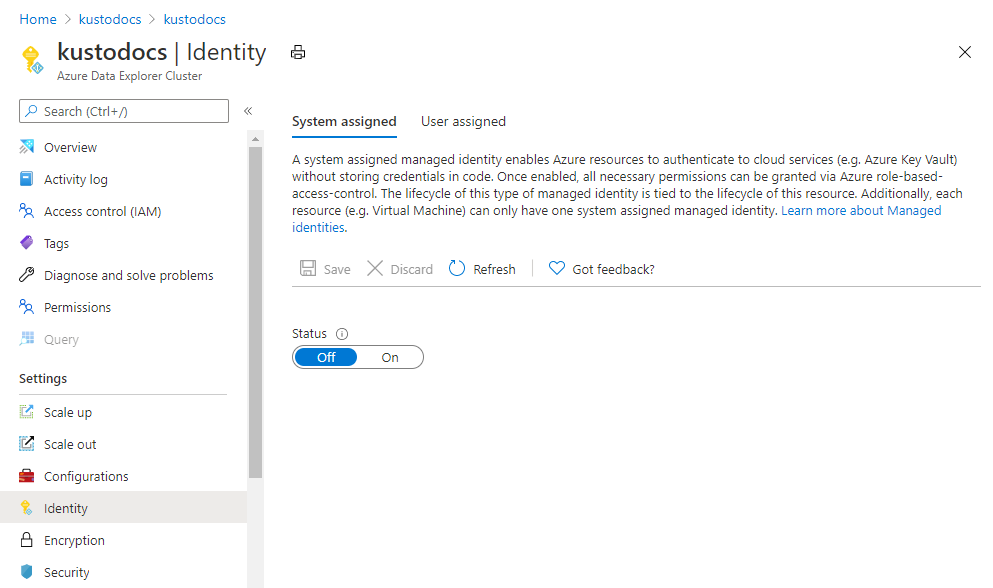
Select Settings > Identity in the left pane of the portal.
In the Identity pane, under the System assigned tab:
- Move the Status slider to Off.
- Select Save.
- In the pop-up window, select Yes to disable the system-assigned identity. The Identity pane reverts to the same condition as before the addition of the system-assigned identity.
Remove a system-assigned identity by using C#
Run the following code to remove the system-assigned identity:
var cluster = (await clusters.GetAsync(clusterName)).Value;
var clusterPatch = new KustoClusterPatch(clusterData.Location)
{
    Identity = new ManagedServiceIdentity(ManagedServiceIdentityType.None)
};
await cluster.UpdateAsync(WaitUntil.Completed, clusterPatch);
Remove a system-assigned identity by using an Azure Resource Manager template
Run the following code to remove the system-assigned identity:
{
   "identity": {
      "type": "None"
   }
}
Note
If the cluster has both system-assigned and user-assigned identities at the same time, after you remove the system-assigned identity, the type property is UserAssigned.
Add a user-assigned identity
Assign a user-assigned managed identity to your cluster. A cluster can have more than one user-assigned identity. To create a cluster with a user-assigned identity, you need to set an additional property on the cluster. Add the user-assigned identity by using the Azure portal, C#, or Resource Manager template as detailed in the following sections.
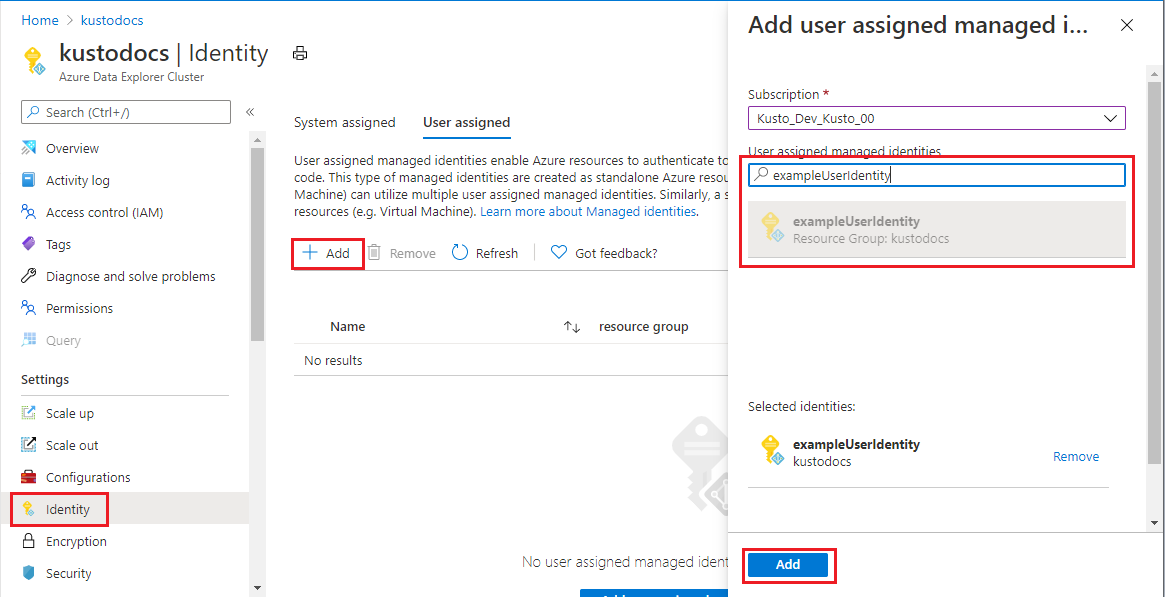
Add a user-assigned identity by using the Azure portal
Sign in to the Azure portal.
Create a user-assigned managed identity resource.
Open an existing Azure Data Explorer cluster.
Select Settings > Identity in left pane of portal.
In the User assigned tab, select Add.
Search for the identity you created earlier and select it. Select Add.
Add a user-assigned identity using C#
Prerequisites
To set up a managed identity using the Azure Data Explorer C# client:
Create or update your cluster
Create or update your cluster by using the Identity property:
var tenantId = "xxxxxxxx-xxxxx-xxxx-xxxx-xxxxxxxxx"; //Directory (tenant) ID
var clientId = "xxxxxxxx-xxxxx-xxxx-xxxx-xxxxxxxxx"; //Application ID
var clientSecret = "PlaceholderClientSecret"; //Client Secret
var subscriptionId = "xxxxxxxx-xxxxx-xxxx-xxxx-xxxxxxxxx";
var credentials = new ClientSecretCredential(tenantId, clientId, clientSecret);
var resourceManagementClient = new ArmClient(credentials, subscriptionId);
var resourceGroupName = "testrg";
var subscription = await resourceManagementClient.GetDefaultSubscriptionAsync();
var resourceGroup = (await subscription.GetResourceGroupAsync(resourceGroupName)).Value;
var clusters = resourceGroup.GetKustoClusters();
var clusterName = "mykustocluster";
var userIdentityResourceId = new ResourceIdentifier($"/subscriptions/{subscriptionId}/resourceGroups/{resourceGroupName}/providers/Microsoft.ManagedIdentity/userAssignedIdentities/<identityName>");
var clusterData = new KustoClusterData(
    location: AzureLocation.CentralUS,
    sku: new KustoSku(KustoSkuName.StandardE8adsV5, KustoSkuTier.Standard) { Capacity = 5 }
)
{
    Identity = new ManagedServiceIdentity(ManagedServiceIdentityType.UserAssigned)
    {
        UserAssignedIdentities = { { userIdentityResourceId, new UserAssignedIdentity() } }
    }
};
await clusters.CreateOrUpdateAsync(WaitUntil.Completed, clusterName, clusterData);
Run the following command to check if you successfully created or updated your cluster with an identity:
clusterData = (await clusters.GetAsync(clusterName)).Value.Data;
If the result contains ProvisioningState with the Succeeded value, then the cluster was created or updated, and has the following properties:
var userIdentity = clusterData.Identity.UserAssignedIdentities[userIdentityResourceId];
var principalGuid = userIdentity.PrincipalId.GetValueOrDefault();
var clientGuid = userIdentity.ClientId.GetValueOrDefault();
The PrincipalId is a unique identifier for the identity that Microsoft Entra administration uses. The ClientId is a unique identifier for the application's new identity that's used for specifying which identity to use during runtime calls.
Add a user-assigned identity by using an Azure Resource Manager template
You can use an Azure Resource Manager template to automate deployment of your Azure resources. To learn more about deploying to Azure Data Explorer, see Create an Azure Data Explorer cluster and database by using an Azure Resource Manager template.
You can create any resource of type Microsoft.Kusto/clusters with a user-assigned identity by including the following property in the resource definition. Replace <RESOURCEID> with the resource ID of the desired identity:
{
   "identity": {
      "type": "UserAssigned",
      "userAssignedIdentities": {
         "<RESOURCEID>": {}
      }
   }
}
For example:
{
    "apiVersion": "2019-09-07",
    "type": "Microsoft.Kusto/clusters",
    "name": "[variables('clusterName')]",
    "location": "[resourceGroup().location]",
    "identity": {
        "type": "UserAssigned",
        "userAssignedIdentities": {
            "[resourceId('Microsoft.ManagedIdentity/userAssignedIdentities', variables('identityName'))]": {}
        }
    },
    "dependsOn": [
        "[resourceId('Microsoft.ManagedIdentity/userAssignedIdentities', variables('identityName'))]"
    ]
}
When you create the cluster, it has the following additional properties:
{
   "identity": {
      "type": "UserAssigned",
      "userAssignedIdentities": {
         "<RESOURCEID>": {
            "principalId": "<PRINCIPALID>",
            "clientId": "<CLIENTID>"
         }
      }
   }
}
The PrincipalId is a unique identifier for the identity that Microsoft Entra administration uses. The ClientId is a unique identifier for the application's new identity that's used for specifying which identity to use during runtime calls.
Note
A cluster can have both system-assigned and user-assigned identities at the same time. In this case, set the type property to SystemAssigned,UserAssigned.
Remove a user-assigned managed identity from a cluster
Remove the user-assigned identity by using the Azure portal, C#, or Resource Manager template as detailed in the following section.
Remove a user-assigned managed identity by using the Azure portal
Sign in to the Azure portal.
Select Settings > Identity in the left pane of the portal.
Select the User assigned tab.
Search for the identity you created earlier and select it. Select Remove.

In the pop-up window, select Yes to remove the user-assigned identity. The Identity pane reverts to the same condition as before the addition of the user-assigned identity.
Remove a user-assigned identity by using C#
Run the following code to remove the user-assigned identity:
var cluster = (await clusters.GetAsync(clusterName)).Value;
var clusterUpdate = new KustoClusterPatch(clusterData.Location)
{
    Identity = new ManagedServiceIdentity(ManagedServiceIdentityType.UserAssigned)
    {
        UserAssignedIdentities = { { userIdentityResourceId, null } }
    }
};
await cluster.UpdateAsync(WaitUntil.Completed, clusterUpdate);
Remove a user-assigned identity by using an Azure Resource Manager template
Run the following code to remove the user-assigned identity:
{
   "identity": {
      "type": "UserAssigned",
      "userAssignedIdentities": {
         "<RESOURCEID>": null
      }
   }
}
Note
- Set the values of identities to null to remove them. This action doesn't affect other existing identities.
- Set the
type property to None to remove all user-assigned identities.
- If the cluster has both system-assigned and user-assigned identities, set the
type property to SystemAssigned,UserAssigned with the identities to remove, or set it to SystemAssigned to remove all user-assigned identities.
Related content