Note
Access to this page requires authorization. You can try signing in or changing directories.
Access to this page requires authorization. You can try changing directories.
This article shows how to use the Azure CLI or Azure portal to create a connected registry resource in Azure. The connected registry feature of Azure Container Registry allows you to deploy a registry remotely or on your premises and synchronize images and other artifacts with a cloud-based Azure container registry.
In this article, you create two connected registry resources for an existing cloud registry: one that supports read and write (artifact pull and push) functionality, and one that supports read-only functionality.
After creating a connected registry, you can deploy and use it on your on-premises or remote infrastructure.
Prerequisites
You must have an Azure Container registry in the Premium SKU (pricing plan) to use the connected registry feature. If you don't already have a container registry, create one, being sure to select Premium for Pricing plan.
Even if you use the Azure portal to create your connected registry resource, these steps use Azure CLI to import images to the container registry.
Use the Bash environment in Azure Cloud Shell. For more information, see Get started with Azure Cloud Shell.

If you prefer to run CLI reference commands locally, install the Azure CLI. If you're running on Windows or macOS, consider running Azure CLI in a Docker container. For more information, see How to run the Azure CLI in a Docker container.
If you're using a local installation, sign in to the Azure CLI by using the az login command. To finish the authentication process, follow the steps displayed in your terminal. For other sign-in options, see Authenticate to Azure using Azure CLI.
When you're prompted, install the Azure CLI extension on first use. For more information about extensions, see Use and manage extensions with the Azure CLI.
Run az version to find the version and dependent libraries that are installed. To upgrade to the latest version, run az upgrade.
Enable the dedicated data endpoint for the cloud registry
Enable the dedicated data endpoint for the Azure container registry in the cloud. This step is necessary to allow the connected registry to communicate with the cloud registry.
- In the Azure portal, go to your container registry.
- In the service menu, under Settings, select Networking.
- In the Public access section, select the Enable dedicated data endpoint checkbox.
- Select Save.
Import images to your cloud registry
Next, import the following container images to your cloud registry. Skip this step if you already imported these images.
Use the az acr import command to import the connected registry image into your private registry:
# Use the REGISTRY_NAME variable in the following Azure CLI commands to identify the registry
REGISTRY_NAME=<container-registry-name>

az acr import \
  --name $REGISTRY_NAME \
  --source mcr.microsoft.com/acr/connected-registry:1.0.0
For testing the connected registry, import the hello-world image. This repository will be synchronized to the connected registry and pulled by the connected registry clients.
az acr import \
  --name $REGISTRY_NAME \
  --source mcr.microsoft.com/hello-world:1.1.2
Create a connected registry resource for read and write functionality
Follow these steps to create a connected registry in ReadWrite mode that is linked to your cloud registry.
In the Azure portal, go to your container registry.
In the service menu, under Services, select Connected registries.
Select Create.
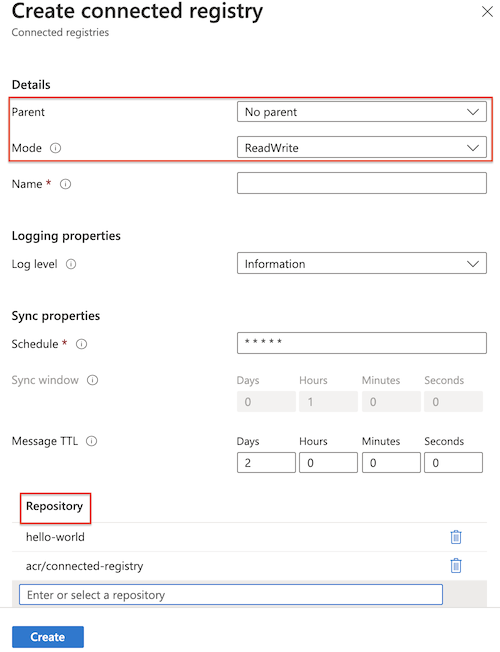
Enter or select the values in the following table, and select Save.
Item Description Parent Select No parent for a connected registry linked directly to the cloud registry. Mode Select ReadWrite. Name The connected registry name must start with a letter and contain only alphanumeric characters. It must be 5 to 40 characters long and unique in the hierarchy for this Azure container registry. Logging properties Keep the default settings. Sync properties Keep the default settings. Because there's no synchronization schedule defined by default, the repositories synchronize between the cloud registry and the connected registry without interruptions. Repositories Select or enter the names of the repositories you imported in the previous step. The specified repositories synchronize between the cloud registry and the connected registry once deployed.
Create a connected registry resource for read-only functionality
Next, create a connected registry in ReadOnly mode whose parent is the connected registry you created in the previous section. This connected registry enables read-only (artifact pull) functionality once deployed.
In Connected registries, select Create again.
Repeat the steps to create a connected registry, with the following changes to the values in the previous table:
Item Description Parent Select the connected registry you created previously. Mode Select ReadOnly. Select Save.
Verify that the resources are created
After you create the connected registry resources, verify that they exist and view their properties.
Select a connected registry in the portal to view its properties, such as its connection status (Offline, Online, or Unhealthy) and whether it activated (deployed on-premises). In the following example, the connected registry isn't deployed yet, so the connection state is Offline.

From this view, you can select Connection string to generate a connection string, which contains configuration settings used for deploying a connected registry and synchronizing content with a parent registry. You can also optionally generate passwords for the sync token.
Configure the connected registry sync schedule and window
The steps in this article create connected registries without a defined synchronization schedule and window. To define a specific schedule after you create your registry, use the az acr connected-registry update command to set a schedule. Use CRON expressions to define the sync schedule and the ISO 8601 duration format for the sync window.
For example, the following command configures the connected registry to schedule a daily sync at 12:00 PM UTC with a 4 hour synchronization window (PT4H):
az acr connected-registry update --registry myacrregistry \
--name myconnectedregistry \
--sync-schedule "0 12 * * *" \
--sync-window PT4H
This example command configures the connected registry will sync every minute with the cloud registry:
az acr connected-registry update --registry myacrregistry \
--name myconnectedregistry \
--sync-schedule "* * * * *"
You can also enter values for Schedule and Sync window in the Sync properties section of the connected registry in the Azure portal.
Next steps
In this quickstart, you used the Azure CLI and Azure portal to create two connected registry resources in Azure. These new connected registry resources tie to your cloud registry and allow synchronization of artifacts with the cloud registry.
Next, learn how to deploy connected registry to an Azure Arc-enabled Kubernetes cluster.