Note
Access to this page requires authorization. You can try signing in or changing directories.
Access to this page requires authorization. You can try changing directories.
Applies to: Azure Logic Apps (Consumption + Standard)
This guide shows how to add an Office 365 Outlook trigger or action to your workflow in Azure Logic Apps. You can automate tasks for your Office 365 Outlook account by adding operations from the Office 365 Outlook connector.
For example, your workflow can perform the following tasks:
- Get, send, and reply to email.
- Schedule meetings on your calendar.
- Add and edit contacts.
Note
The Office 365 Outlook connector works only with a work or school account, for example, @fabrikam.onmicrosoft.com. If you have an @outlook.com or @hotmail.com account, use the Outlook.com connector. To connect to Outlook with a different user account, such as a service account, see Connect using other accounts.
Connector technical reference
For information about this connector's operations and any limits, see the connector's reference page.
Prerequisites
An Azure account and subscription. If you don't have an Azure subscription, sign up for a free Azure account.
Your Microsoft Office 365 account for Outlook where you sign in with a work or school account.
Note
If you're using Microsoft Azure operated by 21Vianet, Microsoft Entra authentication works only with an account for Microsoft Office 365 operated by 21Vianet (.cn), not .com accounts.
The logic app resource with the workflow from where you want to access your Outlook account.
To start your workflow with an Office 365 Outlook trigger, you need to have a blank workflow.
To use an Office 365 Outlook action, your workflow can start with any trigger that best fits your scenario.
If you don't have a logic app resource and workflow, see the following articles:
Add an Office 365 Outlook trigger
Based on whether you have a Consumption or Standard logic app workflow, follow the corresponding steps:
In the Azure portal, open your Consumption logic app resource.
On the sidebar menu, under Development Tools, select the designer to open your blank workflow.
Add the Office 365 Outlook trigger that suits your scenario by following the general steps to add a trigger to your workflow.
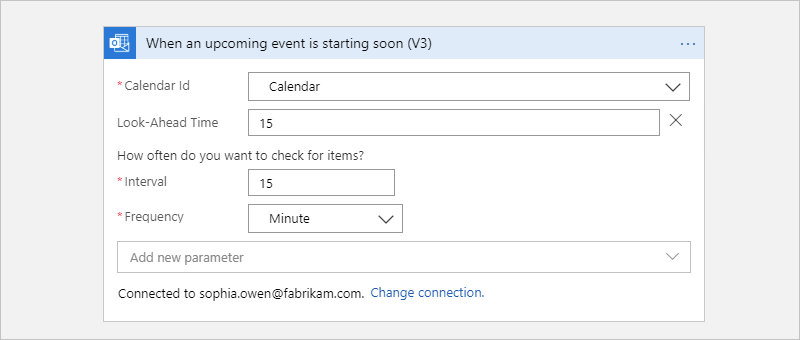
This example continues with the trigger named When an upcoming event is starting soon. This polling trigger regularly checks for any updated calendar event in your email account, based on the specified schedule.
If prompted, sign in to your Office 365 Outlook account, which creates a connection. To connect with a different user account, such as a service account, see Connect using other accounts.
Note
Your connection doesn't expire until revoked, even if you change your sign-in credentials. For more information, see Configurable token lifetimes in Microsoft Entra ID.
In the trigger information box, provide the required information, for example:
Parameter Required Value Description Calendar Id Yes Calendar The calendar to check Interval Yes 15 The number of intervals Frequency Yes Minute The unit of time You can add any other available parameters, such as Time zone, from the Advanced parameters list.
Save your workflow. On the designer toolbar, select Save.


You can now add any other actions that your workflow requires. For example, you can add the Twilio Send message action, which sends a text when a calendar event starts in 15 minutes.
Add an Office 365 Outlook action
Based on whether you have a Consumption or Standard logic app workflow, follow the corresponding steps:
In the Azure portal, open your logic app and workflow in the designer.
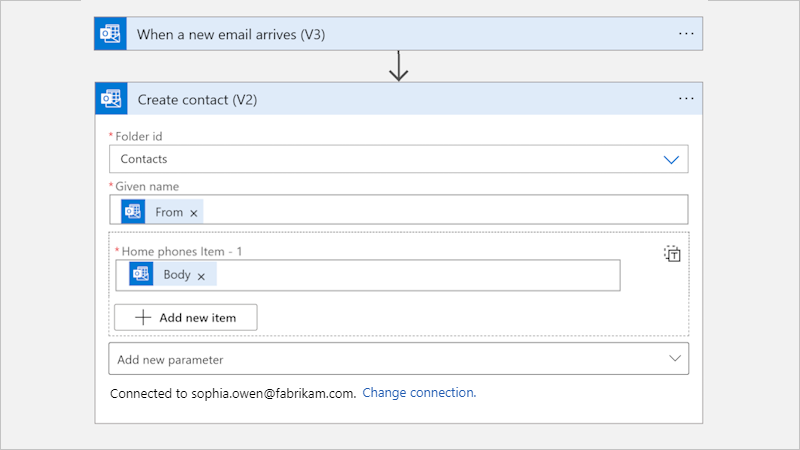
This example continues with the Office 365 Outlook trigger named When a new email arrives.
Add the Office 365 Outlook action that best suits your scenario by following the general steps to add an action to your workflow.
This example continues with the Office 365 Outlook action named Create contact.
This operation creates a new contact in Office 365 Outlook. You can use the output from a previous operation in the workflow to create the contact.
If prompted, sign in to your Office 365 Outlook account, which creates a connection. To connect with a different user account, such as a service account, see Connect using other accounts.
Note
Your connection doesn't expire until revoked, even if you change your sign-in credentials. For more information, see Configurable token lifetimes in Microsoft Entra ID.
In the trigger information box, provide the required information, for example:
Parameter Required Value Description Folder Id Yes Contacts The folder where the action creates the new contact Given name Yes <contact-name> The name to give the contact Home phones Yes <home-phone-number> The home phone number for the contact This example selects the Contacts folder where the action creates the new contact and uses trigger outputs for the remaining parameter values:
You can add any other available parameters from the Advanced parameters list.
Save your workflow. On the designer toolbar, select Save.


Connect using other accounts
If you try connecting to Outlook by using a different account than the one currently signed in to Azure, you might get single sign-on (SSO) errors. This problem happens when you sign in to the Azure portal with one account, but use a different account to create the connection. The designer expects that you use the account that's signed in to the Azure portal. To resolve this problem, you have these options:
Set up the other account with the Contributor role in your logic app's resource group.
In the Azure portal, open your logic app's resource group.
On the resource group menu, select Access control (IAM).
Assign the Contributor role to the other account.
For more information, see Assign Azure roles using the Azure portal.
After you set up this role, sign in to the Azure portal with the account that now has Contributor permissions. You can now use this account to create the connection to Outlook.
Set up the other account so that your work or school account has send as permissions.
If you have admin permissions, on the service account's mailbox, set up your work or school account with either Send as or Send on behalf of permissions. For more information, see Give mailbox permissions to another user - Admin Help. You can then create the connection by using your work or school account. Now, in triggers or actions where you can specify the sender, you can use the service account's email address.
For example, the Send an email action has an optional parameter, From (Send as), which you can add to the action and use your service account's email address as the sender. To add this parameter, follow these steps:
In the Send an email action, from the Advanced parameters list, select the From (Send as) parameter.
Enter the service account's email address.