Note
Access to this page requires authorization. You can try signing in or changing directories.
Access to this page requires authorization. You can try changing directories.
This tutorial describes how to back up an SAP Adaptive Server Enterprise (ASE) (Sybase) database that's running on an Azure Virtual Machine (VM) using Azure Business Continuity Center.
Learn about the supported configurations and scenarios for SAP ASE database backup on Azure VMs.
Prerequisites
Before you set up the SAP ASE database for backup, review the following prerequisites:
Identify or create a Recovery Services vault in the same region and subscription as the VM running SAP ASE.
Allow connectivity from the VM to the internet, so that it can reach Azure.
The combined length of the SAP ASE Server VM name and the Resource Group name must have <= 84 characters for Azure Resource Manager (ARM) VMs (and 77 characters for classic VMs) as the service reserves some characters.
VM must have python >= 3.6.15 (recommended- Python3.10) with requests module installed. The default sudo python3 must run python 3.6.15 or higher. Validate by running python3 and sudo python3 in your system to check the python version. To change the default version, link python3 to python 3.6.15 or higher.
Run the SAP ASE backup configuration script (preregistration script) in the virtual machine that hosts the SAP ASE database. This script gets the ASE system ready for backup.
Assign the following privileges and settings for the backup operation:
Privilege/ Setting Description Operator role Enable this ASE database role for the database user to create a custom database user for the backup and restore operations and pass it in the preregistration script. Map external file privilege Enable this role to allow database file access. Own any database privilege Allows differential backups. The Allow incremental dumps for the database should be True. Trunc log on chkpt privilege Disable this privilege for all databases that you want to protect using the ASE Backup. Allows you to back up the database log to recovery services vault. Learn more about the SAP note - 2921874 - "trunc log on chkpt" in databases with HADR - SAP ASE - SAP for Me.Note
Log backups aren't supported for the Master database. For other system databases, log backups can only be supported if the database's log files are stored separately from its data files. By default, system databases are created with both data and log files in the same database device, which prevents log backups. To enable log backups, the database administrator must change the location of the log files to a separate device.
Use the Azure built-in roles to configure backup- assignment of roles and scope to the resources. The following Contributor role allows you to run the Configure Protection operation on the database VM:
Resource (Access control) Role User, group, or service principal Source Azure VM running the ASE database Virtual Machine Contributor Allows you to configure the backup operation.
Create a custom role for Azure Backup
To create a custom role for Azure Backup, run the following bash commands:
Note
After each of these commands, ensure that you run the command go to execute the statement.
Sign in to the database using the single sign-on (SSO) role user.
isql -U sapsso -P <password> -S <sid> -XCreate a role.
create role azurebackup_roleGrant operator role to the new role.
grant role oper_role to azurebackup_roleEnable granular permissions.
sp_configure 'enable granular permissions', 1Sign in to the database using the
SArole user.isql -U sapsa -P <password> -S <sid> -XSwitch to the master database.
use masterGrant map external file privilege to the new role.
grant map external file to azurebackup_roleSign in again using the SSO role user.
isql -U sapsso -P <password> -S <sid> -XCreate a user.
sp_addlogin backupuser, <password>Grant the custom role to the user.
grant role azurebackup_role to backupuserSet the custom role as the default for the user.
sp_modifylogin backupuser, "add default role", azurebackup_roleGrant own any database privilege to the custom role as SA user.
grant own any database to azurebackup_roleSign in to the database as SA user again.
isql -U sapsa -P <password> -S <sid> -XEnable file access.
sp_configure "enable file access", 1Enable differential backup on the database.
 use master
 go
 sp_dboption <database_name>, 'allow incremental dumps', true
 go
Disable trunc log on chkpt on the database.
 use master
 go
 sp_dboption <database_name>, 'trunc log on chkpt', false
 go
Establish network connectivity
For all operations, an SAP ASE database running on an Azure VM requires connectivity to the Azure Backup service, Azure Storage, and Microsoft Entra ID. You can achieve this connectivity by using private endpoints or by allowing access to the required public IP addresses or Fully Qualified Domain Names (FQDNs). If you don't allow proper connectivity to the required Azure services, it might lead to failure in operations, such as database discovery, configuring backup, performing backups, and restoring data.
The following table lists the various alternatives you can use to establish connectivity:
| Option | Advantages | Disadvantages |
|---|---|---|
| Private endpoints | Allow backups over private IPs in the virtual network. Provide granular control on the network and vault side. |
Incurs standard private endpoint costs. |
| Network Security Group (NSG) service tags | Easier to manage because the range changes are automatically merged. No extra costs. |
Used with NSGs only. Provides access to the entire service. |
| Azure Firewall FQDN tags | Easier to manage since the required FQDNs are automatically managed. | Used with Azure Firewall only. |
| Allow access to service FQDNs/IPs | No extra costs. Works with all network security appliances and firewalls. You can also use service endpoints for Storage. However, for Azure Backup and Microsoft Entra ID, you need to assign the access to the corresponding IPs/FQDNs. |
A broad set of IPs or FQDNs might be required to be accessed. |
| Virtual Network Service Endpoint | Used for Azure Storage. Provides large benefit to optimize performance of data plane traffic. |
Can't be used for Microsoft Entra ID, Azure Backup service. |
| Network Virtual Appliance | Used for Azure Storage, Microsoft Entra ID, Azure Backup service. Data plane - Azure Storage: *.blob.core.windows.net, *.queue.core.windows.net, *.blob.storage.azure.net Management plane - Microsoft Entra ID: Allow access to FQDNs mentioned in sections 56 and 59 of Microsoft 365 Common and Office Online. - Azure Backup service: .backup.windowsazure.com Learn more about Azure Firewall service tags. |
Adds overhead to data plane traffic and decrease throughput/performance. |
The following sections detail about the usage of the connectivity options.
Private endpoints
Private endpoints allow you to connect securely from servers in a virtual network to your Recovery Services vault. The private endpoint uses an IP from the Virtual Network (VNET) address space for your vault. The network traffic between your resources in the virtual network and the vault travels over your virtual network and a private link on the Microsoft backbone network. This operation eliminates exposure from the public internet. Learn more on private endpoints for Azure Backup.
Note
- Private endpoints are supported for Azure Backup and Azure storage. Microsoft Entra ID has support for private endpoints. Until they are generally available, Azure backup supports setting up proxy for Microsoft Entra ID so that no outbound connectivity is required for ASE VMs. For more information, see the proxy support section.
- The download operation for SAP ASE Pre-registration script (ASE workload scripts) requires Internet access. However, on VMs with Private Endpoint (PE) enabled, the pre-registration script can't download these workload scripts directly. So, it’s necessary to download the script on a local VM or another VM with internet access, and then use SCP or any other transfer method to move it to the PE enabled VM.
Network Security Group tags
If you use Network Security Groups (NSG), use the AzureBackup service tag to allow outbound access to Azure Backup. In addition to the Azure Backup tag, you must allow connectivity for authentication and data transfer by creating similar NSG rules for Microsoft Entra ID and Azure Storage (Storage).
To create a rule for the Azure Backup tag, follow these steps:
- In the Azure portal, go to Network security groups and select the network security group.
- On the Settings pane, select Outbound security rules.
- Select Add.
- Enter all the required details for creating a new rule. Ensure the Destination is set to Service Tag and Destination service tag is set to
AzureBackup. - Select Add to save the newly created outbound security rule.
You can similarly create NSG outbound security rules for Azure Storage and Microsoft Entra ID. Learn more about service tags.
Azure Firewall tags
If you're using Azure Firewall, create an application rule by using the AzureBackup Azure Firewall FQDN tag. This rule allows all outbound access to Azure Backup.
Note
Azure Backup currently doesn't support the TLS inspection enabled Application Rule on Azure Firewall.
Allow access to service IP ranges
If you choose to allow access service IPs, see the IP ranges in the JSON file. You need to allow access to IPs corresponding to Azure Backup, Azure Storage, and Microsoft Entra ID.
Allow access to service FQDNs
You can also use the following FQDNs to allow access to the required services from your servers:
| Service | Domain names to be accessed | Ports |
|---|---|---|
| Azure Backup | *.backup.windowsazure.com |
443 |
| Azure Storage | *.blob.core.windows.net *.queue.core.windows.net *.blob.storage.azure.net |
443 |
| Microsoft Entra ID | *.login.microsoft.com Allow access to FQDNs under sections 56 and 59 according to this article. |
443 As applicable. |
Use an HTTP proxy server to route traffic
Note
Currently, the HTTP Proxy for Microsoft Entra ID traffic is only supported for the SAP ASE database. If you need to remove outbound connectivity requirements (for Azure Backup and Azure Storage traffic) for database backups via Azure Backup in ASE VMs, use other options, such as private endpoints.
Use an HTTP proxy server for Microsoft Entra ID traffic
To use an HTTP proxy server to route traffic for Microsoft Entra ID, follow these steps:
In the database, go to the
opt/msawb/binfolder.Create a new JSON file named
ExtensionSettingsOverrides.json.Add a key-value pair to the JSON file as follows:
{
   "UseProxyForAAD":true,
   "UseProxyForAzureBackup":false,
   "UseProxyForAzureStorage":false,
   "ProxyServerAddress":"http://xx.yy.zz.mm:port"
}
Change the permissions and ownership of the file as follows:
chmod 750 ExtensionSettingsOverrides.json
chown root:msawb ExtensionSettingsOverrides.json
Note
No restart of any service is required. The Azure Backup service will attempt to route the Microsoft Entra ID traffic via the proxy server mentioned in the JSON file.
Use outbound rules
If the Firewall or NSG setting block the management.azure.com domain from Azure Virtual Machine, snapshot backups fail.
Create the following outbound rule and allow the domain name to back up the database. Learn how to create the outbound rules.
Source: IP address of the VM.
Destination: Service Tag.
Destination Service Tag:
AzureResourceManager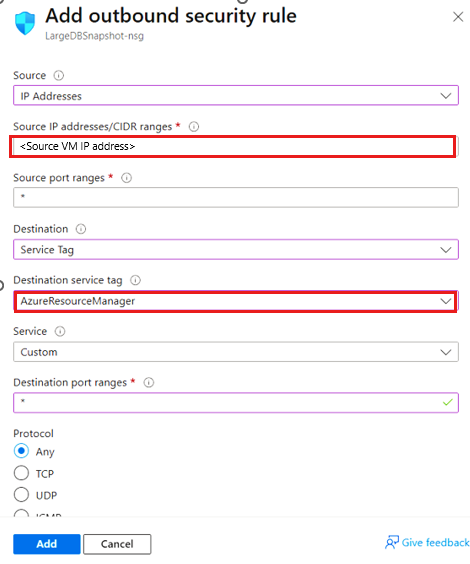

Create a Recovery Services vault
A Recovery Services vault is a management entity that stores recovery points that are created over time, and it provides an interface to perform backup-related operations. These operations include taking on-demand backups, performing restores, and creating backup policies.
To create a Recovery Services vault:
Sign in to the Azure portal.
Search for Business Continuity Center, and then go to the Business Continuity Center dashboard.

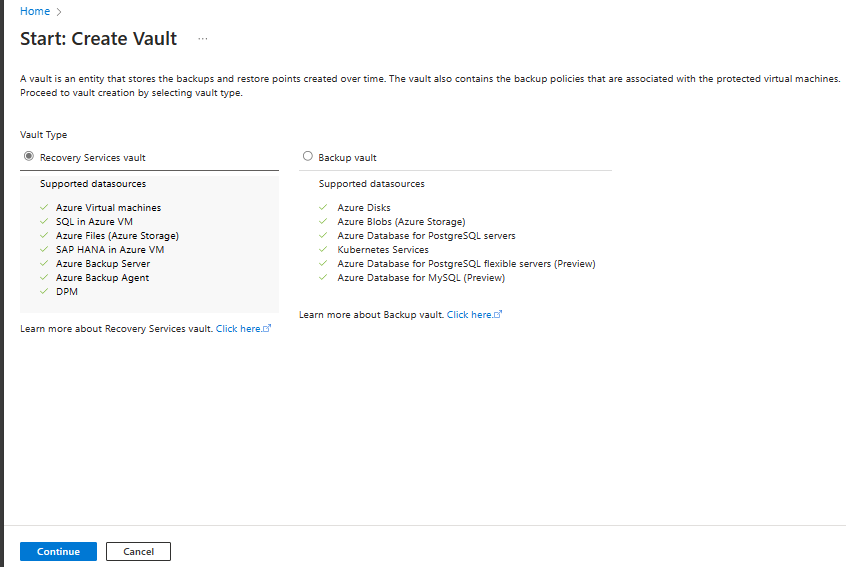
On the Vault pane, select +Vault.

Select Recovery Services vault > Continue.
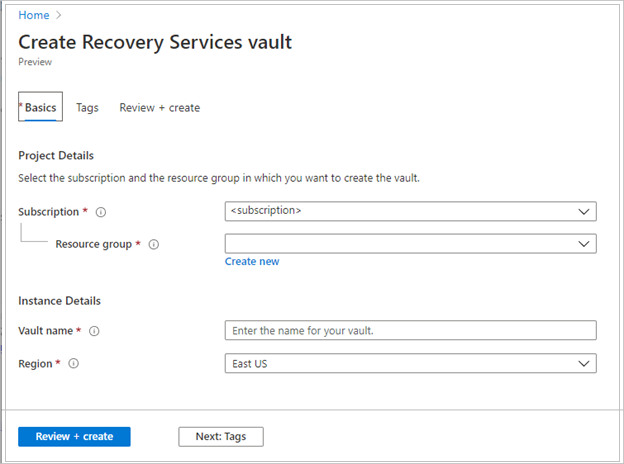
On the Recovery Services vault pane, enter the following values:
Subscription: Select the subscription to use. If you're a member of only one subscription, you'll see that name. If you're not sure which subscription to use, use the default subscription. There are multiple choices only if your work or school account is associated with more than one Azure subscription.
Resource group: Use an existing resource group or create a new one. To view a list of available resource groups in your subscription, select Use existing, and then select a resource in the dropdown list. To create a new resource group, select Create new, and then enter the name. For more information about resource groups, see Azure Resource Manager overview.
Vault name: Enter a friendly name to identify the vault. The name must be unique to the Azure subscription. Specify a name that has at least 2 but not more than 50 characters. The name must start with a letter and consist only of letters, numbers, and hyphens.
Region: Select the geographic region for the vault. For you to create a vault to help protect any data source, the vault must be in the same region as the data source.
Important
If you're not sure of the location of your data source, close the window. Go to the list of your resources in the portal. If you have data sources in multiple regions, create a Recovery Services vault for each region. Create the vault in the first location before you create a vault in another location. There's no need to specify storage accounts to store the backup data. The Recovery Services vault and Azure Backup handle that automatically.
After providing the values, select Review + create.
To finish creating the Recovery Services vault, select Create.
It can take a while to create the Recovery Services vault. Monitor the status notifications in the Notifications area at the upper right. After the vault is created, it appears in the list of Recovery Services vaults. If the vault doesn't appear, select Refresh.


Note
Azure Backup now supports immutable vaults that help you ensure that recovery points once created can't be deleted before their expiry as per the backup policy. You can make the immutability irreversible for maximum protection to your backup data from various threats, including ransomware attacks and malicious actors. Learn more.
Enable Cross Region Restore
In the Recovery Services vault, you can enable Cross Region Restore that allows you to restore the database to a secondary region. Learn how to turn on Cross Region Restore.

Discover the SAP ASE databases
To discover the SAP ASE databases, follow these steps:
Go to the Business Continuity Center, and then select + Configure protection.
On the Configure protection pane, select Resource managed by as Azure, Datasource type as SAP ASE (Sybase) in Azure VM, and Solution as Azure Backup.
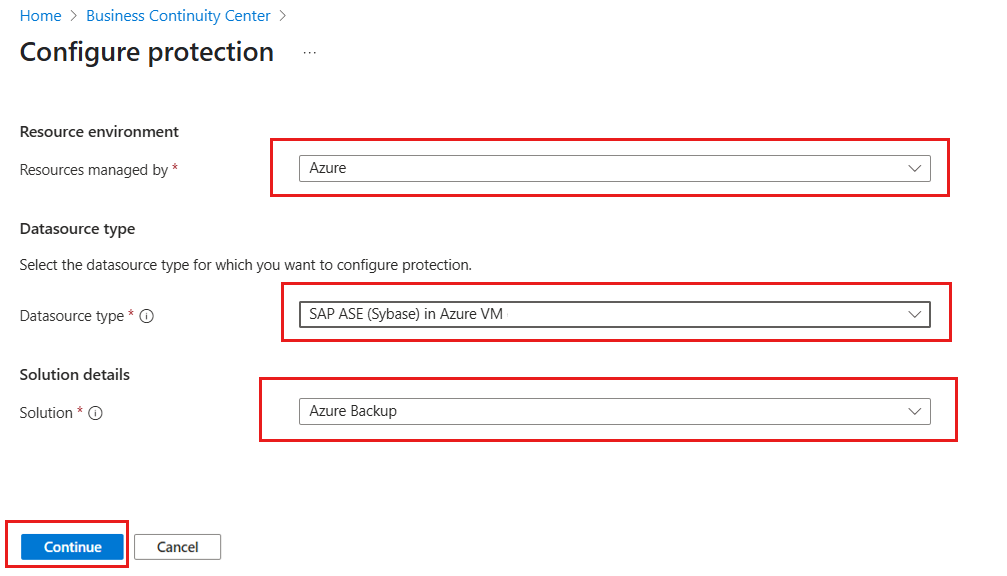
Select Continue.
On the Start: Configure Backup pane, under Vault, click Select vault.
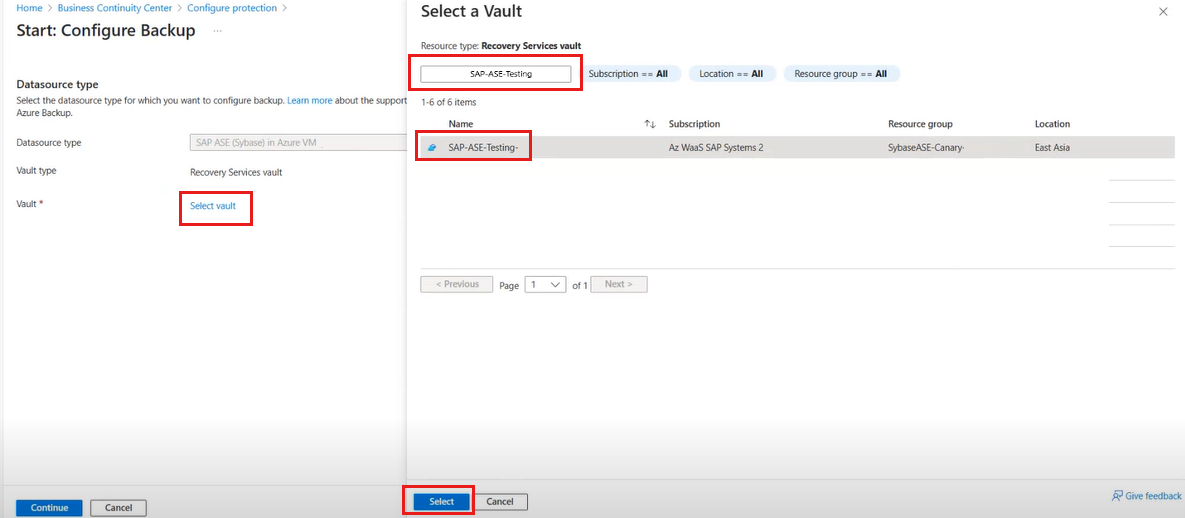
On the Select a Vault pane, under Filter by name, type the vault name that hosts the SAP ASE database.
Select the vault from the list, and then click Select.
On the Start: Configure Backup pane, select Continue.
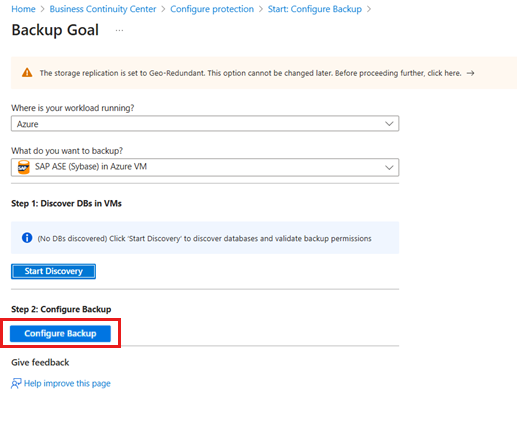
On the Backup Goal pane, select Start Discovery to initiate discovery of unprotected Linux VMs in the vault region.

Note
- After discovery, unprotected VMs appear in the portal, listed by name and resource group.
- If a VM isn't listed as expected, check if it's already backed up in a vault.
- Multiple VMs can have the same name if they belong to different resource groups.
On the Select Virtual Machines pane, download the prepost script that provides permissions for the Azure Backup service to access the SAP ASE VMs for database discovery.
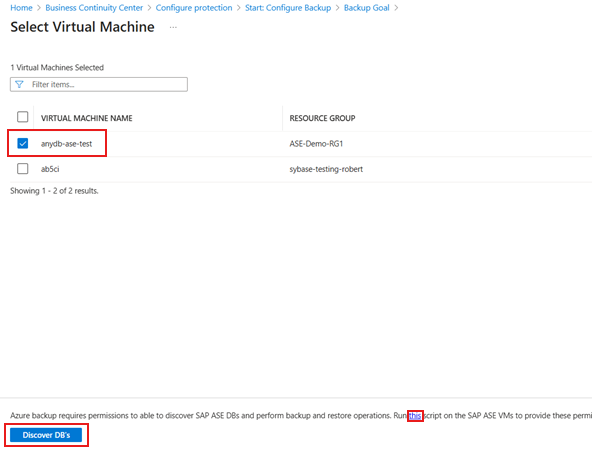
Run the script on each VM hosting SAP ASE databases that you want to back up.
After you run the script on the VMs, on the Select Virtual Machines pane, select the VMs, and then select Discover DBs.
Azure Backup discovers all SAP ASE databases on the VM. During discovery, Azure Backup registers the VM with the vault, and installs an extension on the VM. No agent is installed on the database.


Configure the SAP ASE (Sybase) database backup
After the database discovery process is complete, Azure Backup redirects to the Backup Goal pane, allowing you to configure backup settings for the selected VM hosting the SAP ASE database.
To configure the backup operation for the SAP ASE database, follow these steps:
On the Backup Goal pane, under Step 2, select Configure Backup.
On the Configure Backup pane, on the Backup policy tab, under Backup policy, select Create a new policy for the databases.

A backup policy defines when backups are taken, and how long they're retained.
- A policy is created at the vault level.
- Multiple vaults can use the same backup policy, but you must apply the backup policy to each vault.
On the Create policy pane, under Policy name, enter a name for the new policy.
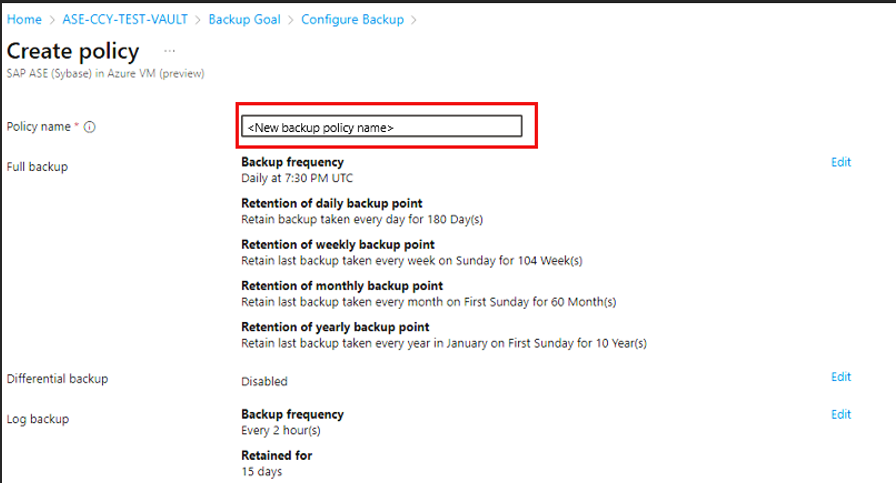
Under Full backup, select Edit.
On the Full Backup policy pane, select a Backup Frequency, and then select Daily or Weekly as required.
Daily: Select the hour and time zone in which the backup job begins.
Note
- You must run a full backup. You can't turn off this option.
- Go to Full Backup policy to view the policy settings.
- You can't create differential backups for daily full backups.
Weekly: Select the day of the week, hour, and time zone in which the backup job runs.
The following screenshot shows the backup schedule for full backups.

On the Retention Range, define the retention range for the full backup.
Note
- By default, all options are selected. Clear any retention range limits you don't want to use, and set those that you want.
- The minimum retention period for any type of backup (full/differential/log) is seven days.
- Recovery points are tagged for retention based on their retention range. For example, if you select a daily full backup, only one full backup is triggered each day.
- The backup for a specific day is tagged and retained based on the weekly retention range and setting.
- The monthly and yearly retention ranges behave in a similar way.
Select OK to save the policy configuration.
On the Create Policy pane, under Differential Backup, select Edit to add a differential policy.
On the Differential Backup policy pane, select Enable to open the frequency and retention controls.
Note
- At most, you can trigger one differential backup per day.
- Differential backups can be retained for a maximum of 180 days. If you need longer retention, you must use full backups.
Select OK to save the policy configuration.
On the Backup policy pane, under Log backup, select Edit to add a transactional log backup policy.
On the Log Backup policy pane, select Enable to set the frequency and retention controls.
Note
- Log backups only begin to flow after a successful full backup is completed.
- Each log backup is chained to the previous full backup to form a recovery chain. This full backup is retained until the retention of the last log backup has expired. This might mean that the full backup is retained for an extra period to make sure all the logs can be recovered. Let's assume a user has a weekly full backup, daily differential and 2-hour logs. All of them are retained for 30 days. But the weekly full can be cleaned up/deleted only after the next full backup is available, that is, after 30 + seven days. For example, if a weekly full backup is performed on November 16th, it remains stored until December 16th in accordance with the retention policy. The final log backup for this full backup occurs on November 22nd, before the next scheduled full backup. Since this log backup remains accessible until December 22nd, the November 16th full backup cannot be deleted until that date. As a result, the November 16th full backup is retained until December 22nd.
Select OK to save the log backup policy configuration.
On the Create Policy pane, select OK to complete the backup policy creation.
On the Configure Backup pane, on the Backup policy tab, under Backup Policy, select the new policy from the dropdown list, and then select Add.
Select Configure backup.
On the Select items to backup pane, select the Databases for protection, and then select Next.

On the Configure Backup pane, on the Review tab, review the backup configuration.
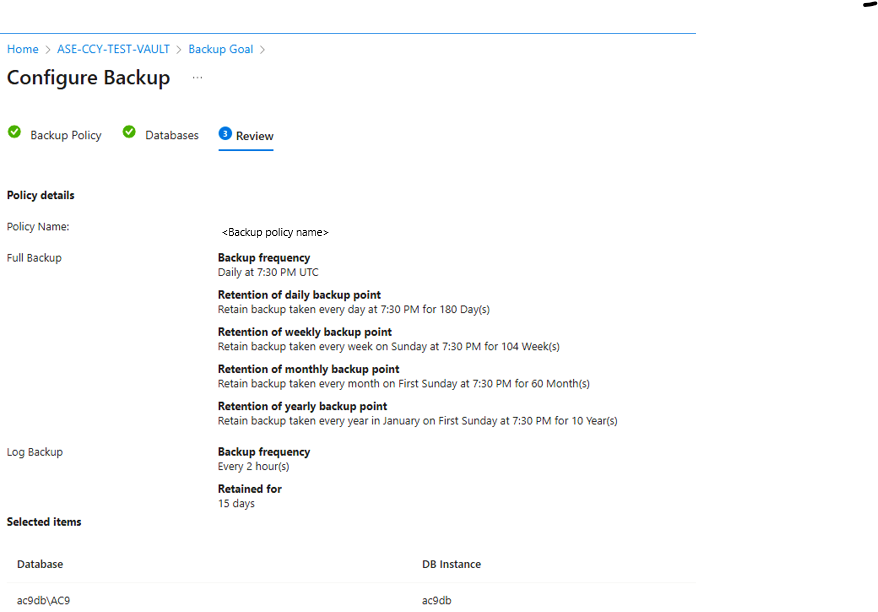
Select Enable Backup to start the backup operation.


Run an on-demand backup for SAP ASE database
To run on-demand backups for SAP ASE database, follow these steps:
Go to Business Continuity Center, and then select Vaults.
On the Vaults pane, select the Recovery Services vault from the list that is used to configure backup.
On the selected Recovery Services vault, select Backup items.
On the Backup Item pane, select the Backup Management Type as SAP ASE (Sybase) in Azure VM.
Select view details of Database for on-demand backup.
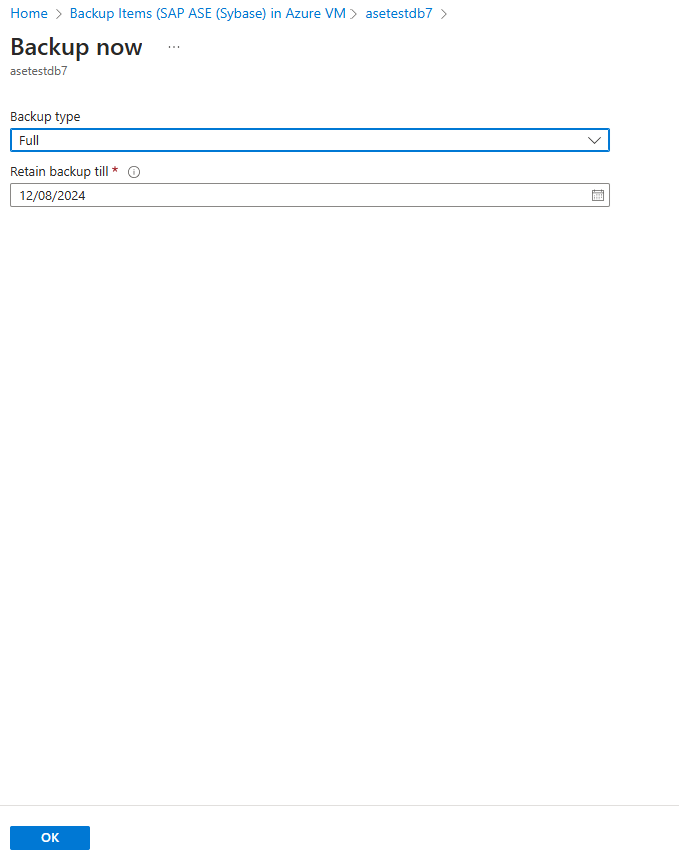
Select Backup now for taking on-demand backup.
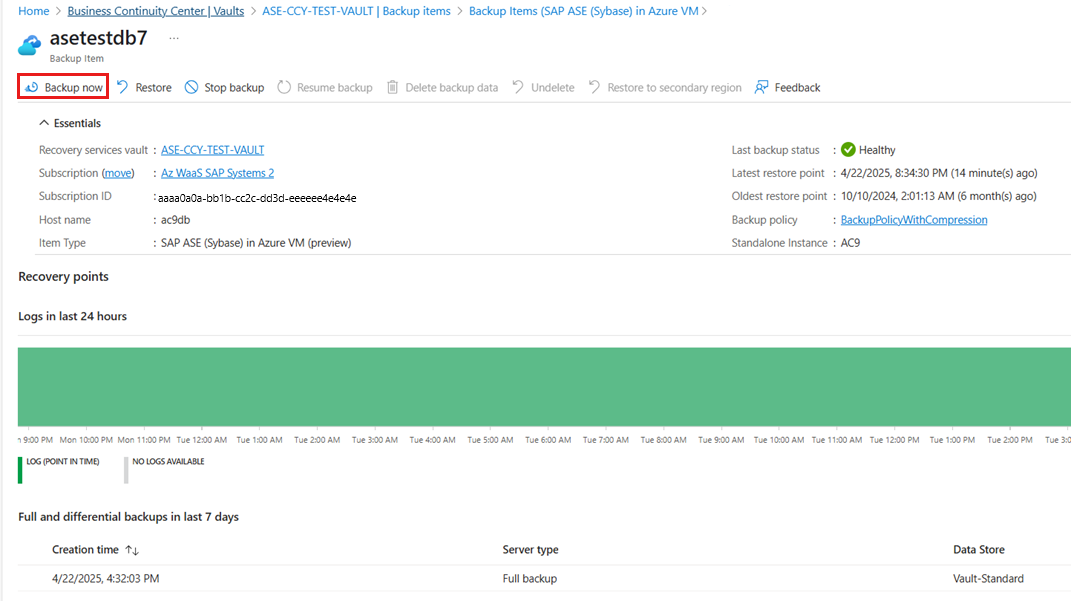
On the Backup Now pane, choose the type of backup that you want to perform, and then select OK. The type of on-demand backup you choose determines the retention period of this backup.
- On-demand full backups are retained for a minimum of 45 days and a maximum of 99 years.
- On-demand differential backups are retained as per the log retention set in the policy.