Tutorial: Create a write-behind cache by using Azure Functions and Azure Redis
The objective of this tutorial is to use an Azure Managed Redis (preview) or Azure Cache for Redis instance as a write-behind cache. The write-behind pattern in this tutorial shows how writes to the cache trigger corresponding writes to a SQL database (an instance of the Azure SQL Database service).
You use the Redis trigger for Azure Functions to implement this functionality. In this scenario, you see how to use Redis to store inventory and pricing information, while backing up that information in a SQL database.
Every new item or new price written to the cache is then reflected in a SQL table in the database.
In this tutorial, you learn how to:
- Configure a database, trigger, and connection strings.
- Validate that triggers are working.
- Deploy code to a function app.
Prerequisites
- An Azure subscription. If you don't have an Azure subscription, create a free account.
- Completion of the previous tutorial, Get started with Azure Functions triggers in Azure Redis, with these resources provisioned:
- An Azure Managed Redis (preview) or Azure Cache for Redis instance
- Azure Functions instance
- A working knowledge of using Azure SQL
- Visual Studio Code (VS Code) environment set up with NuGet packages installed
Create and configure a new SQL database
The SQL database is the backing database for this example. You can create a SQL database through the Azure portal or through your preferred method of automation.
For more information on creating a SQL database, see Quickstart: Create a single database - Azure SQL Database.
This example uses the portal:
Enter a database name and select Create new to create a new server to hold the database.

Select Use SQL authentication and enter an admin sign-in and password. Be sure to remember these credentials or write them down. When you're deploying a server in production, use Microsoft Entra authentication instead.

Go to the Networking tab and choose Public endpoint as a connection method. Select Yes for both firewall rules that appear. This endpoint allows access from your Azure function app.

After validation finishes, select Review + create and then Create. The SQL database starts to deploy.
After deployment finishes, go to the resource in the Azure portal and select the Query editor tab. Create a new table called inventory that holds the data you'll write to it. Use the following SQL command to make a new table with two fields:
ItemNamelists the name of each item.Pricestores the price of the item.
CREATE TABLE inventory (
    ItemName varchar(255),
    Price decimal(18,2)
    );
After the command finishes running, expand the Tables folder and verify that the new table was created.
Configure the Redis trigger
First, make a copy of the same VS Code project that you used in the previous tutorial. Copy the folder from the previous tutorial under a new name, such as RedisWriteBehindTrigger, and open it in VS Code.
Second, delete the RedisBindings.cs and RedisTriggers.cs files.
In this example, you use the pub/sub trigger to trigger on keyevent notifications. The goals of the example are:
- Trigger every time a
SETevent occurs. ASETevent happens when either new keys are written to the cache instance or the value of a key is changed. - After a
SETevent is triggered, access the cache instance to find the value of the new key. - Determine if the key already exists in the inventory table in the SQL database.
- If so, update the value of that key.
- If not, write a new row with the key and its value.
To configure the trigger:
Import the
System.Data.SqlClientNuGet package to enable communication with the SQL database. Go to the VS Code terminal and use the following command:dotnet add package System.Data.SqlClientCreate a new file called RedisFunction.cs. Make sure you've deleted the RedisBindings.cs and RedisTriggers.cs files.
Copy and paste the following code in RedisFunction.cs to replace the existing code:
using Microsoft.Extensions.Logging;
using Microsoft.Azure.Functions.Worker;
using Microsoft.Azure.Functions.Worker.Extensions.Redis;
using System.Data.SqlClient;

public class WriteBehindDemo
{
    private readonly ILogger<WriteBehindDemo> logger;

    public WriteBehindDemo(ILogger<WriteBehindDemo> logger)
    {
        this.logger = logger;
    }

    public string SQLAddress = System.Environment.GetEnvironmentVariable("SQLConnectionString");

    //This example uses the PubSub trigger to listen to key events on the 'set' operation. A Redis Input binding is used to get the value of the key being set.
    [Function("WriteBehind")]
    public void WriteBehind(
        [RedisPubSubTrigger(Common.connectionString, "__keyevent@0__:set")] Common.ChannelMessage channelMessage,
        [RedisInput(Common.connectionString, "GET {Message}")] string setValue)
    {
        var key = channelMessage.Message; //The name of the key that was set
        var value = 0.0;

        //Check if the value is a number. If not, log an error and return.
        if (double.TryParse(setValue, out double result))
        {
            value = result; //The value that was set. (i.e. the price.)
            logger.LogInformation($"Key '{channelMessage.Message}' was set to value '{value}'");
        }
        else
        {
            logger.LogInformation($"Invalid input for key '{key}'. A number is expected.");
            return;
        }

        // Define the name of the table you created and the column names.
        String tableName = "dbo.inventory";
        String column1Value = "ItemName";
        String column2Value = "Price";

        logger.LogInformation($" '{SQLAddress}'");
        using (SqlConnection connection = new SqlConnection(SQLAddress))
            {
                connection.Open();
                using (SqlCommand command = new SqlCommand())
                {
                    command.Connection = connection;

                    //Form the SQL query to update the database. In practice, you would want to use a parameterized query to prevent SQL injection attacks.
                    //An example query would be something like "UPDATE dbo.inventory SET Price = 1.75 WHERE ItemName = 'Apple'".
                    command.CommandText = "UPDATE " + tableName + " SET " + column2Value + " = " + value + " WHERE " + column1Value + " = '" + key + "'";
                    int rowsAffected = command.ExecuteNonQuery(); //The query execution returns the number of rows affected by the query. If the key doesn't exist, it will return 0.

                    if (rowsAffected == 0) //If key doesn't exist, add it to the database
                 {
                         //Form the SQL query to update the database. In practice, you would want to use a parameterized query to prevent SQL injection attacks.
                         //An example query would be something like "INSERT INTO dbo.inventory (ItemName, Price) VALUES ('Bread', '2.55')".
                        command.CommandText = "INSERT INTO " + tableName + " (" + column1Value + ", " + column2Value + ") VALUES ('" + key + "', '" + value + "')";
                        command.ExecuteNonQuery();

                        logger.LogInformation($"Item " + key + " has been added to the database with price " + value + "");
                    }

                    else {
                        logger.LogInformation($"Item " + key + " has been updated to price " + value + "");
                    }
                }
                connection.Close();
            }

            //Log the time that the function was executed.
            logger.LogInformation($"C# Redis trigger function executed at: {DateTime.Now}");
    }
}
Important
This example is simplified for the tutorial. For production use, we recommend that you use parameterized SQL queries to prevent SQL injection attacks.
Configure connection strings
You need to update the local.settings.json file to include the connection string for your SQL database. Add an entry in the Values section for SQLConnectionString. Your file should look like this example:
{
  "IsEncrypted": false,
  "Values": {
    "AzureWebJobsStorage": "",
    "FUNCTIONS_WORKER_RUNTIME": "dotnet-isolated",
    "redisConnectionString": "<redis-connection-string>",
    "SQLConnectionString": "<sql-connection-string>"
  }
}
To find the Redis connection string, go to the resource menu in the Azure Managed Redis or Azure Cache for Redis resource. Locate the string is in the Access Keys area on the Resource menu.
To find the SQL database connection string, go to the resource menu in the SQL database resource. Under Settings, select Connection strings, and then select the ADO.NET tab. The string is in the ADO.NET (SQL authentication) area.
You need to manually enter the password for your SQL database connection string, because the password isn't pasted automatically.
Important
This example is simplified for the tutorial. For production use, we recommend that you use Azure Key Vault to store connection string information or use Azure Microsoft Entra ID for SQL authentication.
Build and run the project
In VS Code, go to the Run and debug tab and run the project.
Go back to your Redis instance in the Azure portal, and select the Console button to enter the Redis console. Try using some
SETcommands:SET apple 5.25SET bread 2.25SET apple 4.50
Important
The console tool is not yet available for Azure Managed Redis. Instead, consider using the redis-cli or a tool like Redis Insight to run commands directly on the Redis instance.
Back in VS Code, the triggers are being registered. To validate that the triggers are working:
Go to the SQL database in the Azure portal.
On the resource menu, select Query editor.
For New Query, create a query with the following SQL command to view the top 100 items in the inventory table:
SELECT TOP (100) * FROM [dbo].[inventory]Confirm that the items written to your Redis instance appear here.

Deploy the code to your function app
This tutorial builds on the previous tutorial. For more information, see Deploy code to an Azure function.
In VS Code, go to the Azure tab.
Find your subscription and expand it. Then, find the Function App section and expand that.
Select and hold (or right-click) your function app, and then select Deploy to Function App.
Add connection string information
This tutorial builds on the previous tutorial. For more information on the redisConnectionString, see Add connection string information.
Go to your function app in the Azure portal. On the resource menu, select Environment variables.
In the App Settings pane, enter SQLConnectionString as a new field. For Value, enter your connection string.
Select Apply.
Go to the Overview blade and select Restart to restart the app with the new connection string information.
Verify deployment
After the deployment finishes, go back to your Redis instance and use SET commands to write more values. Confirm that they also appear in your SQL database.
If you want to confirm that your function app is working properly, go to the app in the portal and select Log stream from the resource menu. You should see the triggers running there, and the corresponding updates being made to your SQL database.
If you ever want to clear the SQL database table without deleting it, you can use the following SQL query:
TRUNCATE TABLE [dbo].[inventory]
Clean up resources
If you want to continue to use the resources you created in this article, keep the resource group.
Otherwise, if you're finished with the resources, you can delete the Azure resource group that you created to avoid charges.
Important
Deleting a resource group is irreversible. When you delete a resource group, all the resources in it are permanently deleted. Make sure that you do not accidentally delete the wrong resource group or resources. If you created the resources inside an existing resource group that contains resources you want to keep, you can delete each resource individually instead of deleting the resource group.
To delete a resource group
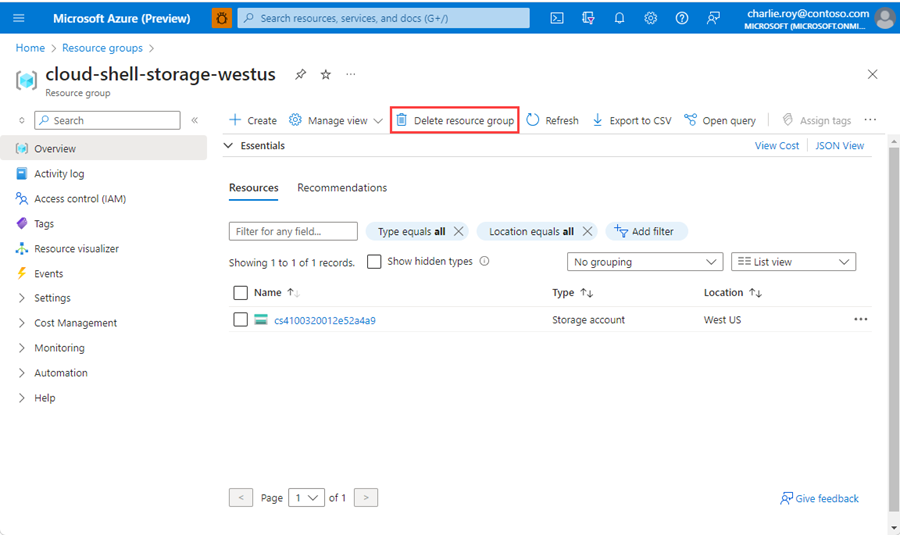
Sign in to the Azure portal, and then select Resource groups.
Select the resource group you want to delete.
If there are many resource groups, use the Filter for any field... box, type the name of your resource group you created for this article. Select the resource group in the results list.

Select Delete resource group.
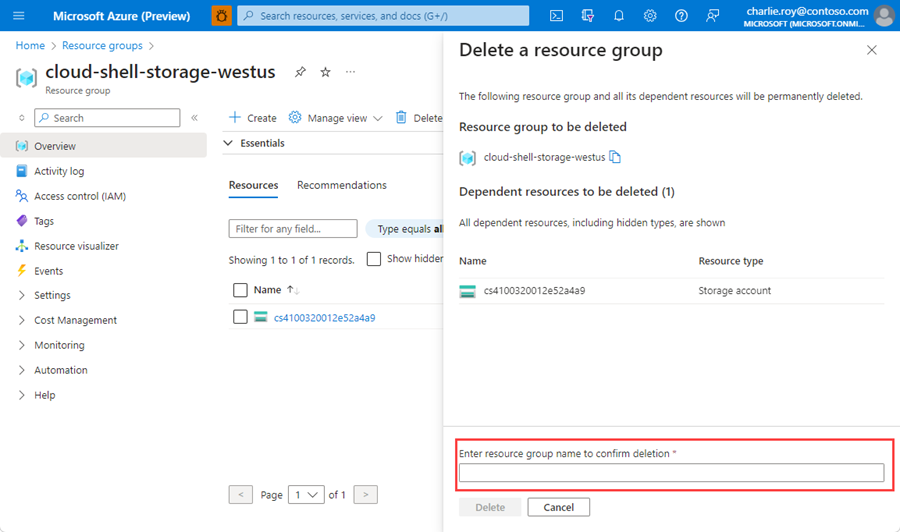
You're asked to confirm the deletion of the resource group. Type the name of your resource group to confirm, and then select Delete.

After a few moments, the resource group and all of its resources are deleted.
Summary
This tutorial and Get started with Azure Functions triggers in Azure Redis show how to use Redis triggers and bindings in Azure function apps. They also show how to use Redis as a write-behind cache with Azure SQL Database. Using Azure Managed Redis or Azure Cache for Redis with Azure Functions is a powerful combination that can solve many integration and performance problems.