Note
Access to this page requires authorization. You can try signing in or changing directories.
Access to this page requires authorization. You can try changing directories.
Question
Monday, January 28, 2013 5:46 PM
I was wondering how I can use my local printer from a Azure VM that I have RDPed into, without using Virtual Networks or Windows Azure Connect. The goal is to allow my customers who will use the program that I have installed on the VM to each use their own local printer to print from the VM session.
Please help.
All replies (6)
Wednesday, January 30, 2013 6:32 AM ✅Answered
Hi John,
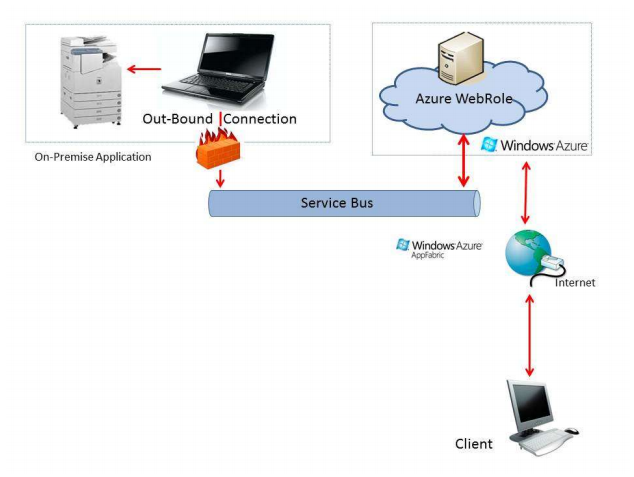
I have implemented the exact scenario, except that it was Azure Cloud Server [Azure Web Role, at that time], I am sure the pattern can be transferred to Azure VM as well.
Azure AppFabric Services Bus is the back-bone of the architecture.
Other MSDN thread - I want to access my network printer on public Cloud (Azure) on VM Role or Web Role or Worker Role
Naveen [www.navcode.info, [email protected]]
Tuesday, January 29, 2013 5:27 AM
Hi,
Since the issue is related to Iaas, I have moved this thread to Virtual Machine forums for getting a better support.
Thanks for your understanding.
QinDian Tang
MSDN Community Support | Feedback to us
Develop and promote your apps in Windows Store
Please remember to mark the replies as answers if they help and unmark them if they provide no help.
Tuesday, July 9, 2013 11:57 AM | 5 votes
How to use your local printer on Azure Virtual Machine? 1, Make sure your local printer connected to your computer by USB cable and its printer driver is installed - make sure it is not a network printer 2, In Windows Azure Virtual Machine open control panel and click on Devices and Printers In the Devices and Printers dialog click on Add a printer button 3, Click on Add a local printer 4, In the Choose a printer port select Use an existing port - the default is LPT1 (printer port) 5, Click on the list drop and you will see lots of available ports - and your computer ports are listed too. If your computer name is SERVER1111 you will see ports like TS001 (SERVER1111: PRN2). Choose TS001 port! For me other ports didn't work. TS stands for Terminal Services redirected printer 6, Click on Next - Install printer driver - click on Windows Update button if driver is not available from list 7, Windows driver update takes time - go and have a cup of tea 8, Select your printer manufacturer and select the printer from the list - click Next (my printer is: Kyocera Mita FS-1920 FS) 9, This window confirms your selected printer name - you could change it but why would you do it? Click Next - the printer driver installation starts 10, The next screen offers you to share the printer. If it is shared, all virtual machines on your virtual network can print on that local printer. Share it and click on Next 11, You are done! Print a test page 12, The printing is going to be relative slow. You might get a message that Printer is not responding. But wait, it is going to print.
Sunday, October 20, 2013 3:23 PM
Thanks mate. That was really helpful
Saturday, September 3, 2016 8:14 PM
Hi all
that is exactly what i m doing and it works!! But:
After a reboot the driver is gone and i need to do all that again. Even if it takes not longer than a minute, that not suitable for cistomers. Any help?
Please also answer to andres.mueller[_at_]gmx.at
thanks in advance
Andreas
Wednesday, October 4, 2017 6:06 PM
How to use your local printer on Azure Virtual Machine? 1, Make sure your local printer connected to your computer by USB cable and its printer driver is installed - make sure it is not a network printer 2, In Windows Azure Virtual Machine open control panel and click on Devices and Printers In the Devices and Printers dialog click on Add a printer button 3, Click on Add a local printer 4, In the Choose a printer port select Use an existing port - the default is LPT1 (printer port) 5, Click on the list drop and you will see lots of available ports - and your computer ports are listed too. If your computer name is SERVER1111 you will see ports like TS001 (SERVER1111: PRN2). Choose TS001 port! For me other ports didn't work. TS stands for Terminal Services redirected printer 6, Click on Next - Install printer driver - click on Windows Update button if driver is not available from list 7, Windows driver update takes time - go and have a cup of tea 8, Select your printer manufacturer and select the printer from the list - click Next (my printer is: Kyocera Mita FS-1920 FS) 9, This window confirms your selected printer name - you could change it but why would you do it? Click Next - the printer driver installation starts 10, The next screen offers you to share the printer. If it is shared, all virtual machines on your virtual network can print on that local printer. Share it and click on Next 11, You are done! Print a test page 12, The printing is going to be relative slow. You might get a message that Printer is not responding. But wait, it is going to print.
Merci pour votre aide. Tout fonctionne très bien!